|
|


 05-09-2006, 01:03 PM
MallCrawlin will be installing, and then thoroughly abusing, the ZJ Hard Arm 4-Link Long Arm Suspension from Clayton Off Road.
Clayton Off Road is a very well known name in aftermarket suspension setups. There are many debates on internet forums about the different long arm manufacturers, and which one is the best. Most people out there feel that Clayton's setup is considerably better than the rest of the competition. I tend to agree with those statements, and that is why I am going with Clayton's setup. What I hope to do here is provide the reader with the proper information so that they know why Clayton's Hard Arm 4-Link is considered to be the best long arm kit on the market for ZJ's.
We will be going through and do the full install ourselves, with detailed pictures and descriptions of what it is we are doing.
We will be installing the bracketry first, hopefully within the next 10-14 days, and then the arms shortly after that. The arms are currently on backorder, but the project will be done before GSW.
INSTALL UPDATE!!!
Alright, the bracketry has arrived (the arms have too, I just haven't gone to work to get them yet) and the bracketry is installed!
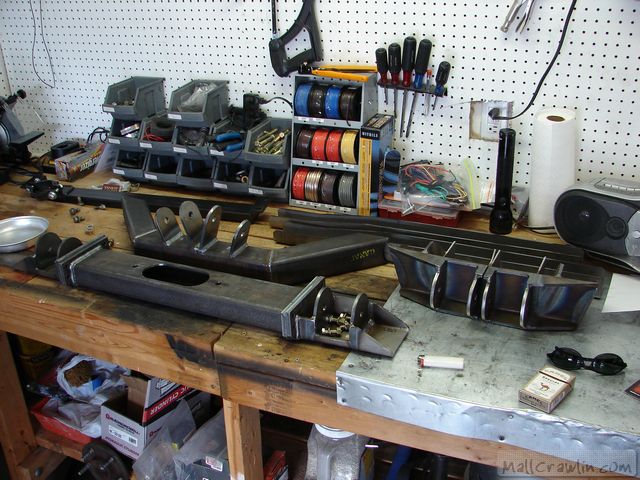
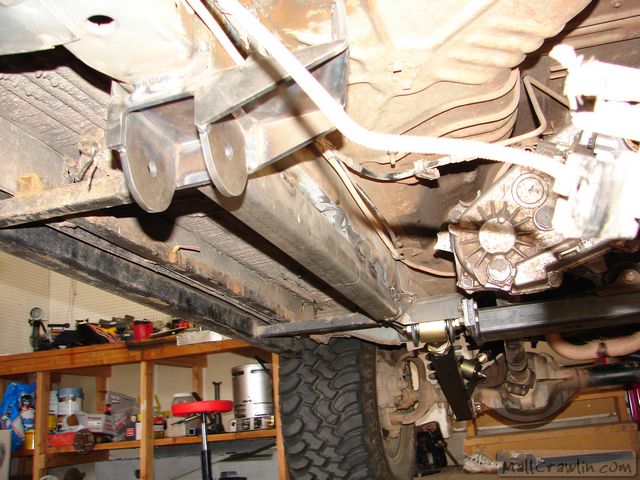
Here is all of the bracketry:
Notice the thickness of the steel and the high quality of the welds, Clayton is putting out some excellent stuff here!
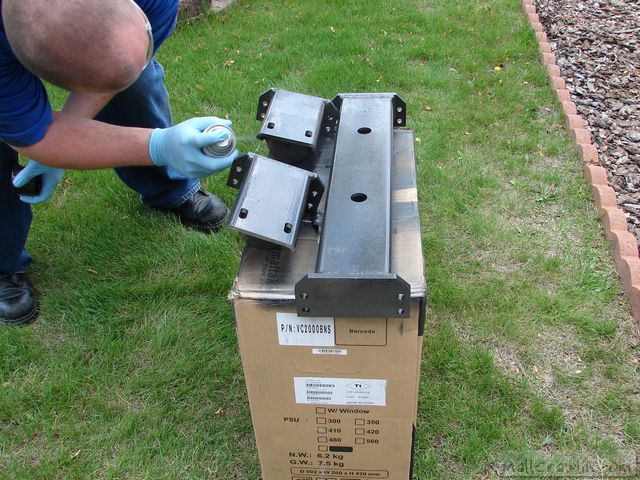
I decided to throw down a coat of Hammerite before I started assembling anything. I had debated on what to do with painting, and decided to paint as much as I could ahead of time since it would be much easier to paint, and then I just ground off the paint where I needed to weld.
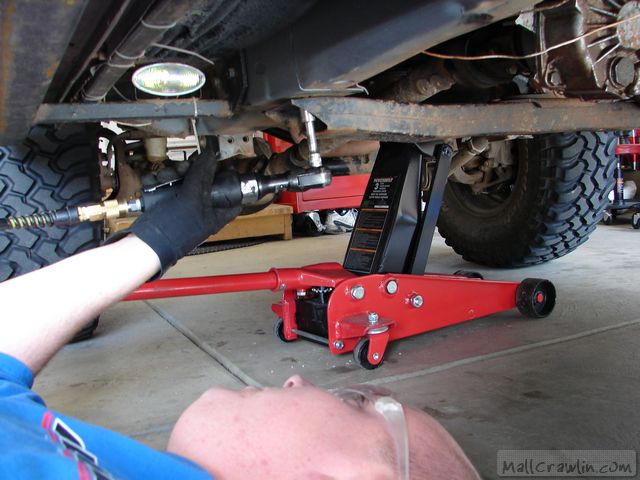
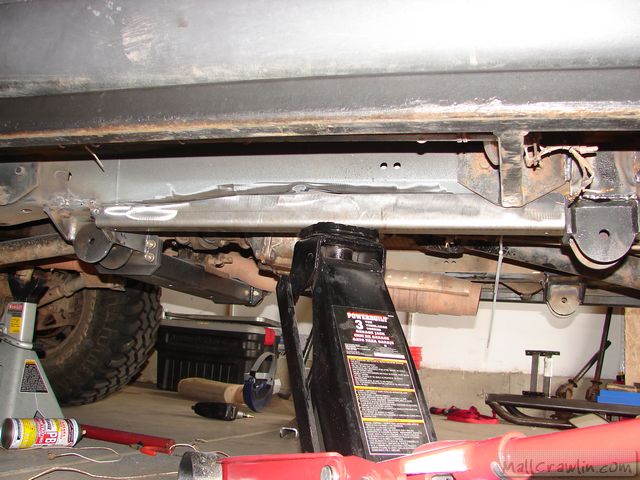
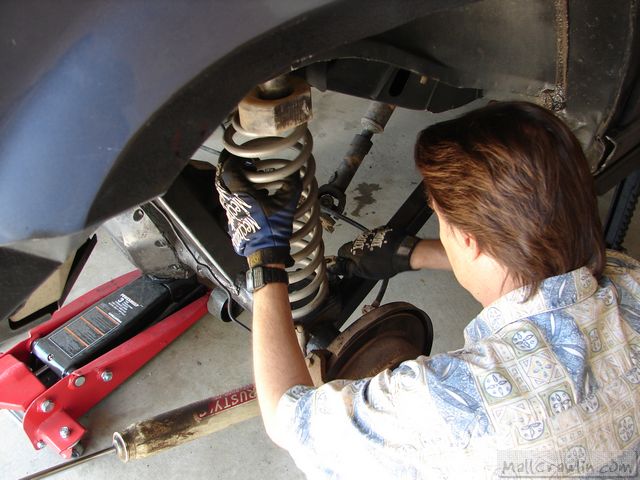
After the Hammerite had dried we went to work on the factory crossmember. We originally supported the drivetrain from the tranny, but then decided the t-case would be a bit stronger point.
Make sure everything is supported well here as that's a lot of heavy stuff that could come crashing down on you!
In removing the crossmember, we decided to pull the crossmember off of the tranny mount on the vehicle. Clayton's directions say to disassemble the mount and attach the mount to the new crossmember off the vehicle, but this is what we did. Not saying either way is right or wrong, just seemed easier at the time.
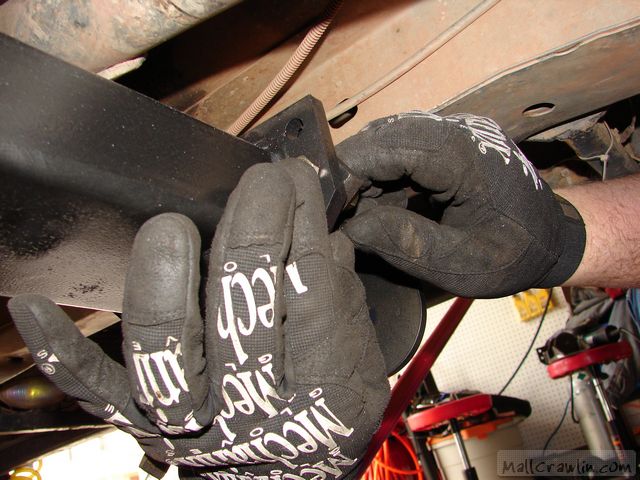
With the new crossmember mounted to the transmission, we began bolting the control arm mounts to the crossmember.
I really like the way this setup works. Very strong on the unibody rails for the control arms with the mounts being welded and bolted, and then the center section of the crossmember drops out for easy drivetrain work.
Once the control arm mounts were attached to crossmember, we went to center the crossmember under the vehicle. This took a bit of work and some measuring. We had to move the drivetrain to the driver side about 5/8" to get it centered. It most likely became off centered while we were removing the old crossmember. When doing all of this, be sure to keep an eye on your t-case linkage as it can very easily fall out of its pivot locations and be a MAJOR pain in the ass to get back in.
Here's the crossmember all bolted up and ready for the sides to be welded in:
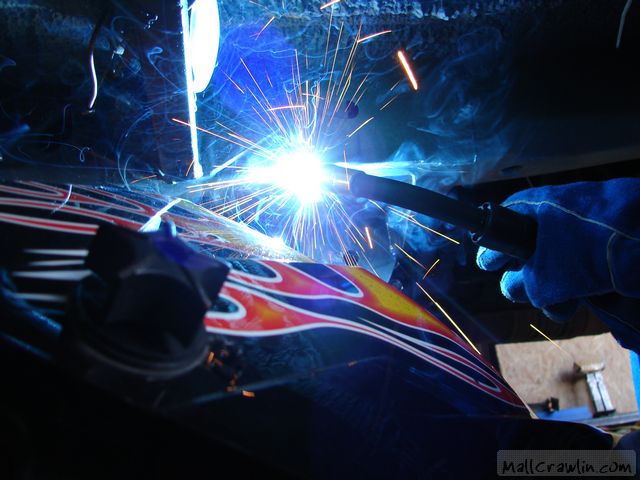
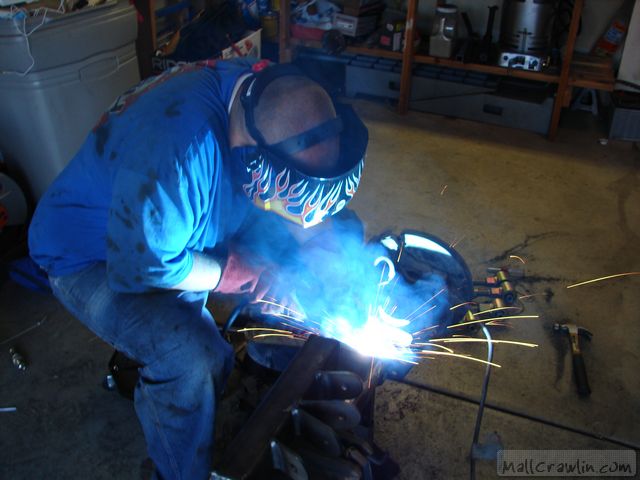
This is the part where I started to get nervous. I am a relatively novice welder and don't have much experience welding to the unibody. Most of the welds didn't turn out pretty by any means, but I managed to get good penetration and only blew a hole through the unibody once or twice. I would recommend anyone getting ready to weld on their unibody to read Kraqa's Unibody Welding Bible. There is a lot of good info in there that will help with welding to the unibody. One thing to make sure you do, is disconnect your battery! It's never a good idea to weld to your vehicle with the battery connected.
I welded up the passenger side, and then let Pam have a go at welding some of the driver side.
The welds on the outside of the control arm mounts are pretty simple, but the front and back get pretty tricky because of the way the metal in the mounts is bent. I found myself making some pretty big J-hooks to get it to work.
Another thing to make sure you do is prep your metal VERY well. Here's Pam using a flap disk on a grinder cleaning up the metal for the rear mounts.
I wouldn't recommend using a regular grinding disk as they are too aggressive for the unibody, but a flap disk works very well for me. For those who haven't seen a flap disk, it's basically a grinder wheel with layers of sandpaper on it. Works great for getting paint off and prepping metal for welding.
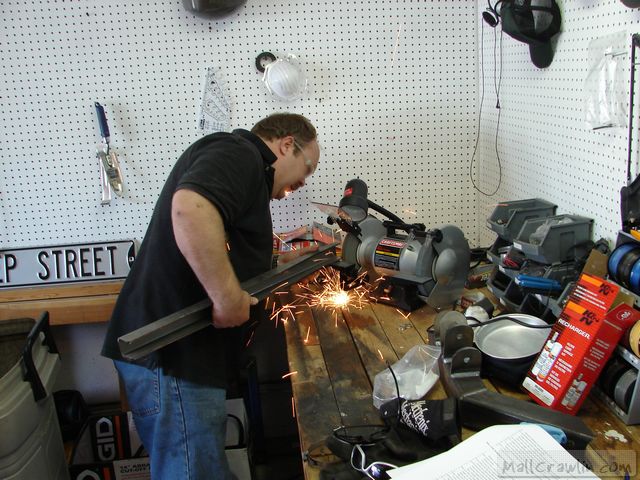
One other little problem we ran into was some of my welds were too big. So Keith (mtn WJ) took the unibody protectors to the bench grinder to make a little more room.
Now they fit like a glove.
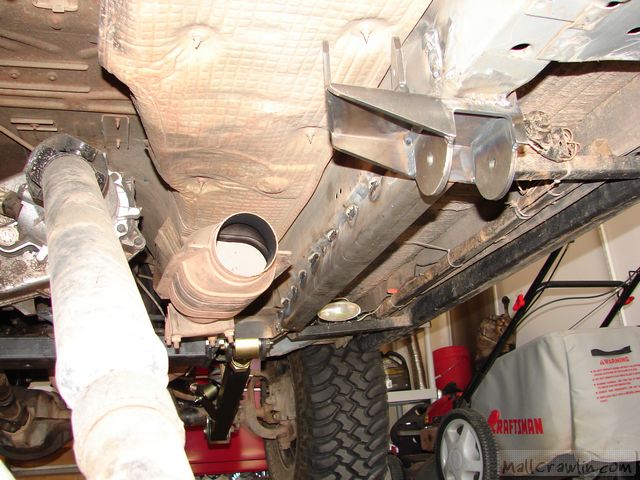
These pieces are important to the overall design of the kit because they tie in the front and rear components of the suspension and allow forces to be distributed over a much larger area, and they also add some stiffness to our weak unibodies.
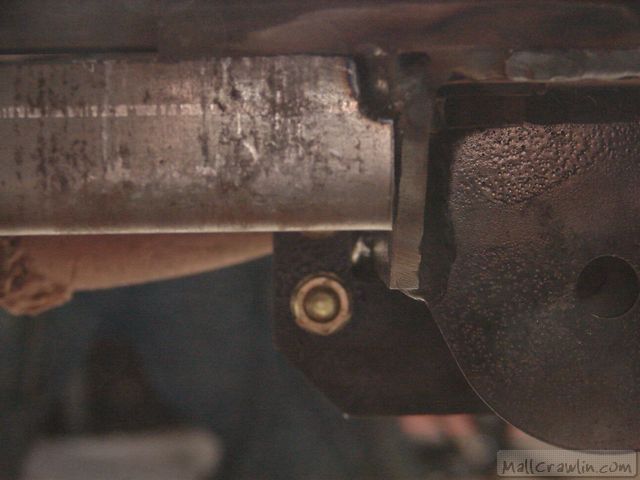
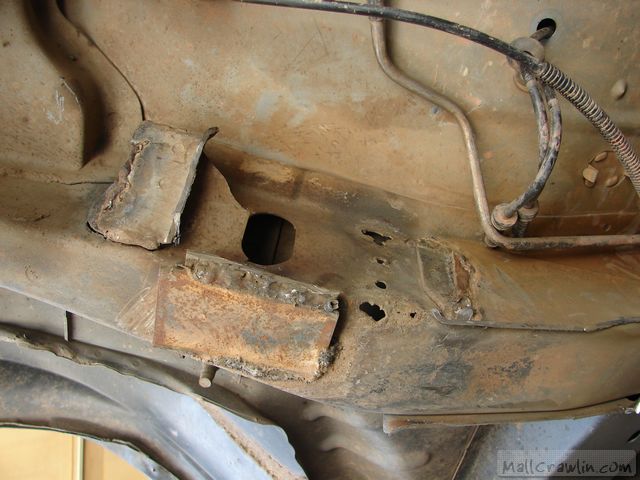
Along the driverside unibody rail you will need to move the fuel supply line, the fuel return line, and the brake line. I zip tied mine off to my driveshaft. One thing I did goof on though that I haven't figured out how to fix yet is getting those lines back where they're supposed to be. The upper control arm mount on that side goes up far enough to where I can no longer snake those lines along the unibody rail. In Clayton's instructions he mentions that 1/4" may need to be ground off the top of the mounts. I would highly recommend doing this before welding anything in. I'll probably use a plasma to notch the mounts and get my lines back out of the way. You can also see one of the rear mounts welded into place in this picture. We test fit the unibody protectors several times before welding the mounts into place to make sure we had the right spot.
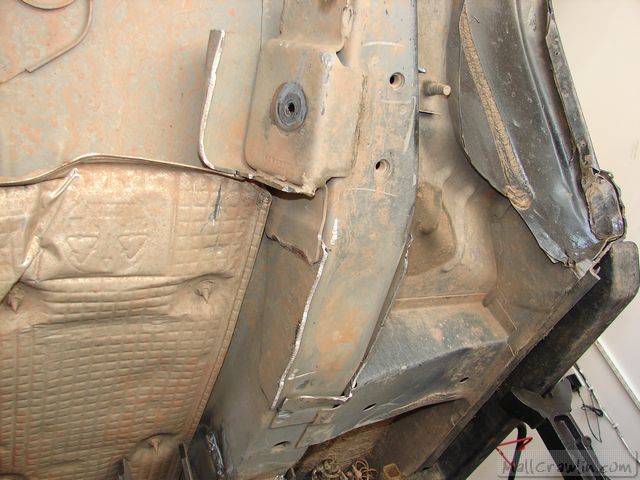
On the passenger side, my Rocky Road Outfitter's Rock Rails were interfering with the control arm mounts. Between the choice of remove the Rails and cut them, or notch the control arm mount, we decided to notch the control arm mount.
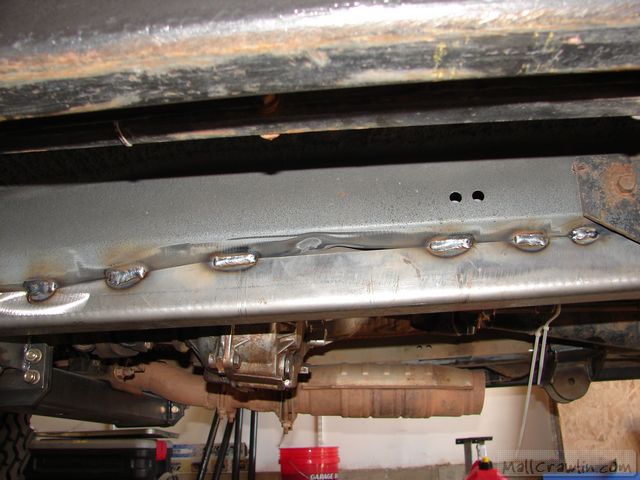
Once both rear mounts were in, I moved on to the unibody protectors. Here you can that this one doesn't quite line up because of the size of the weld. Back to the grinder . . .
After a little finessing they fit perfect! Time to weld them up!
The driver side unibody rail on my ZJ has seen quite a bit of abuse, so I had to skip a section of stitch welding, but I don't see it being an issue. I could've tried to fill the gap, but with the difference in thickness of the metal figured it would be more trouble than it's worth. This section here doesn't need a full weld either, stitch welding is okay, and frankly probably your best bet.
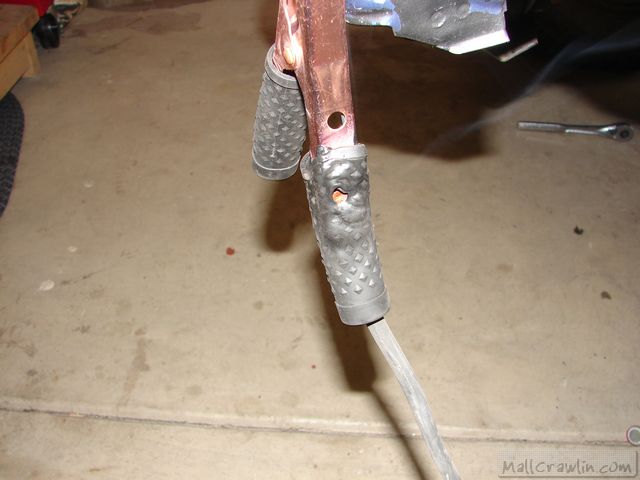
During all of this I somehow managed to melt the little rubber grips on the ground clamp from my welder . . . .
The arms and the rear truss will be going in soon and I'll certainly have pics as soon as I can get them up!
Last edited by BigDaveZJ; 05-22-2006 at 05:17 PM.
05-09-2006, 01:14 PM
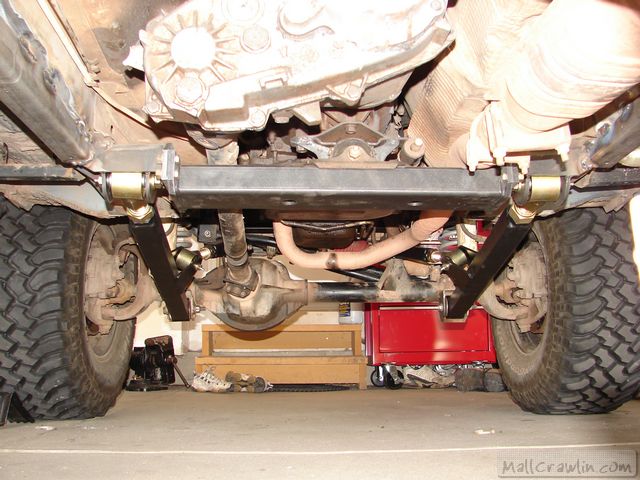
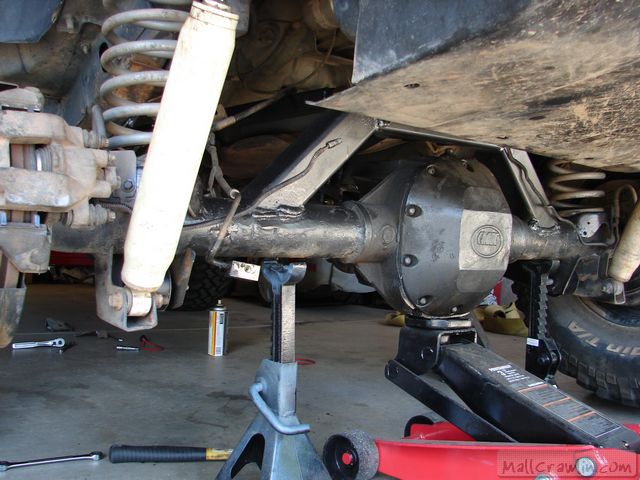
Now onto installing the arms and the rear truss.
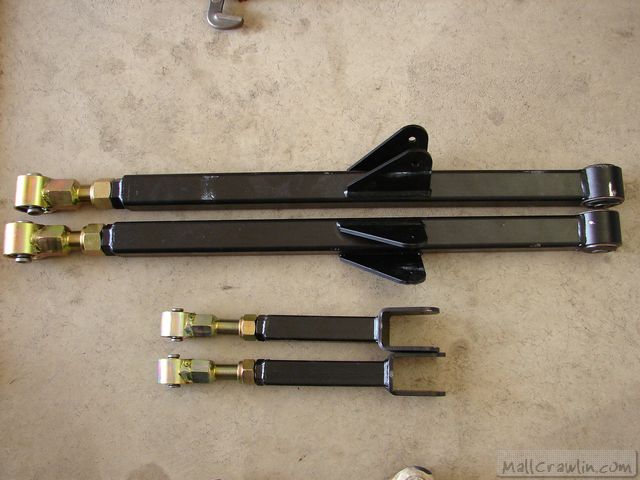
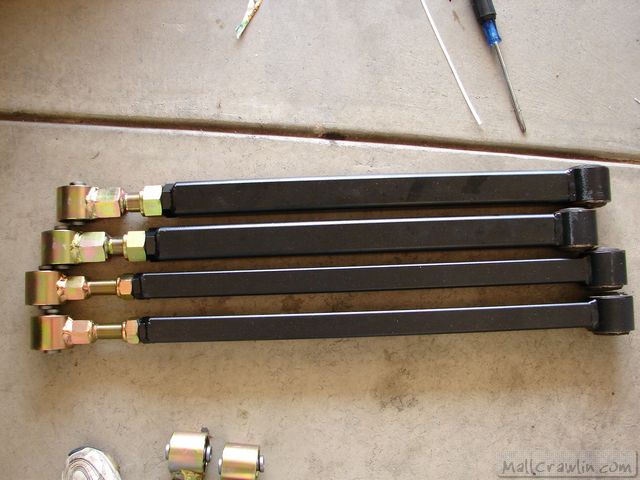
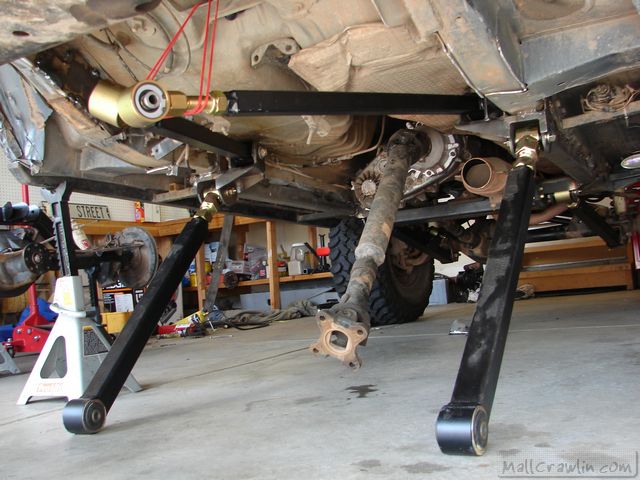
Here is a picture of the front arms. They use a radius arm style system where the upper is actually attached to the lower control arm. Works quite well and is similar geometrically speaking to the front arms used on old Bronco's.
And the rear arms. The uppers are the smaller size box and triangulate, eliminating the need for a rear trackbar.
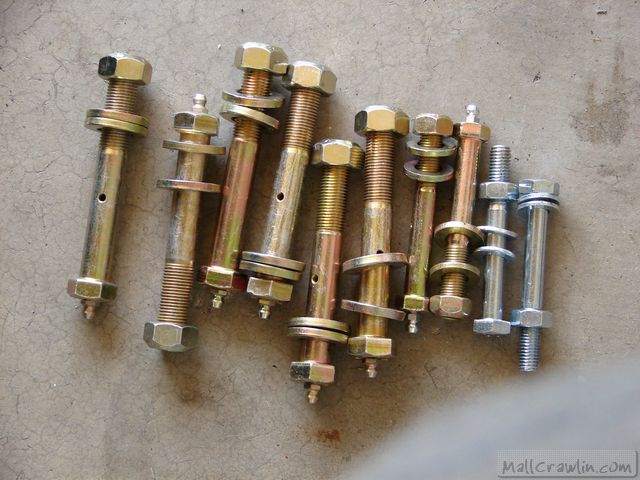
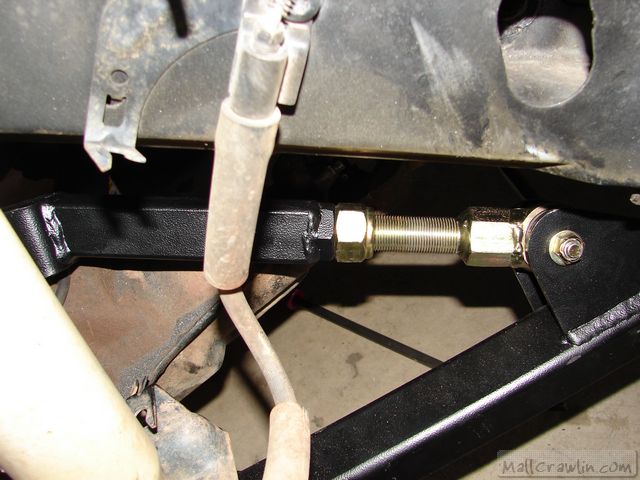
These are the new bolts included with the kit. Notice the plated ones have grease zerks on the bolt, and holes in the bolt for the grease to lube the joints.
Before installing the front arms, cut off and grind down as much of the old lower control arm brackets as much as you can. How neat you leave them is up to you, but be sure you cut enough away so the front arms don't hit them.
Use the lower arms to determine your axle position, and then set and attach your uppers to determine your pinion angle. I left mine as close to what they were before as I could since I had no vibes or DW.
Make sure all bolts are torqued to spec and the ones with grease zerks are greased, and the jamb nuts are tightened.
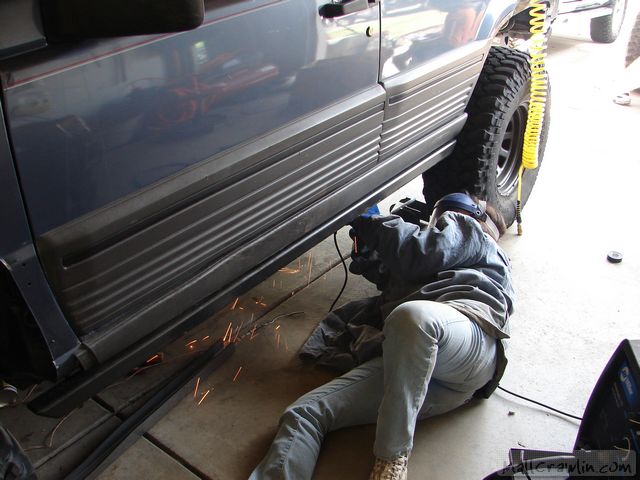
This is where I basically went out of comission. We had moved on to removing the rear axle to install the truss and rear arms, and when I was pulling off one of the shocks, I managed to catch my thumb in between the shock and the unibody. Cracked the nail clean, and it was all still imbedded in the nail bed. Hurt like a SONOFABITCH!!!
Here's Keith (mtn WJ) working on pulling the rear axle.
With my gimp thumb I was able to cut the UCA brackets off the rear axle and grind the axle smooth and install the truss. Lining up the truss is crucial, take your time, and weld it good.
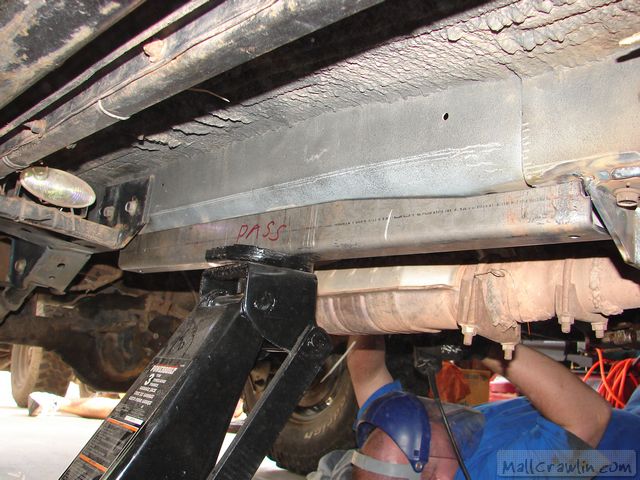
All welded up and ready for paint.
And the #1 reason why I went to long arms.
Unibody control arm mounts = teh SUCK
The rear brackets cut down and ready to go for the rear arms.
Here's a view of all of the bracketry and the front arms looking forward from the rear before we put the rear arms and axle in.
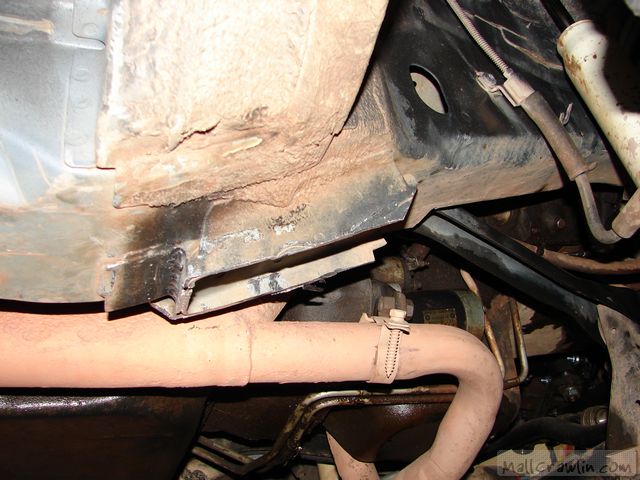
Notice the missing muffler. Makes it MUCH easier to install the kit if you just hack it off. Turns out the setup I was already running will fit with the kit on, but wouldn't allow us to install the kit!
Rear arms in place and ready for the axle
We decided that the rear lowers were already set to a good length, so we left those where they were and adjusted the uppers as needed to set pinion angle.
Scott (Colorado 5.9) putting the coils back in so we can set everything back on the ground to get our ride height pinion angle.
Just about ready to go.
For some stupid reason I forgot to take a pic of the whole thing installed and painted, but I'll take one and post it up soon.
Couple thoughts/notes on the kit:
Attention to detail is evident. The jamb nuts and most of the other nuts with the kit have a Nylock style locking ring in them. One of the things that irked me about my RE control arms was the jamb nut coming loose all of the time. I don't see this happening very much here.
Everything is built VERY well with high quality welds and built to very good tolerances. With a proper installation, this kit should work well for almost anyone.
As always, there's a couple problems I ran into installing the kit. None major and all easily fixed. The only one that really comes to mind is in the instructions it says to re-use the axle end LCA bolts for the frame end UCA's. We found these bolts were a hair too long and had to grind about 1/4" off of them.
And now some tips for anyone looking to install this that may or may not have been already mentioned:
On the driver side rear control arm bracket, be sure to grind off 1/4" or so from the top of the upper control arm tabs so that you can slide your brake and fuel lines back where they belong. I didn't and had to do a very ugly job of plasma cutting them down.
Be prepared. Have LOTS of cutoff wheels and grinding disks ready to go, as well as flap disks for prepping the unibody for welding. I probably went through 15-20 cut off wheels, 5 grinding disks, and 5 flap disks.
Enlist the help of an experienced welder. I can weld "okay" but not excellent by any means. Good penetration and STRONG welds are the key with this install. It's not easy welding thick metal to our pop can unibodies. Most of my welds didn't come out the prettiest, but all appear to have penetrated well, so I'm happy.
If doing the install yourself, be able to have your rig down for days at a time. It took me roughly 10 days to install this kit. Granted there was really only 2.5 solid days of half work and half standing around bullshitting, but don't expect this to take an afternoon. It's a very involved install, but in my opinion the end result is VERY much worth the effort.
I took it out for a couple quick spins tonight and am VERY impressed with how she rides. I'm gonna take her on the highway tomorrow, and then Moab next week, so the updates will keep coming!
Alright, we are back from MOAB!! The long arms performed GREAT. There's still some minor tuning and other issues I need to address but the kit worked VERY well. Climbing ledges and such was a whole lot easier because the axle wasn't crawling backwards under the vehicle ue to the new geometery of the arms. Very smooth ride, soaked up some of the washboards very well and made the baja action much more fun.
Some of the issues I've run into are shocks being too short. I'm running the shocks Rusty sells with his 3" lift kit, and have been running the same shocks for the last 4 years, so they're a little worn and a little short. I didn't have the time before GSW to measure proper stuff and droop and get the right bumpstops and shocks in there but will be doing this shortly. I also need to extend the brake lines up front a bit. In the back, the rear UCA's hit the unibody a couple times too and clearanced the floorboards a bit. With proper bumpstoppage this wouldn't have happened, I just didn't have the time to get all of those details done before GSW but will start working on them now. My shocks were really limiting my flex in the rear, not quite as bad up front.
Once the longer shocks, bumpstops, and limiting straps are in place I'll post some new flex pics.
Last edited by BigDaveZJ; 06-13-2006 at 12:22 PM.
 05-09-2006, 02:08 PM
Nice!
05-09-2006, 02:09 PM
Oh, and this will be a relatively kamikaze install as I don't have much free time between now and GSW, so if anybody wants to come down and help and/or just stand around and drink beer, you're more than welcome to come down.
 05-09-2006, 04:50 PM
Clayton's NOW your talking.
 05-09-2006, 06:02 PM
Awsome.
 05-09-2006, 07:23 PM
Dave just let me know when you will be working on it and I will drop by to help.
05-09-2006, 08:30 PM
My goal will be to get the brackets on Sunday May 21st. The arms are on backorder right now, so they might not be in by then. The rears might, but from what Adam said the front ones certainly won't be. I figure getting the brackets on, the rear truss, and the rear arms in should be a pretty quick job.
Too bad there's a huge list of other crap I gotta do too before GSW!
05-09-2006, 08:45 PM
Sunday the 21st is open for me. Keep me posted on a start time.
I have a question about the hard arms but will call you later. Are you getting springs as well?
05-09-2006, 09:00 PM
Arms and brackets only. Going to stick with the RE Springs I've got. I get off work like 2 minutes ago, so give me a call.
 05-13-2006, 12:18 AM
Pay for a plane ticket for me to come down and I'll help ya out
Can't wait to see pics of the install man.
 05-15-2006, 11:12 PM
You should have had them ordered and ready for install when I was there last month. I would have leant a hand. I have to redeam my self with a good weld on your rig.
Chad
05-16-2006, 11:49 PM
Brackets showed up today, so the install of the brackets should go as planned this Sunday. I felt like a little kid on Christmas morning when the UPS man showed up today at work and had to rip open the boxes while I was at work. My first impression of this stuff is PURE BEEF!! Totally looking forward to getting the arms and get all of this stuff on!
 05-17-2006, 12:03 AM
That's great news Dave, I'm sure a well written Clayton review will go a long way to helping out people who are trying to decide on a lift. I doubt I can be of much help since I'm welding incompetent, but I wouldn't mind dropping by for a beer and a hello.
Besides, you should check out the custom t/c skid plate I had made up for my Clayton cross member. It might give you an idea or two
What are you going to run for shocks?
 05-17-2006, 07:04 AM
pure beef X2 -

 05-19-2006, 02:40 PM
I am soooo pissed, I ordered mine like 1 month before they started powder coating and including the zinc coated joints, oh well.
05-19-2006, 03:26 PM
Just heard from Adam that my arms should be arriving Monday! Going to install all of the bracketry and the rear truss this Sunday. If any of the local folk wanna swing by, shoot me a PM.
 05-19-2006, 11:30 PM
Excellent choice Dave. I have been negotiating a few things out and Clayton Mfg is the next product line we intend to carry at Steel City Off Road. I have seen how well the Clayton kit has held up on Matt's ZJ (and now what is left of it) and I am looking forward to installing the long arm kit on my TJ.
I will be looking forward to reading that review.
-Bill
 05-19-2006, 11:47 PM
I didn't realize how close my setup was to Claytons. Is the rear double triangulated?
 05-19-2006, 11:54 PM
Negative on double triangulated, which is why it allows so much unbinding flex.
05-20-2006, 11:52 AM
Yeah. I'm happy with my setup. I'd like to make my front arms about 8" longer though... should have done it when I set it up, but oh well.
My rears lowers are 46", fronts are only like 33"
 05-20-2006, 02:06 PM
any pics of your LA setup? I thought you were running the standard clayton kit.Originally Posted by nate
05-21-2006, 08:36 PM
Got the front x-member in and 3/4 of one of the rear mounts before I ran out of wire and energy. Plan on finishing up the brackets tomorrow. I've had a couple little hiccups along the way, I'll go into details when I get pics up, but they're all because my ZJ has been beat to hell and back.
05-21-2006, 10:33 PM
I ran out of wire today too, but I keep an extra 12 lb spool
05-21-2006, 11:20 PM
Actually I have a Rock Control setup.
| « Previous Thread | Next Thread » |
| Thread Information |
Users Browsing this ThreadThere are currently 1 users browsing this thread. (0 members and 1 guests) |