|
|


 12-13-2005, 03:10 AM
Yes, you read that right. This is short for New bag of tricks. As opposed to Dave's Old Bag.
We'll just call her ho bag when she's pissing me off and copping an attitude which is 90% of the time. I couldn't come up with anything better and I just can't call my jeep the same thing half my friends call me (Bustin' Loose). So there it is.
Dave's Notes:
Trixy will undergo a lot of fairly common modifications to most MallCrawlin members, but the project will be designed to help those not familiar with what it takes to modify a ZJ beyond your basic modifications and build a very capable vehicle. We will be utilizing the vendors that support this site for every modification that we can, and will use the project to pursue more vendors as well. Most modifications done to Trixy will have a detailed writeup of how we installed the product, as well as our impressions of how the product works. One of the main goals of this entire site is to provide people with the knowledge needed to as much of the work on their own as possible, so there will be tons of pictures and descriptions of what we're doing and why. Most of this will be brought to us from a relatively newbish perspective as well. Pam has been around Jeeps for a long time, but has never really wrenched on them like we will be doing now. So I will provide as much technical information as I can, but Pam will make sure it's still something understandable by people who may not have a ton of experience.
Now . . . back to the rig!!
Pam:
So, it's a 98 ZJ, Limited. So far, all I've done is put a 2" BB on, JKS disco's, 31" MTR's, and slaped on the skid plates over the t-case and the gas tank.
Dave:
We purchased the 2" Budget Boost from Kevin at www.kevinsoffroad.com and installed it this last summer. A budget boost installation is fairly simple, and can be done with fairly common tools. At some point we will do a write-up on a budget boost installation as well.
We also purchased the JKS Gen II Quicker Disconnects from Kevin at www.kevinsoffroad.com and installed them this last sumer. Again, a fairly straight forward install. The JKS Gen II QD's are regarded as the simplest and strongest disconnect system out there. They utilize a single lynch pin for the disconnect and reconnecting process, and use rubber bushing to keep them quiet. These disconnects are also adjustable so that you can fine tune them to the ride height in your specific application. If you are not familiar with what a swaybar disconnect allows you to do, I will go into it very quickly. A swaybar is designed to limit body roll in on-road situations via a bar that connects to the body/frame and the axle. This same system also limits valuable articulation in off-road situations. So by disconnecting it, you are maximizing the articulation available from your suspension configuration. One note on the install with these, BE SURE TO USE THE LOC-TITE as the instructions say. I skipped this step out of laziness and lost one of the bolts during normal driving.
Pam:
As a general overview of the Disconnects, I love them. I've seen many people with disconnet systems where they are jumping on the hood of the jeep to get the swaybar to line back up so they can reconnect it. I've yet to have a problem getting my JKS Disco's to disconnect and reconnect by myself. They slide in an out very easily as long as you are on even ground. Uneven ground makes it a little more tricky but still doable all by my lonesome. And they are a piece of cake to install.
Dave:
We purchased some take-off 245/75R16 Goodyear MT/R's from a Rubicon owner and had those put on Trixy. Everybody has a tire they know and love, and everybody has an opinion about tires. We chose the MT/R's because they are a good all-around tire off-road that also maintains good on-road manners in many conditions. So far we have not been disappointed with the tires.
Skid plates and tow hooks are very common things that it just so happened Trixy didn't have when we got her. Those were an immediate priority, and we were able to procure some stock skids and tow hooks and installed those as well. Protecting the undercarriage components is always important, and no manufacturer has really come out with superior skid plates yet, so we stuck with the OEM parts.
Pam:
Okay..no big deal. I know. That got it to the point where I could take her wheelin' a couple of times this summer.
Comming up...
Sliderz and the new Aussie Locker for the D44a. Since this is basically going to be a project vehicle and used quite a bit to first and formost teach me AND be the guinie pig vehicle for quite a bit of the vendor testing I figured it was about time I started my own thread. Eventually I want to be able to get Trixie up to about 3.5-4.5 inch of lift and fit some bigger tires under there. From there? Who knows...it's a work in progress.
Dave:
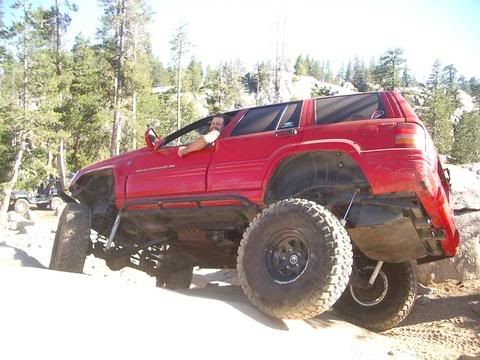
The Rock Sliderz, again from our good friend Kevin at www.kevinsoffroad.com were something we were hoping to be able to get done this past summer, but we never got around to doing it, and Trixy paid for it. We made it on a couple trails with Trixy this year, Bill Moore Lake, Spring Creek, and Wheeler Lake. Bill Moore was the only trail that Trixy made it through without kissing the rocker panels. Both drivers and passenger side rocker panels have some dents and scratches in them now. We have decided to go with Kevin's LP-1 Rock Sliderz for several reasons. Simple design, strong, and they provide excellent protection. Unlike the Rocky Road Outfitters Rock Rails that I run on my ZJ, Kevin's offer more lateral protection for the doors and body. With Trixy, I'm hoping we can keep her looking nice, unlike my pile o' metal. Also, as Trixy goes up in suspension height, Kevin's Rock Sliderz will offer Pam a nice step to get in, or reach the roof if she needs to. We will be installing these soon, so please be sure to check back for updates.
As for the Aussie Locker, I'm still in shock that there's now a locker available for the Aluminum 44! Please check into the Aussie Locker Product Review thread for more information on the new Aussie Locker!
Pam:
So...on the grand sceme of things, this will hopefully grow to become a more technical thread (without Dave's assistance) over time as I learn my ass from my elbow.
Last edited by BigDaveZJ; 07-02-2008 at 08:32 PM.
 12-13-2005, 03:11 AM
And the link to the Aussie Locker Addition. . .
And my jeep already starting off as the ho bag that I know and love.
http://www.mallcrawlin.com/forum/showthread.php?t=6161

 12-13-2005, 02:27 PM
What trail was that on? Looks like H.C. maybe??
 12-13-2005, 03:48 PM
It's the 2nd obstacle on Wheeler Lake.Originally Posted by SuicideTireZJ
 12-13-2005, 03:54 PM
Looking good so far.
 12-13-2005, 04:51 PM
Great project Pam. i can;t wait to see the updates.
12-13-2005, 04:51 PM
God, I gotta branch out and do some different trails.
12-14-2005, 04:03 PM
Thanks guys. Keeping my fingers crossed that we can get the bolt out of the carrier on Christmas Eve to get the locker done. No clue when Dave and I will have time to do the Sliderz. And since I sure as hell don't have the upper body strenght to do those on my own, I'll be needing Dave around as my shop bitch.
Actually, it's kinda nice. Anytime we work on my jeep, I learn, my jeep gets random new mod#_ and I have a built in shop bitch. Does it get any better than that? Oh yeah...now if we could just find someone else to pay for all of it.
12-14-2005, 04:13 PM
I feel the SAME way.
 12-15-2005, 11:58 PM
Its so cute.
12-18-2005, 07:00 PM
Added a little more detail to that and some more information on the upcoming modifications.
 12-19-2005, 08:58 PM
Will keep checking on this thread. SO what are the plans? Would be cool to see what is upcoming, lift, axles, etc etc, and what direction is chosen, and why. I miss my old ZJ's, and seeing one getting built up will be cool. Keep it comingWJ plan is on hold again now that I am starting on another toy, but MTr's and 2" spacers are in for some light playing
12-19-2005, 09:49 PM
Eventual plans for Trixy will be 33-35" tires, gonna do something with the axles, dunno what yet though. Trixy will probably get my 8.8 when I go 60's, and MAYBE an HP30, 4.56's, selectable lockers, those kinda goodies. Custom bumpers, whatever we or any manufacturers come up with that we think will work well. Trixy will more than likely end up on long arms, more from a reliability standpoint if anything so Pam's not constantly ripping CA mounts off the unibody like I do. We'll also do a cage at some point too.
Ultimately we want an extremely capable rig that is multi-functional. It needs to be able to hang on the difficult trails, but not be so one dimensional where it's impractical to take it camping and such and becomes a major PITA to drive on the road.
12-20-2005, 12:52 PM
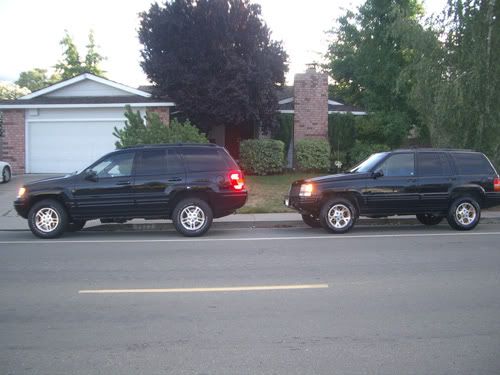
Sweet, sounds like a cool build! Hope you do not mind me posting pics here for ideas for you and Pam.(let me know if you would like for me to remove just in case). This is a buddy's ZJ (Jeff - uglyredzj), he just recently finished a front HP 44 and rear 9 inch HP, I believe he is using Clayton and RR parts on his setup. The setup came really nice, and within a small budget, he did all of the work as far as building the axles and putting the rig together.
The rig is still very streetable and does great on and off-road.
12-20-2005, 01:11 PM
I know Jeff, His rig is pretty cool.
I think he recently move huh??
12-20-2005, 01:20 PM
Dirk, Whattup?! Yep, he just moved up to the Sacramento area, just had a baby a few months back, so he slowed down wheeling a bit, but is back on the trail this Winter!
BTW we are planning some snow runs in the next month, you gotta come!
G
12-20-2005, 01:23 PM
Let me know when, may need to ride shotgun in someones rig though.
01-16-2006, 06:21 AM
Dude I LIKE Dave's fenders
05-13-2006, 12:00 PM
Any updates or is this over?
Hunter
05-13-2006, 12:39 PM
Over? That's like the word done, I don't know what it means!
Pam's working on the Rock Sliderz writeup for Trixy, and as soon as we get that damn bastard carrier out of there we'll get the Aussie Locker in and get that review done. Also going to be installing some rock lights.
05-13-2006, 02:13 PM
Cool!
Hunter
05-29-2006, 01:07 AM
okay, A little update. I'll get pictures up soon.
The Sliderz are on! - joint effort between Dave and I
Aussie Locker is in! Thanks mostly to Cory, (JpRnGr)
Rock lights mounted and wired - My first full blown electrical experience done without supervision (yes they work!)
New hitch purchased, cleaned up, Hammerited and ready to install. With the help of jack stands I should have this done this week...as soon as I'm not so pissed at my bitch of a jeep. Today was a long day.
So as she stands now, she has gone from bone stock, no skids, no nothing to
2" Budget Boost
31" MTR's
T-case skid
Gas tank Skid
JKS Quicker Disco's
Front Tow Hooks
Rock Sliderz
Aussie Locker in the rear aluminum D44
Rock Lights
Trailer Hitch (purchased & ready to install).
New Front Diff Cover (ordered but not here yet)
Now for some seat covers so I don't burn my arse in Moab on those black leather seats!
Full writeups with pictures of the sliderz and the locker install are coming.
But this is what you can expect to see if you go to GSW and this is how she'll sit for the rest of the summer. I plan on wheelin her like this to get some seat time and some more trails under my belt before I lift her up some more and slap some bigger tires on her.
I'll post up full reviews of how she does after I get back from Moab as well. You can expect to hear how the Aussie Locker performed and how the sliderz held up.
Last edited by Bustin' Loose; 05-29-2006 at 01:10 AM.
05-29-2006, 01:10 AM
Between Trixy and my ZJ there's a whole lotta love going on towards our ZJ's right now.
[/sarcasm]
05-29-2006, 01:15 AM
Glad to hear you guys got some stuff accomplished. How do you like the aussie locker so far?
05-29-2006, 01:16 AM
Posted up in the Aussie Locker Review about my opinion after the first week on the road. Right now, I'm loving it. Can't really tell it's there unless I'm listening for it.
The True Test will be Moab.
| « Previous Thread | Next Thread » |
| Thread Information |
Users Browsing this ThreadThere are currently 1 users browsing this thread. (0 members and 1 guests) |