|
|


 06-17-2006, 07:58 PM
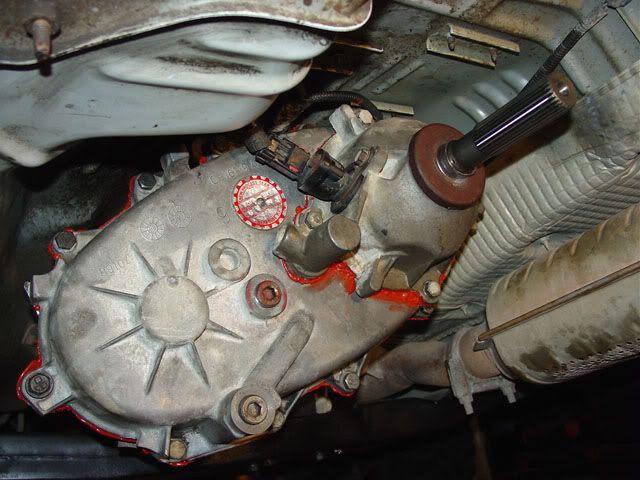
This write-up is just a simple breakdown of the NV242 transfer case while it's still hooked up to the Jeep. In my situation I had a leak that I wanted to take care of fast. Therfore having to drop the whole case was unnecessary. This write-up is not only for the n00bie who has no clue as to what to do or where to begin, but also for the casual mechanic with a short memory. Hopefully by the time you have finished reading this you will have a better understanding of how to break a transfercase down. This should also pave the way for you start working up the nerve to install a Slip Yoke Eliminator kit someday. For now though, we're just gonna fix a leak.
One of the reasons I chose to do this write-up was because of the poor illustration found in my Haynes Repair Manual for the Jeep Grand Cherokee 1993 thru 2000. For some odd reason they illustrated the NP242 on page 7C-5 but no mention of the NV242 that is under my Jeep. As confusing as this world already is, I can only imagine what it must be like for someone who has never torn a t-case down & having only a Haynes manual to help.
The majority of the photos used here are mine with the exception of a few. Those photos are courtesy of Eddie at www.4x4xplor.com & are used with permission. I didn't think about making a write-up untill I was halfway thru my fix-a-leak project. Eddie's pics were blessing when I forgot to snap a few here & there. Please take the time to visit his site as it is packed full of tips & how-to's on TJ's & CJ's.
The orientation of this write-up will have the instructions posted on top of each photo. Read, look & follow along.
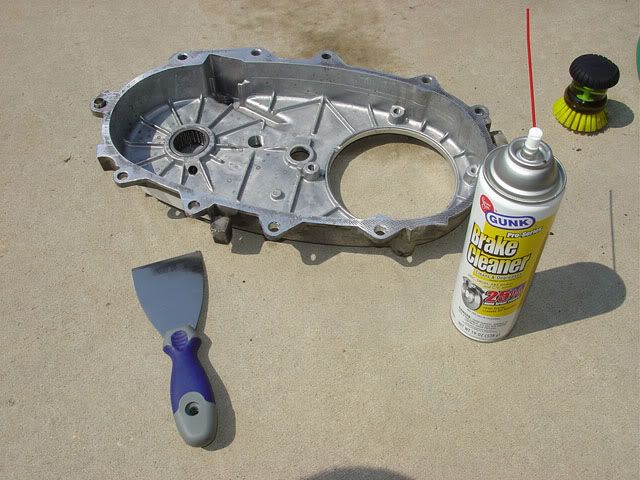
** The first part of this project will list the tools needed and what they will be used for and the breakdown of the case. The right tools for the job will make life much better.
** The second part will go into clean up & reassembly of the case.
** The third part of this write up will be a technical view of the 242 t-case and the differences between them. Somewhere between late 1990's and early 2000's, New Process changed it's name to New Venture. Therefore you will find that there is an NP242 and the NV242. My 242 has the New Process tag but it's designed like the NV242. Are ya confused yet?
Please, please, please read this write-up before you tear into your case. Even though this is the NV242 out of my '98 ZJ, the basics of this breakdown applies to almost any t-case. Of course there will be differences.
• Wheel Chocks / Blocks
• 5/16" Socket w 1/4" Ratchet
• 1/2" Socket w 1/4" Ratchet
• 15mm Socket w 3/8" Ratchet
• 10mm 12-Point Socket w 3/8" Ratchet
• Ratchet Extensions
• 10mm Hex Key
• Flat Head Screwdriver (Small & Large)
• Rubber Mallet
• Needle Nose & Regular Pliers
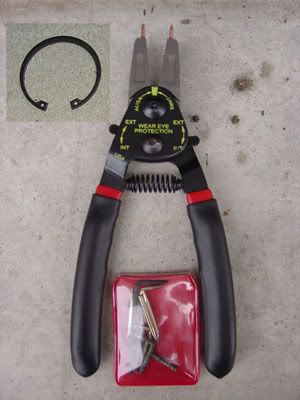
• Heavy Duty Retaining-Ring/Snap-Ring Pliers
• Heavy Duty Lock-Ring Pliers
• Gasket Scraper
• RTV Gasket Sealer (Ultra Black, Gray, Red, or Ultra Copper)
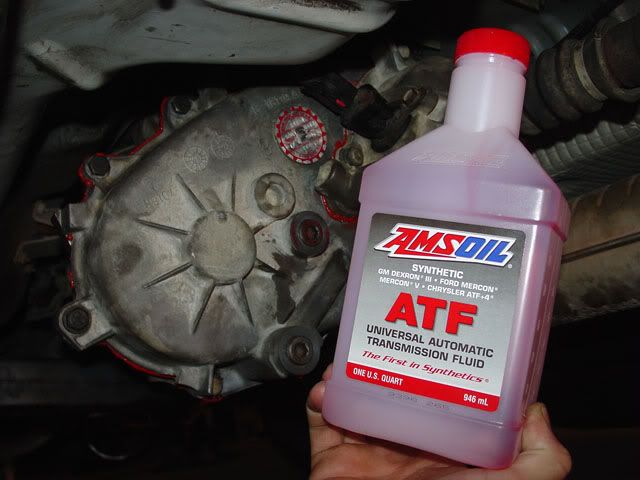
• 2 Pints ATF+3 or ATF+4 (Check your service manual!)
• Bottle Pump or Spout
• Oil Catch Pan
• Rags
• Jack Stands (Recommended)
• Floor Jack (Recommended)
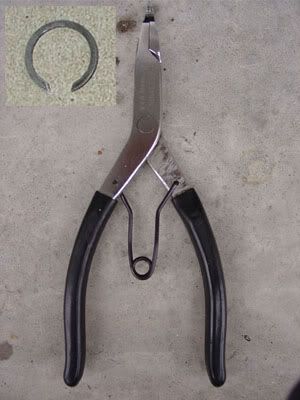
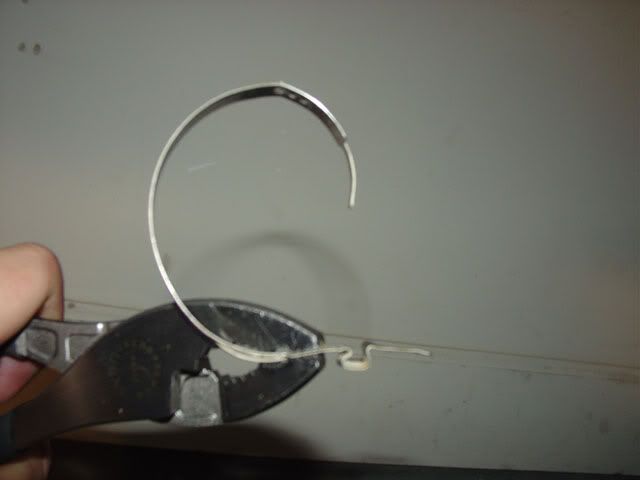
Let me explain to you about the types of pliers used here. When I say Heavy Duty, I mean don't go cheap on these. The pics below have an insert that will show you the type of rings that the pliers will be used for. The pliers on the Left are Internal & Extermanl Retaining-Ring/Snap-Ring Pliers. The pliers on the right are Lock-Ring Pliers.
** What ever you do in this world don't ever forget SAFETY FIRST!! **
The next task to be done will be choking/blocking all four wheels. Even if the tranny on your Jeep is in park, once you start messing with the t-case, you're Jeep could decide to say "F.U." and roll away while you are underneath. Me personnally, I placed my Jeep in park but kept the t-case in neutral so I could rotate the rear driveshaft as I was taking it off. Keeping the t-case in neutal also helped out a bit when it came time to remove the lock-rings.
On the tools list I mentioned jackstands. This is for those who have small or no lift at all. My overall suggestion is this, if you have no problems getting underneath your Jeep then stands may not be necessary. Keep in mind that for this task we are not dropping the t-case but you will still need plenty of room to move around underneath.
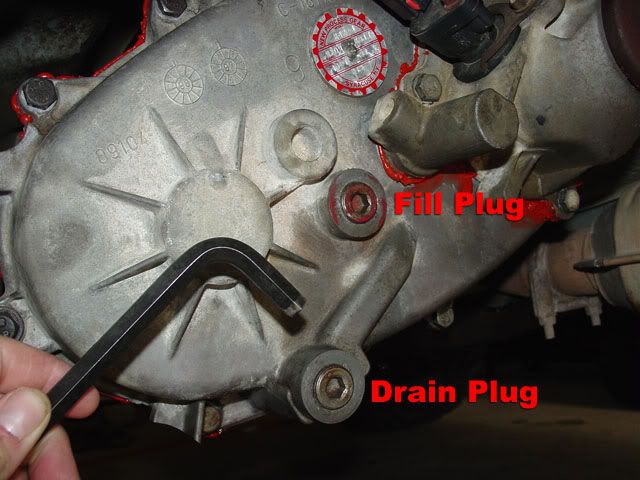
Once you are certain that your Jeep will not roll away it's time to crawl underneath and drain your t-case of fluid. You will see 2 plugs, unscrew the drain plug with a 10mm Hex Key.
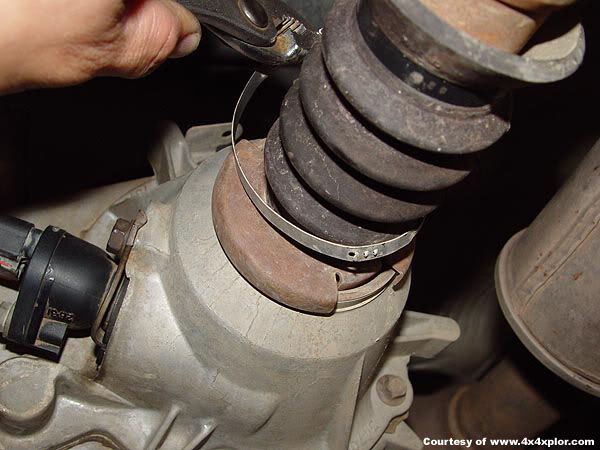
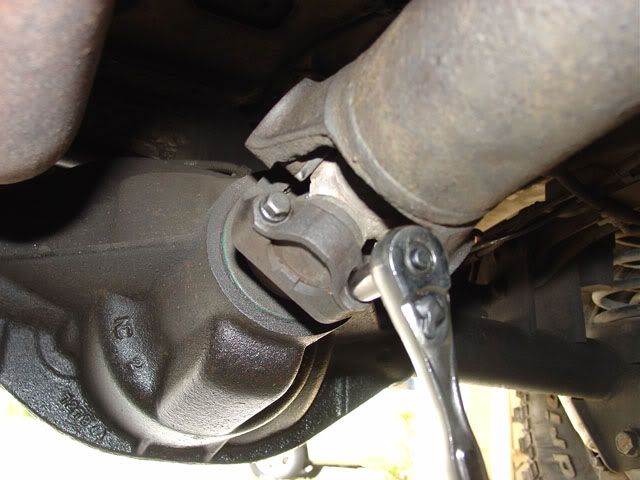
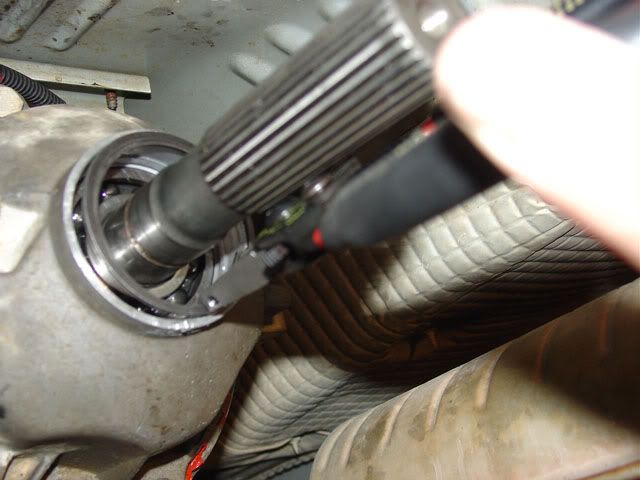
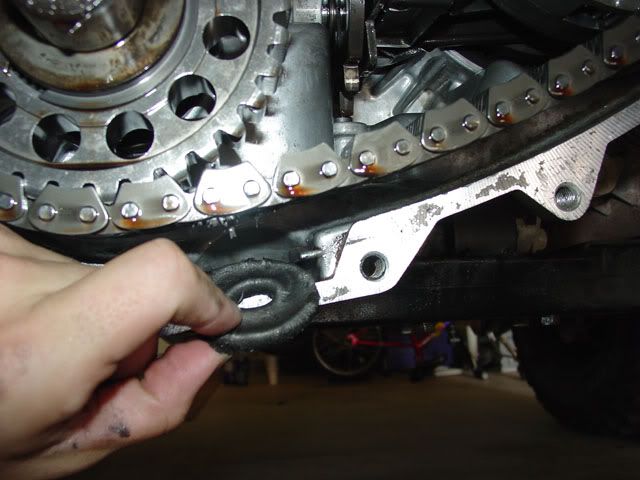
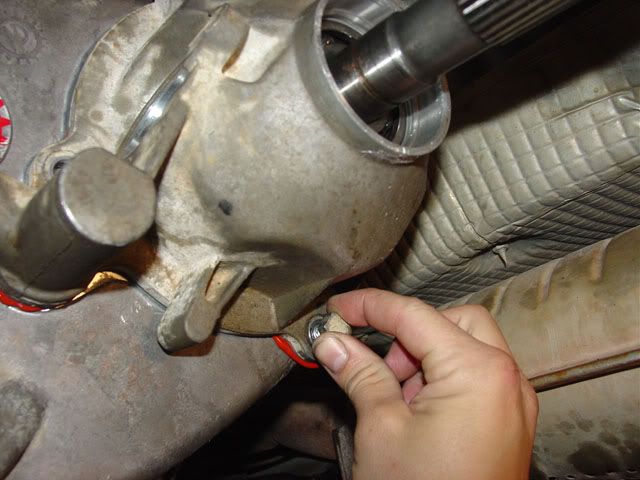
Next use either needle nose or regular pliers and remove one of the two metal bands securing the Slip Yoke rubber boot, which is located on the slipyoke portion of the driveshaft. The strap to be removed secures the boot to the transfer case slinger.
You will find that this strap is a pain in the ass to remove. If you feel that it can not be reused, fear not as zip ties will make an easy replacement. If you use zip ties, you must be careful in removing them so that you do not damage the boot next time you do this project.
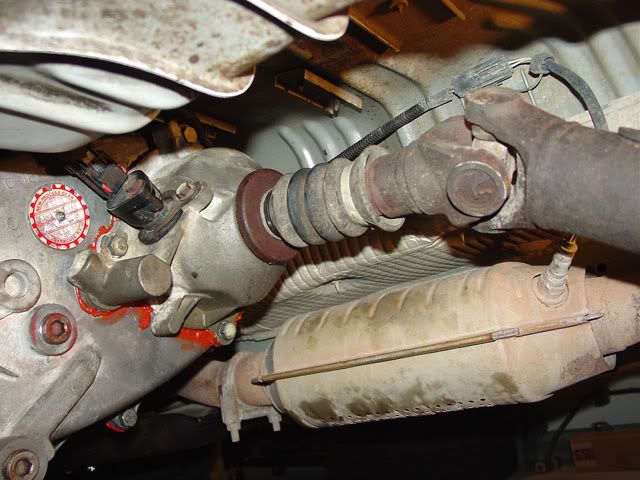
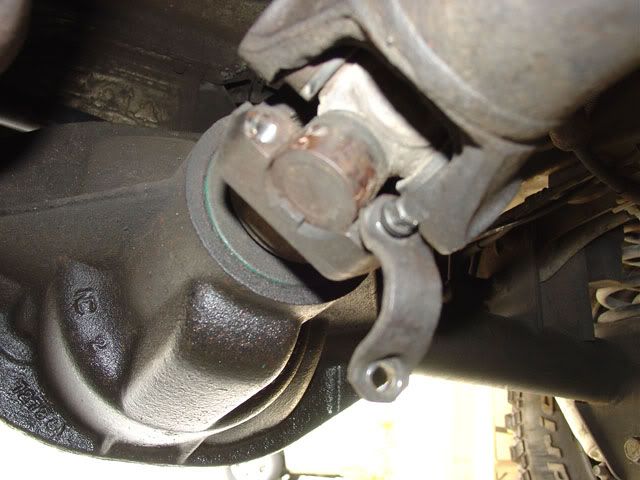
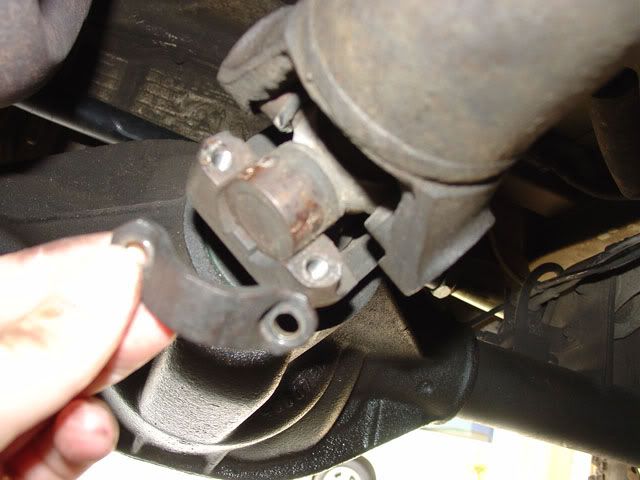
Move to the rear of the axle and remove 4 bolts and 2 yoke straps that secure the drive shaft to the rear axle using a 5/16" socket or wrench. This is where having the t-case in neutral helps. Once you have the 1st yoke strap removed you can grab the driveshaft and rotate untill you remove the 2nd strap. Be prepared to catch the ass-end of the driveshaft in case it drops to the ground. If it does not drop, don't worry as you are about to learn why the other end is called a Slip Yoke.
Simply grab the driveshaft and slide it forward as if you were trying to shove it into the transmission. The ass-end should disengage itself from the axle. You will notice that the driveshaft is rather light. Now slide the shaft out of the transfer case and place it out the way. What you should see is this.
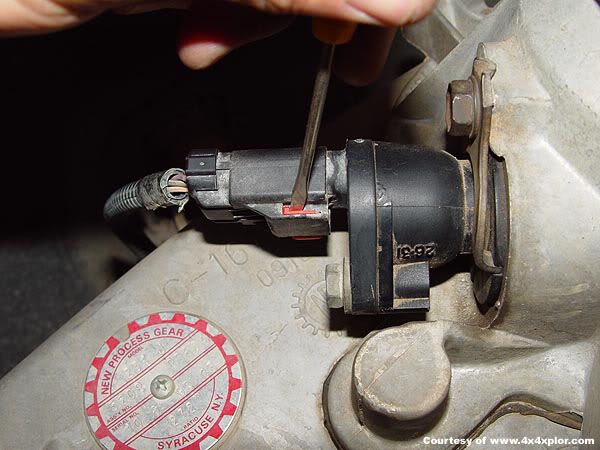
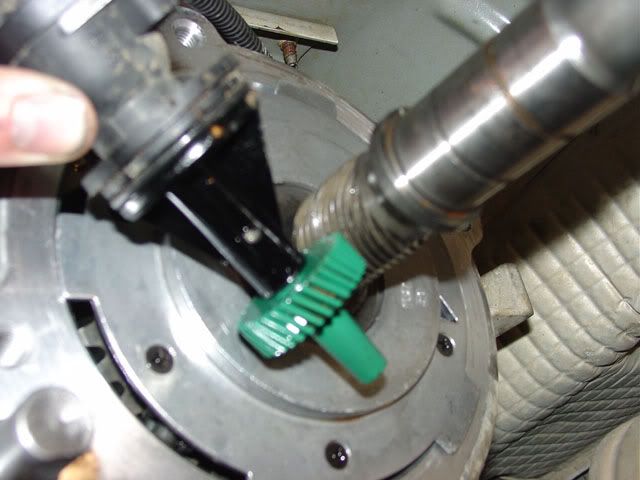
Unplug the speedometer wiring harness connected to your transfer case tail housing. Here you will need to use a small screw driver to slide out the red key locking the connector in place. Disconnect the plug from the speedometer gear.
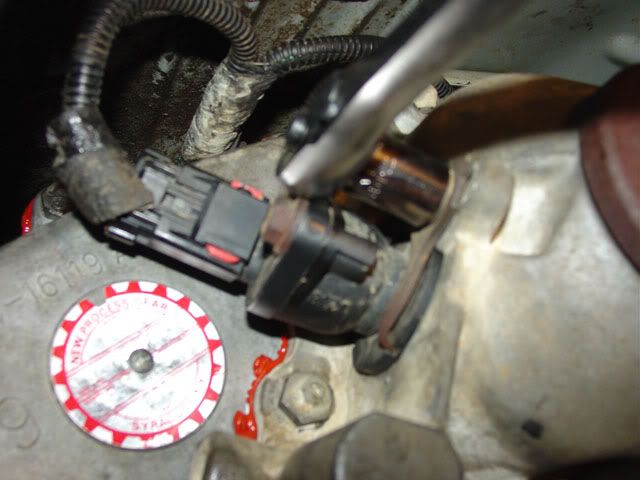
Using a 1/2" socket, remove the retaining bolt and metal clip securing your speedometer gear housing to the tail housing.
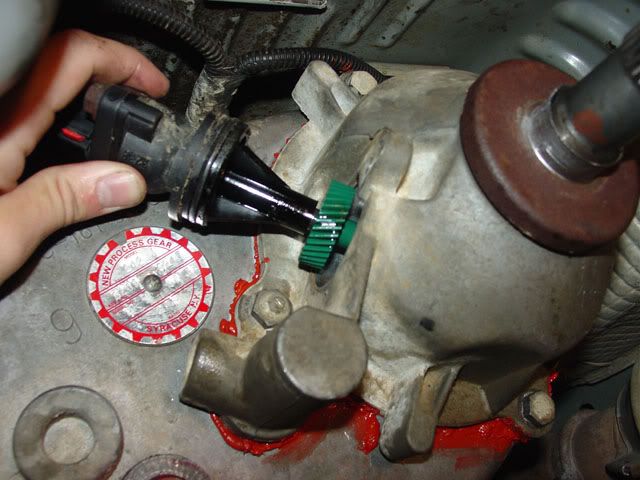
Firmly grab the speedometer gear housing and carefully pull it out. If you have bigger tires already, now would actually be a good time to change this gear out to correct your speedometer.
** Remember the original orientation of the speedo gear during reassembly! **
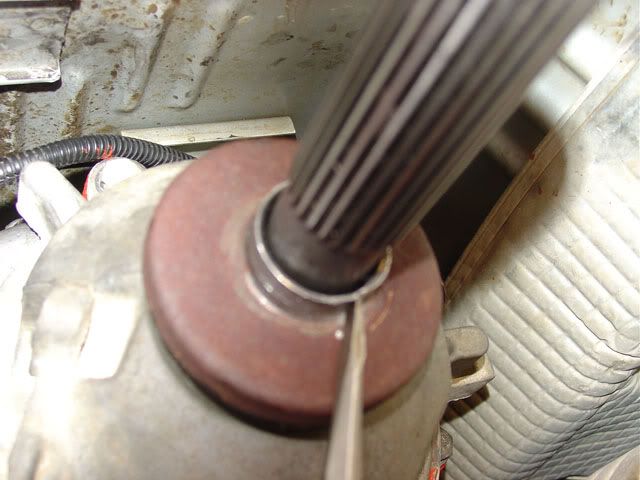
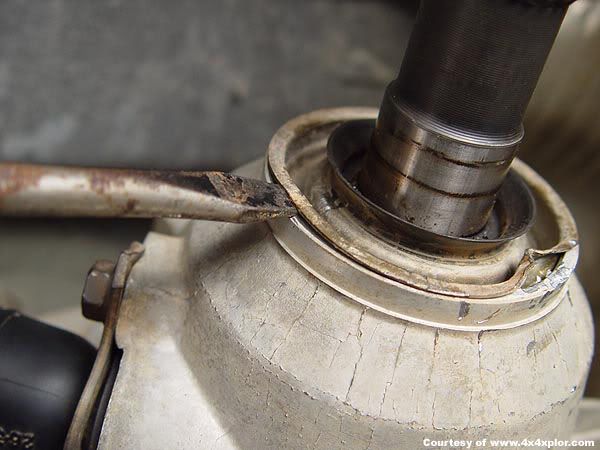
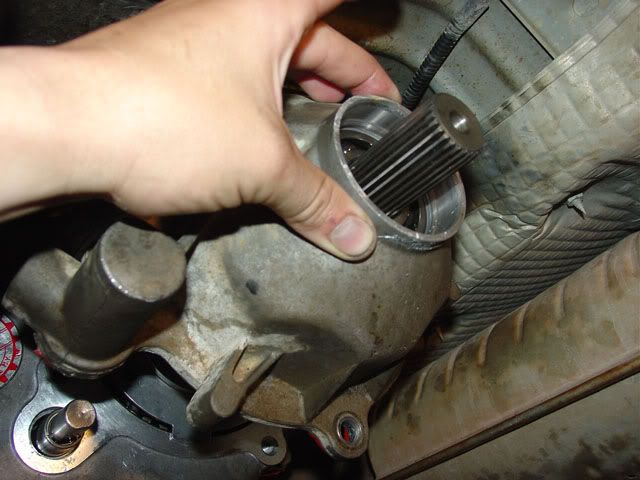
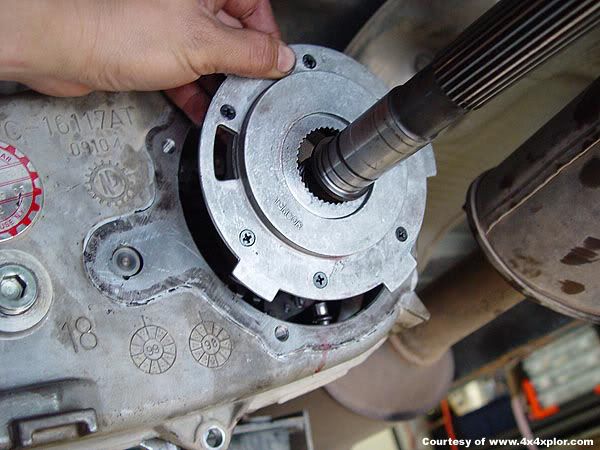
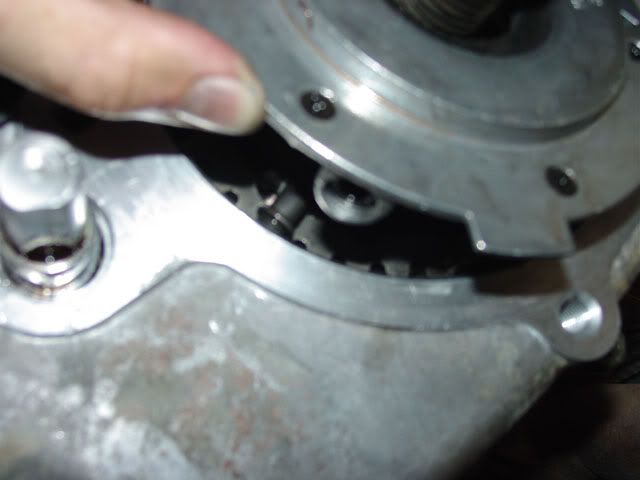
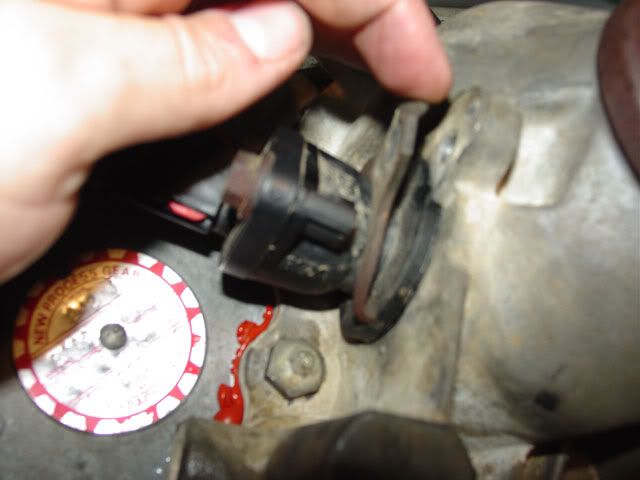
Here is where the fun really begins. The removal of the slinger was an ass kicker for me. There are several ways to remove this. You can use a gear puller with a 5" reach to extract. This can be rented from your local autoshop.
Or use a chisel / flathead screwdriver & hammer. I ended up making a slight groove for the flathead to grab onto and hammered the slinger loose. It rotated counter clockwise off.
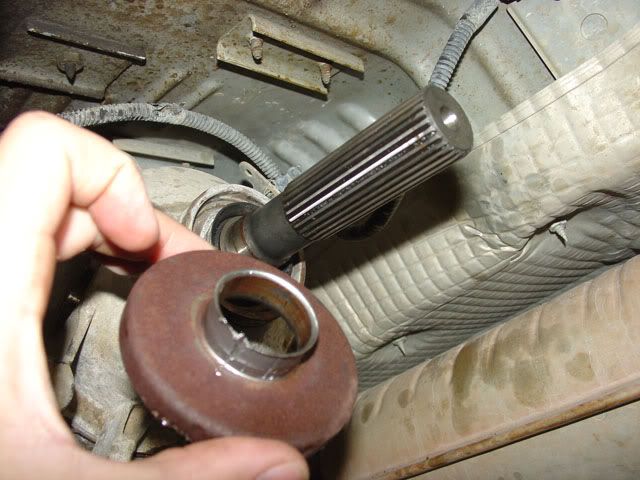
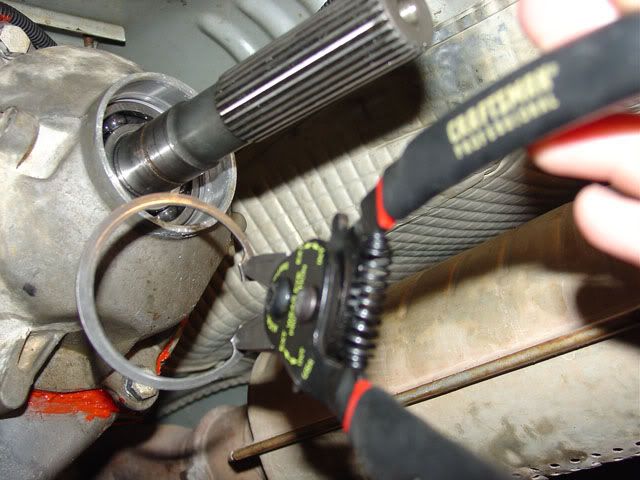
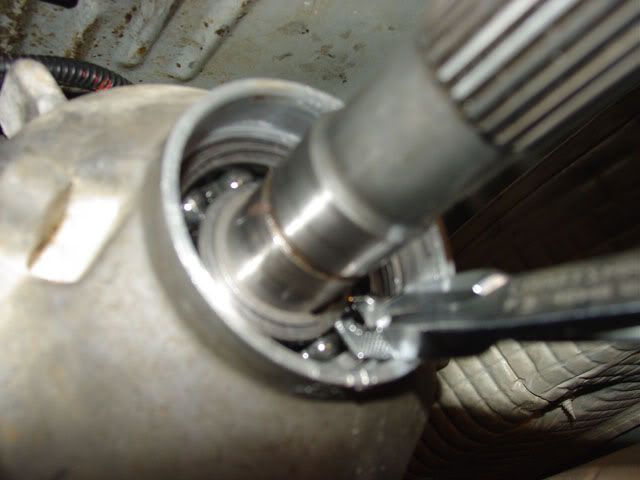
Now that you have that P.O.S. off, there will be a metal slip-ring (if you have one). Simply slide it off and you should see your 1st lock-ring and the Output Shaft Seal.
Grab your lock-ring pliers and go after the lock-ring holding the Output Shaft Seal. If you plan on re-using the lock-ring, be careful not to damage it. It is possible to bend & warp the ring.
Remove the Output Shaft Seal by tapping a flathead screwdriver with a hammer all the way around the seal until it comes off.
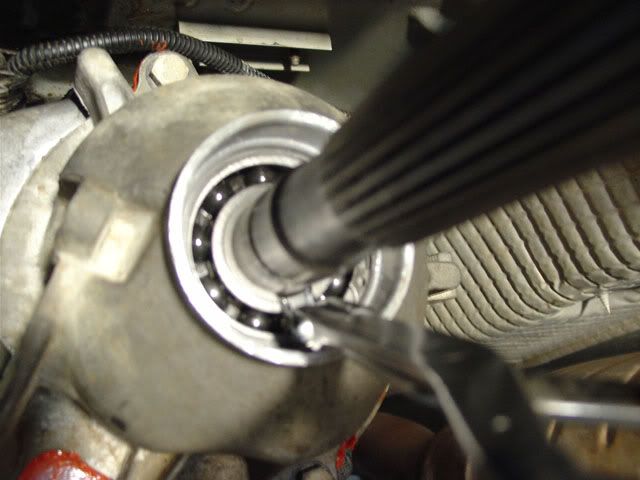
Remove the 2nd lock-ring that keeps the Output Shaft Bearing in place.
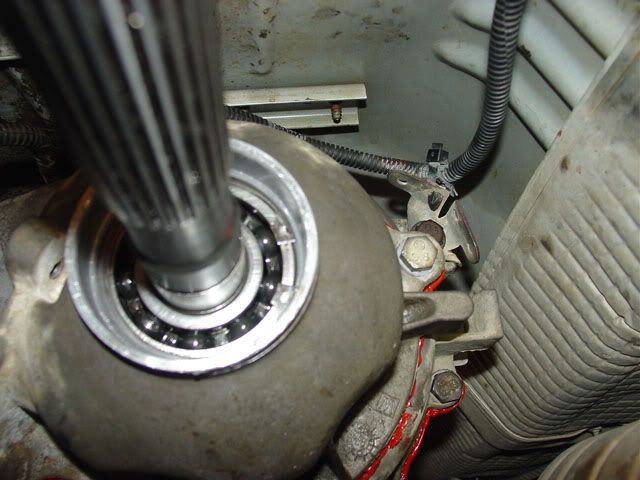
Remove the snap-ring that holds the tail Housing in place.
Remove all bolts holding the transfer case tail housing using a 15mm socket.
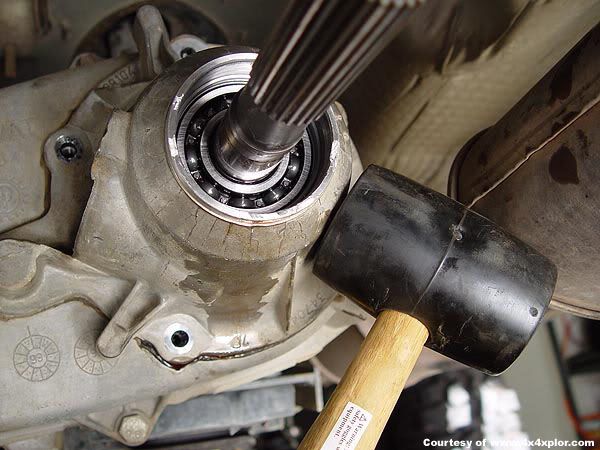
After all bolts are loose, you should be able to whack the tail housing with a rubber mallet. If you end up having to use a screwdriver & a hammer be careful not to damage the case as it is made of aluminum.
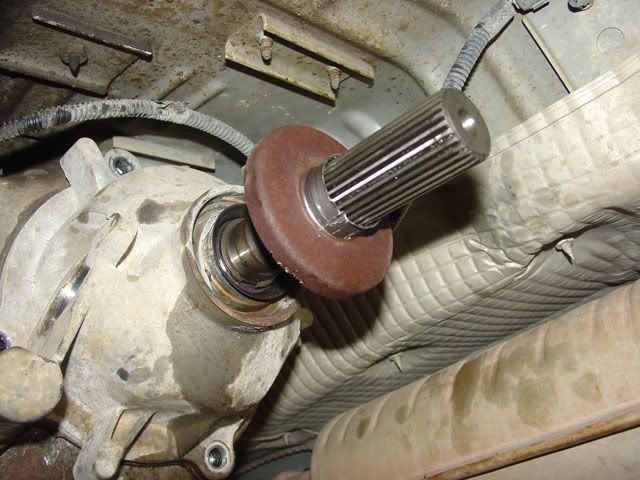
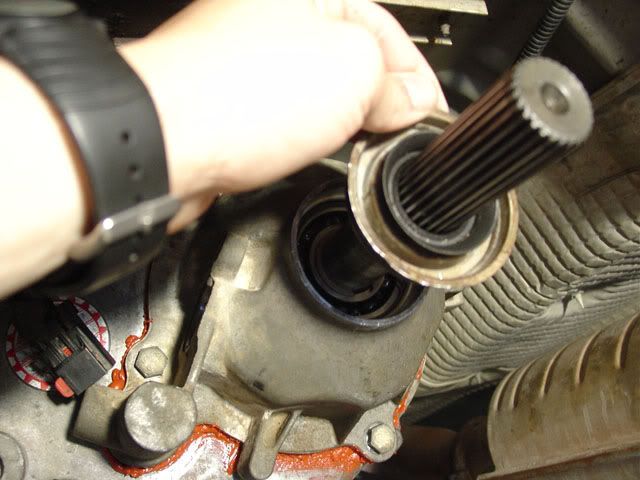
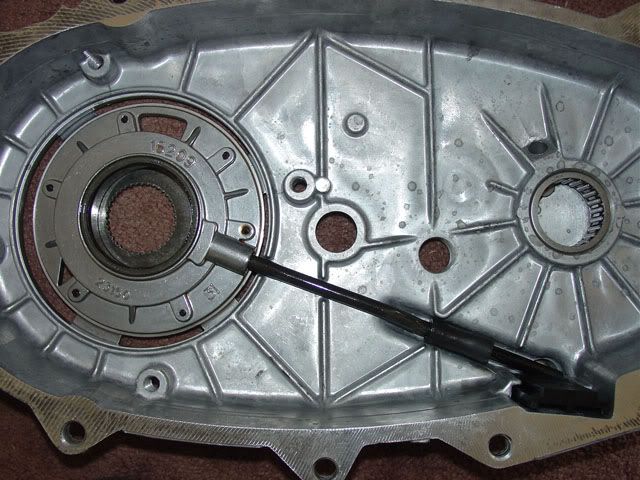
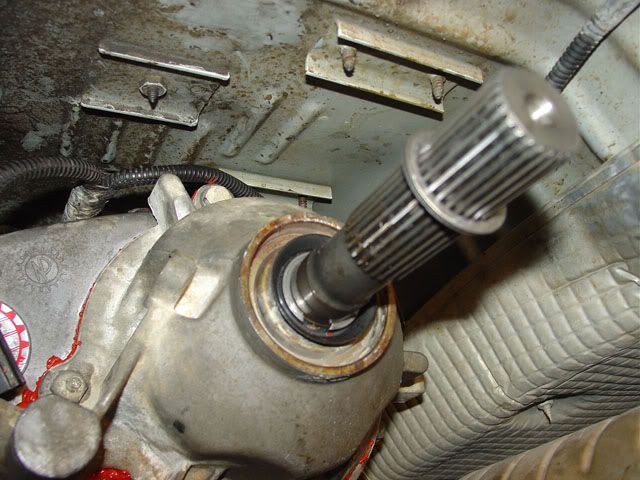
Grab the tail housing and slide it off the Output Shaft.
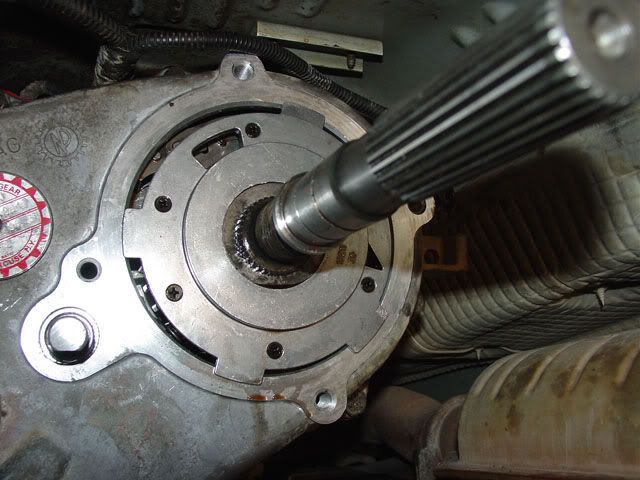
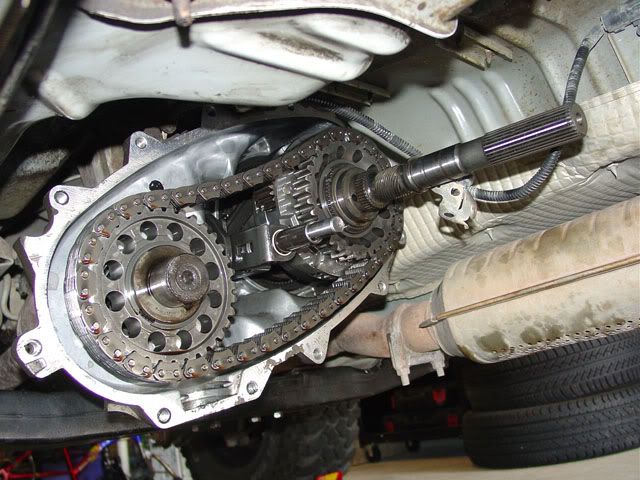
Here is where you should be. What you are looking at is the oil pump.
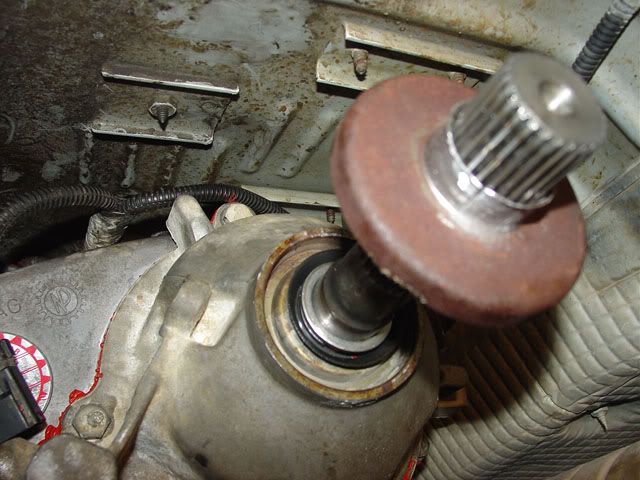
Here is a bit of extra education for ya. Look carefully at the teeth deep inside the output shaft and the teeth on the speed gear and see how they meet to measure the speed of the Jeep.
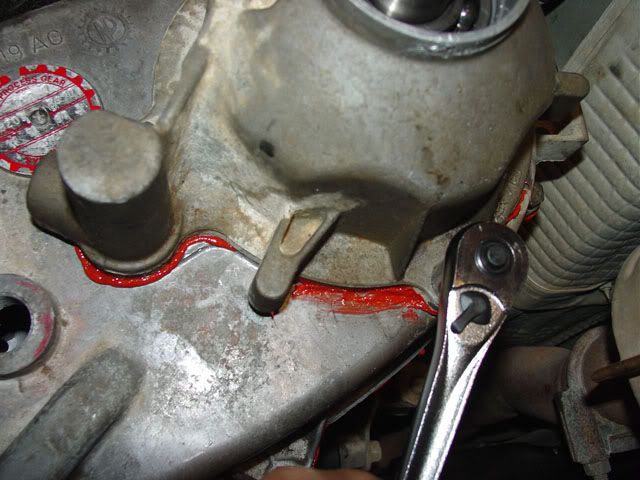
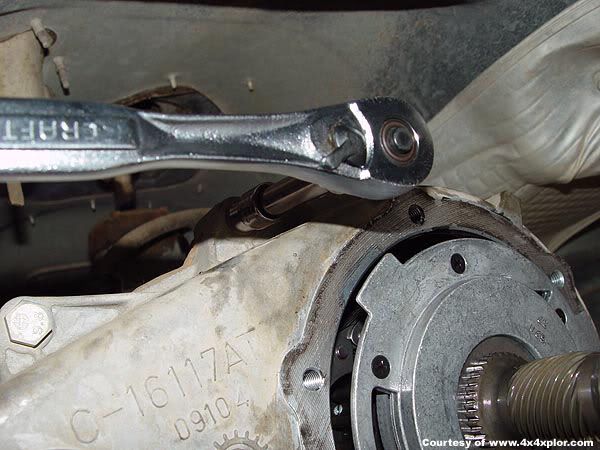
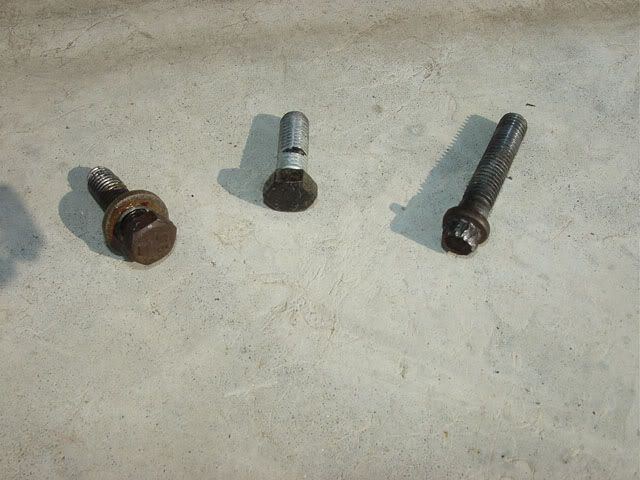
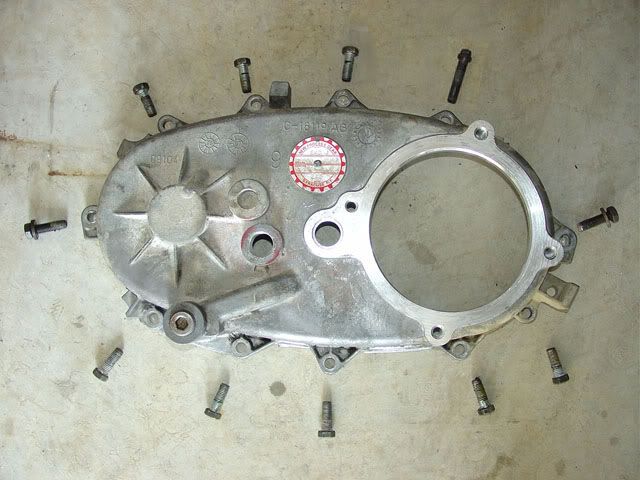
Now it's time to break open the t-case. Using a 15mm socket you will remove all bolts except for one at the top. For the top bolt you need a 10mm 12-point socket. Pay attention to where each bolt came off and arrange them accordingly on the ground. You will notice that a couple of them are longer and that 2 of the bolts have washers. All bolts will need to go back to the specific hole they originally came from.
Here is a look at the bolts. Notice the 12-point bolt on the right. The other two bolts are the same except that one has a washer & is slightly longer.
The 12-point bolt gave me one hell of a hard time. I ended up having to reach around the back end of the transfer case only to realize that I had forgotten there is a nut back there that is used to hold a wire retainer. Not only did I have to unthread the 12-point bolt from the t-case itself but also from this nut thus making life rather hard. This nut is not required for reassembly. Just make sure you keep the wires out of way.
Here is the order in which the bolts are placed. Notice the two bolts on the far left & right with washers & the 12-point bolt.
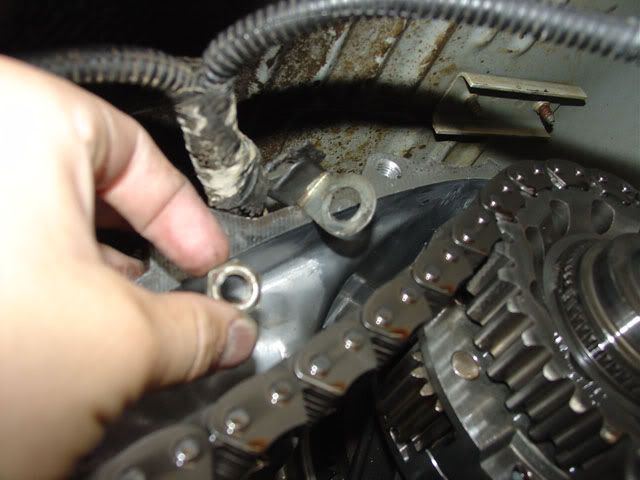
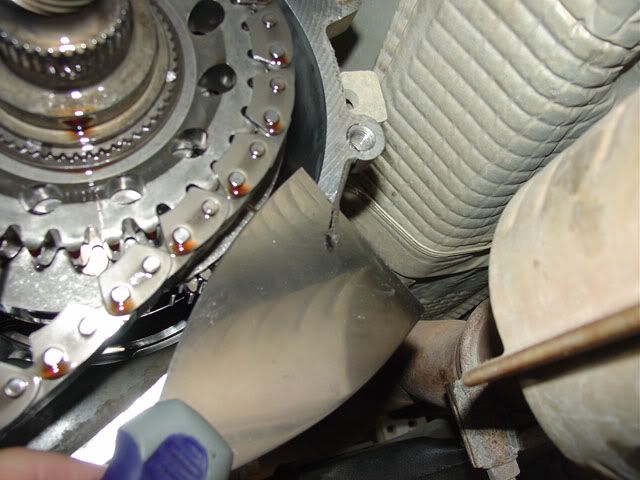
Look at the seam of the t-case and you find a small notch where a flat head screwdriver can be placed. Carefully pry open the t-case without using excessive force which can cause damage. Watch out as more fluid will pour out.
With the transfer case partially separated, you should be able to remove the oil pump by lifting up and pulling it off the output shaft. There is a small oil pickup tube at the base of the pump that will need to be disconnected. It's just held in by a rubber O-ring and will unplug with little effort.
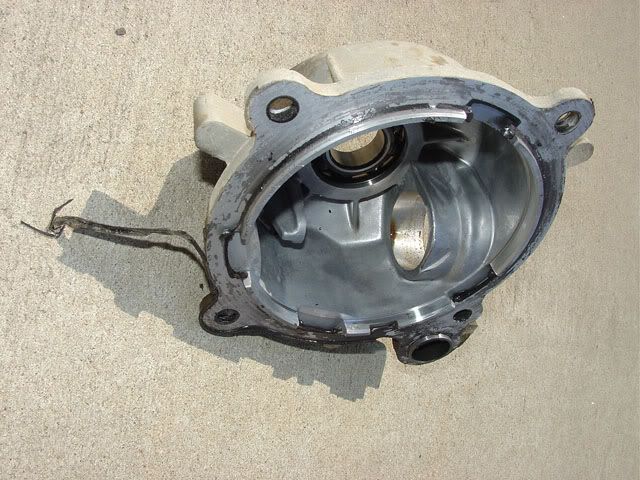
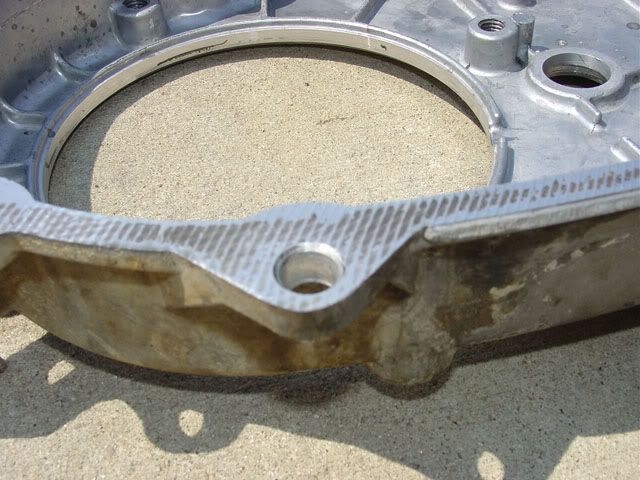
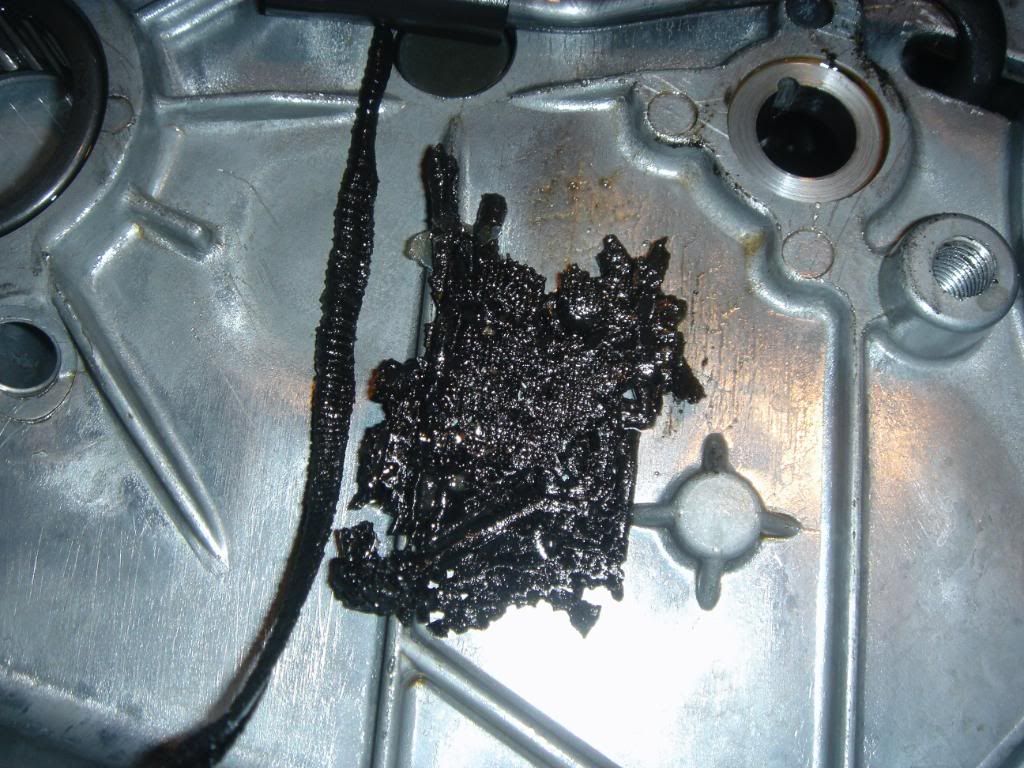
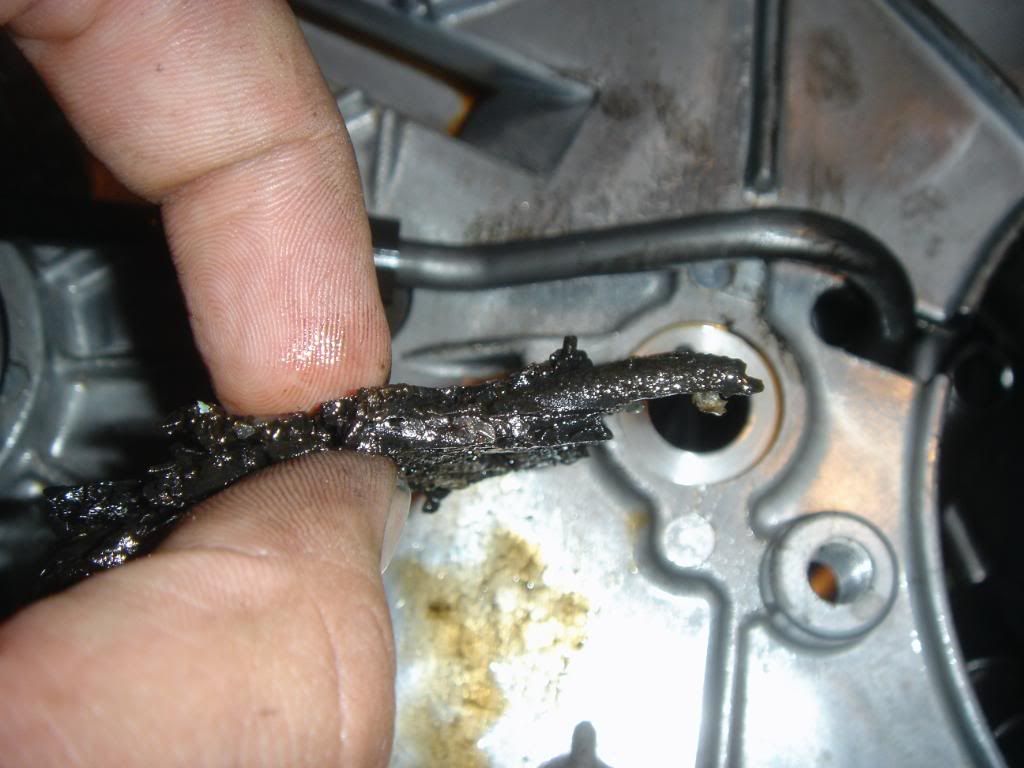
Remove the t-case half and set it aside. At the base of the t-case, you will find a flat round magnet in a slot where the two halves come together.
This is a collecting magnet used to grab metal shavings. It will look rather fuzzy at first but truth be told, that's metal shavings. Pull this magnet out and clean off all metal fillings attached to it. Look for larger chunks that would indicate serious wear or damage to the components inside the case. In the photo below you will see the shavings left behind after a slight cleaning. I used lots of brake cleaner & rags.
At this point, the break down is complete.
Last edited by zj-monster; 07-04-2006 at 12:47 AM.

 06-17-2006, 08:27 PM
Nice start but not all 242s are created equal. Maybe post a pic of the other style of driveshaft (mine is an inny not an outy, way shorter t-case than the later style like yours). Also the other style of 242 has an extra 3 bolt seal/rear bushing retainer on the back, not a 1 piece style like yours.
Of course mine may be different because it was swapped in out of an XJ Cherokee.
06-17-2006, 09:38 PM
Part 2 - On to the clean up portion & assembly.
A gasket scraper & brake cleaner, or degreaser of your choice will help out a lot. Once again be careful not to damage the case itself. Be sure not to allow any of the old gasket residue to fall inside the case.
Clean up the tail housing aswell.
It may not be possible to get it all 100% clean but make enough of an effort to ensure that the new sealant will stick.
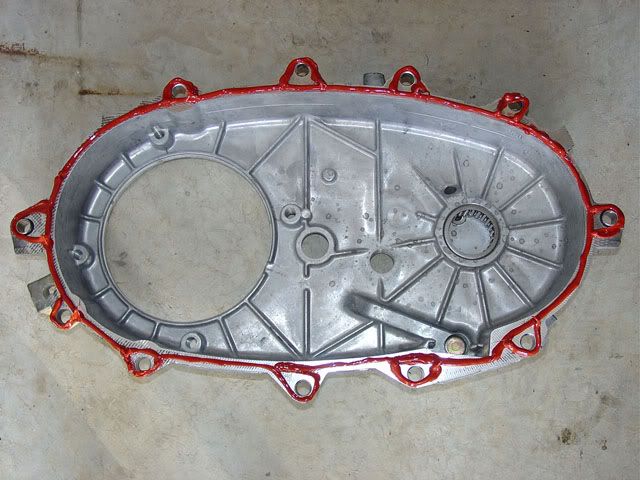
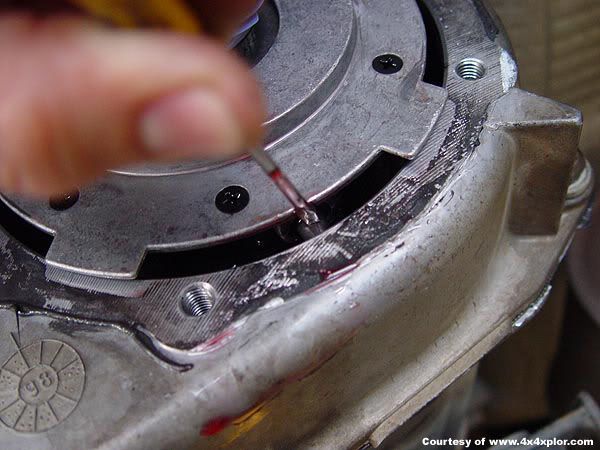
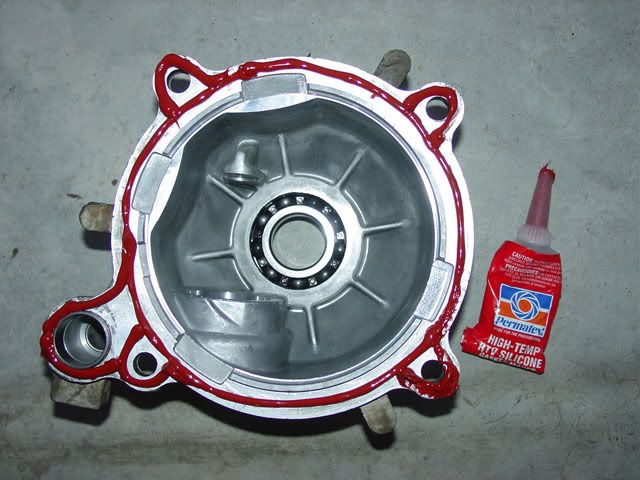
Once you have everything cleaned off, it is time to get out some RTV Gasket maker and have at it. Don't be affraid to use this stuff. I tend to go a bit insane with the stuff.
Using a 1/16" to 1/4" bead of RTV, make a continuous even bead of silicone to one surface surrounding all bolt holes.
Let the silicone dry for a bit then assemble the 2 halves. Finger tighten all bolts (or lightly use your socket) until the silicone begins to squeeze out a bit all around. Allow the silicone to dry for 1 hour then retighten 1/4 to 1/2 turn.
Insert the oil pump. This is a bit of a tricky install because the oil pickup tube MUST be inserted into the oil pump.
Just use a small flathead screwdriver to do this.
Here is a bit of backwards orientation. This photo will give you an idea what you are trying to accomplish.
Using a 1/16" to 1/4" bead of RTV, make a continuous even bead of silicone to one surface surrounding all bolt holes for the tail housing.
Once again allow the silicone to dry for a bit then carefully slide the tail housing over the output shaft. Finger tighten all bolts (or lightly use your socket) untill the silicone begins to squeeze out a bit all around. Allow the silicone to dry for 1 hour then retighten 1/4 to 1/2 turn.
Once the RTV has dried, tighten every bolt down and insert the snap-ring onto the tail housing.
Insert one of the 2 lock-rings onto the output shaft. Pay close attention this part. The lock-ring will slide into a groove on the output shaft right up to the output shaft bearing. Make sure it snaps in the groove.
Insert the output shaft seal. This might be a bit tricky though, if you look at the backside if this seal you will see a thin round retaining spring. This spring will make inserting the seal a bit of a pain in the ass.
The rubber mallet will come in handy for this task.
Insert the last lock-ring. This lock ring will also slide into a groove on the output shaft right up against the output shaft seal. Becareful not to damage the seal!
If you have a slip-ring, insert it on top of the lock ring.
Insert the slinger.
Re-assemble the speed gear.
**Remeber the original orientation of the speedo gear during reassembly!**
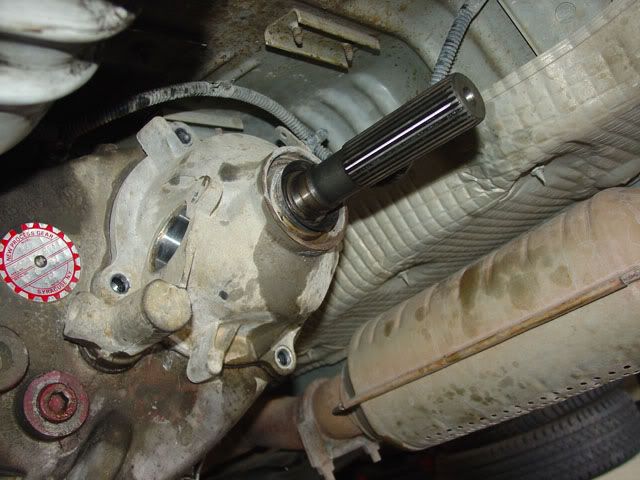
Now you should be at this point. Granted there is a ton of RTV that can be seen. I'm not out to win any showroom trophys but if having some extra silicone bothers you, then by all means trim it off.
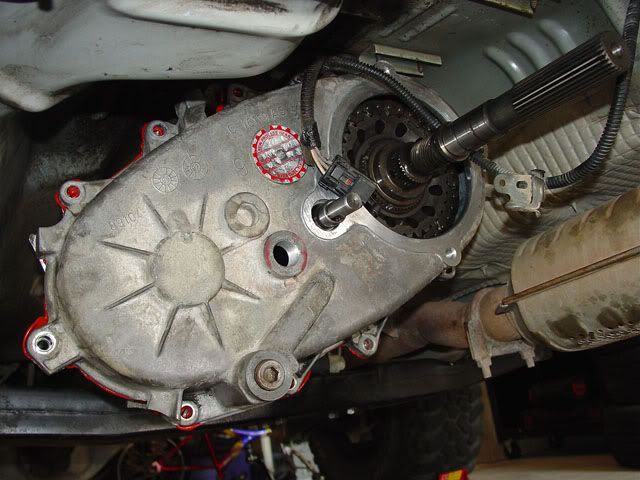
Check your service manual and fill the t-case up with AT+3 or AT+4 of your choice and watch for leaks. If there are none, then resume the assembly by putting your driveshaft back on to the t-case in the reverse order that you took it off.
** Notes:
Please keep in mind that is only a basic break down & re-assembly of the 242 that came with my ZJ. Its a 98 with well over 134,000 miles at this time of this write-up. I know there are many other versions of the 242 as mentioned earlier. Hopefully with this knowledge, you will be able to do this and eventually move on to bigger projects like installing a Slip Yoke Eliminator kit.
Disassembly & reassembly of many transfer cases are the same however. You may find that the bolt on your case may have 10mm all the way around rather than 15mm like mine. Just pay close attention to what you are doing at all times. Make notes of where everything goes, take your time and all will go smoothly.
Last edited by zj-monster; 07-04-2006 at 12:49 AM.
06-18-2006, 12:23 AM
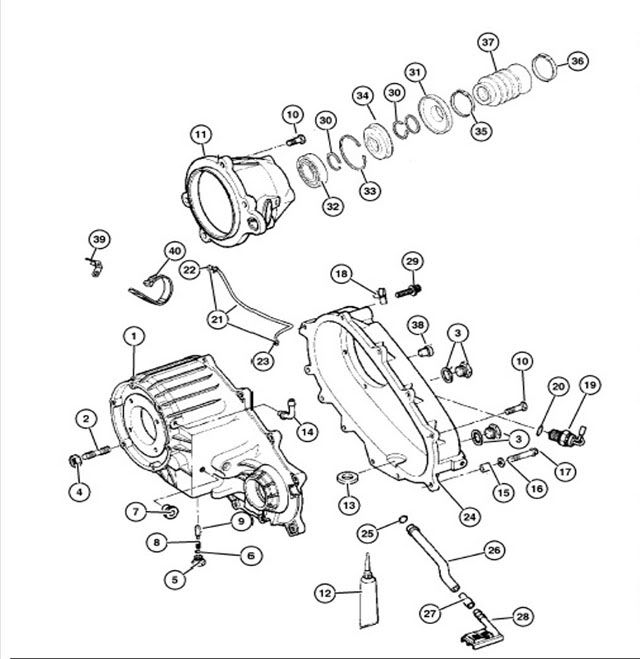
Part 3 - Some technical knowledge.
An earlier version of the 242, the NP242 (New Process) has a 3 bolt extension housing that attaches to the tail housing / rear retainer similar to the NP231. Plus you have a 249-242 hybrid t-case.Originally Posted by rsl
**On this page the illustration will be on top with the part numbers & identification at the bottom.**
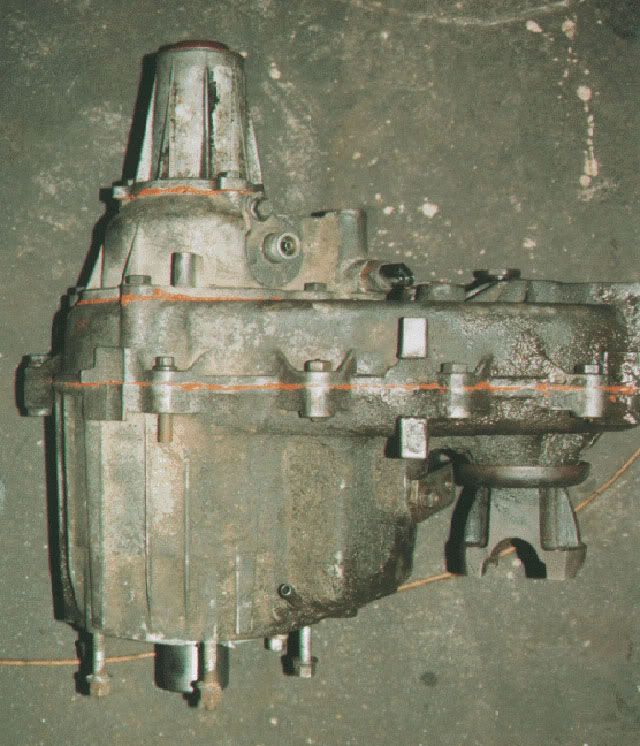
This is the NP242 that has the 3 bolt extension housing (#14) that bolts up to the tail housing / rear bearing retainer (#13). This model is offered on 93 to 95 ZJ's.
1: Shift Lever.
2: Sector O Ring
3: Shift Lever Retaining Ring
4: Outer Shift/Mode Fork Pads
5: Center Shift Fork Pad
6: Center Mode Fork Pad
7: Range Shift Fork
8: Mode Shift Fork
9: Front Retainer Seal
10: Front Bearing Retainer
11: Input Gear Bearing
12: Input Pilot Bearing (input gear / mainshaft)
13: Rear Bearing Retainer (a.k.a. Tail Housing)
14: Extension Housing
15: Bushing
16: Output Shaft Seal
17: Magnet
18: Indicator / Vacuum Switch Seal (speedo gear)
19: Front Yoke Nut
20: Front Yoke Seal
21: Front Yoke (also pictured are the slinger & oil seal)
22: Front Output Shaft Rear Bearing (with lockring)
23: Drive Chain
24: Mainshaft Bearing Rollers
25: Differential Sprocket (pictured is the whole differential assembly)
26: Input Gear
27: Oil Pump Tube O-Ring
28: Oil Pump Pickup Tube Screen
29: Low Range Gear
30: Shift Sleeve
31: Oil Pump Seal
32: Rear Bearing (with snap ring)
33: Oil Pump
34: Rear Case Half
35: Mainshaft
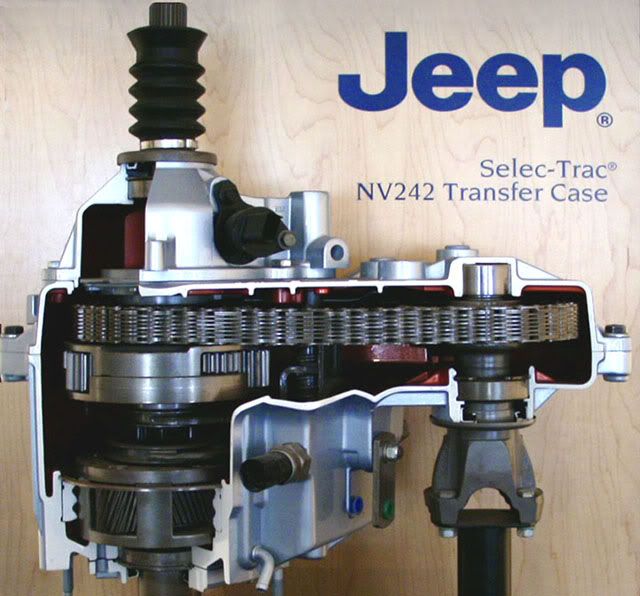
The photo below is the NV242 (New Venture) that I currently have under my '98 ZJ. This is the newer 242 that is bolted on 96 to 98 ZJ's and is also featured on WJ's & KJ's.
However, there are models like this that will have the New Process tag! Just look for the tail housing / rear bearing retainer (#11), slinger (#31), and the slip yoke boot (#37).
1: Front case
2: Bolt
3: Drain / Fill Plugs
4: Nut
5: Detent Pin
6: Seal
7: Seal Plug
8: Detent Pin Spring
9: Detent Plug
10: Bolt
11: Rear Bearing Retainder (a.k.a. Tail Housing)
12: Goo in a Tube?
13: Magnet
14: Vent Tube Assembly
15: Spacer (there are 2 for this half of the case)
16: Washer (there are 2 for this half of the case)
17: Bolt (used for the spacer & washer listed above)
18: Retainer (used with the 12-point head bolt that holds wiring out of the way)
19: Indicator / Vacuum Switch (speedo gear assembly)
20: Indicator / Vacuum Switch Seal
21: Vent Tube Assembly
22: Vent Tube Assembly
23: Vent Tube Assembly
24: Rear Case
25: Oil Pump Tube O-Ring
26: Oil Pickup Tube
27: Oil Tube Pickup Connector
28: Transfer Case Oil Filter (screen)
29: 12-Point Head Bolt
30: Lock-Ring
31: Transfer Case Flange Slinger (also pictured is a slip-ring if equipt)
32: Output Shaft Bearing
33: Reatining Ring (snap-ring)
34: Output Shaft Seal
35: Slip Yoke Boot Front Clamp
36: Slip Yoke Boot Rear Clamp
37: Slip Yoke Boot
Last edited by zj-monster; 07-31-2006 at 06:41 PM.
 06-18-2006, 01:43 AM
EXCELLANT write up.
Thanks.
06-18-2006, 02:17 AM
What can I say, it works for me. Makes it a lot easier for anyone else contemplating a 249 -242 swap also since they don't have to worry about the input gear cut problem.
Great job on the writeup and pics but it looks like you indexed the speedo drive in a different position from the removal pics.
EDIT: Nope I'm wrong, that pic is of a different case ( oil slinger is different ).
Last edited by rsl; 06-18-2006 at 02:22 AM.
06-18-2006, 07:21 AM
FYI, the stamped steel "slinger" on the rear output shaft is just a protector for the neoprene oil seal. My 8.8 has a similar "shield" on the pinion seal. Strangely enough, my rebuilt 231 (which should have had the shield) does not, it was an oversight. But it is pretty much the same as the 242 you wrote about (as far as the external slip yoke.) Nice detailed pics!
Kevin C.

 06-18-2006, 10:01 AM
A couple of things:
- It's brake cleaner, not break cleaner
- Holy shit that's a lot of RTV
I wouldn't worry about the RTV oozing out on the outside, but rather how much is on the inside and if it broke loose. GM makes a sealant made specifically to seal sections of transmissions/transfer cases that would work well (and I suspect Mopar does too). If I was going to use RTV, it would be Ultra Copper applied in a 1/16" bead with a syringe. My method is to apply the RTV, let it skin for 10-15 minutes, assemble everything finger-tight, then let cure for at least an hour, then torque to spec. Never had a leak doing it that way. Right Stuff should work very well too.
 06-18-2006, 10:55 AM
I would love to see a writeup on that 249-242 setup you've got.
06-18-2006, 11:02 AM
Promptly changed. You should've seen me running back & forth between this write up and game 6 of the Huricanes & Oilers last night.
Yea...I tend to go a bit insane on that stuff. Gonna try the Ultra Copper stuff. I've seen it around.
 06-18-2006, 11:13 AM
Yeah that Orange RTV is the devil. I hate it! I always use Ultra Black or Gray... and not half a tube on a T Case
Very good writeup. When you pull the drain plug, pull the fill plug first. If you can't get it off at least the oil will still be in the T Case. Same for diffs.
06-18-2006, 03:11 PM
Made few changes to reflect the differences between the NP242 & NV242.
New Process made a name change to New Venture. There are 2 versions of the NP242 out there as stated in the 3rd portion of the write-up.
Last edited by zj-monster; 06-18-2006 at 03:25 PM.
06-18-2006, 07:12 PM
It's on here somewhere, no pics, nothing fancy, all I did was use the front case half off my 249 with the input and planetary and all the 242 internals and rear case because I ran into the dreaded planetary gear cut problem. Had to drill one 5/16 hole and plug the 249 range switch hole.
Had it out today, put on about 200 miles of highway,gravel roads and 2 lane trails in the mud and it worked like a charm.
06-19-2006, 07:48 AM
Will that work with parts from an older 231?
07-31-2006, 07:37 PM
No it won't the 231 is shaped different.
01-17-2008, 01:49 AM
my transfer case is not locking in low range, what actuates the locking mechanism?
01-17-2008, 02:58 AM
Is it a NP242? I've had two NP242 now that have failed to lock in low range(ie I shifted into low and had 2wd low, no power going to front axle).
In mine(I only took one of them apart), the shift fork had gotten bent, not quite sure how, but it was definetly bent and the pads on the ends were chewed all up. I had a NP231 "parts" case that I borrowed the pads from and I cann't remember if I bent the NP242 fork back into shape or used the NP231... I think the NP231 was different so I bent the NP242 back to where it was supposed to be, not a 100% though.
Either way check your linkage adjustment and if its good then I think that you are going to have to pull your t-case apart.
01-17-2008, 10:20 AM
The FSM states the same.. either the linkage is out of adjustment, the shift fork is bent/broke or the shift fork is hitting the case.. the last two will require you to break down your case and repair the problem for it to work correctly
01-17-2008, 02:34 PM
Old ass thread and not really the place I would have posted this question but none the less...atleast it seems like you tried to search since you found this post.
Most likely, it's your linkage. That's the problem 90% of the time. Try and manually shift it into gear from under the ZJ and see where that gets you.
10-12-2008, 12:05 AM
I know this is a super old thread but I've got something to add
I broke down my 249 today and saw this:
It was clogging up the oil pickup screen thing. I'm sure it can't be good when 95% of the pickup is covered with excess silicone. Whoever worked on that case last really went overboard, and it probably wasn't too good for it. Not conclusive proof it does harm, but definitely something to watch out for.
10-12-2008, 08:46 AM
I've been meaning to post about using a different sealant, but I haven't seen any recent threads pop up. Since this one is back, might as well post about it in here.
Loctite 574 flange sealant. Cures in the absence of air, so any that is squeezed out can be either wiped off or will dilute in the lube and flushed away. Threebond 1194 is supposed to be even better (it used to be 1104, but has been superseded by 1194). The Threebond stuff is more expensive, but you should be able to find it at motorcycle shops (Harley apparently uses it at the factory to seal engine cases).
Some guys use a piece of waxed dental floss between case halves embedded in the sealer and swear by it. Supposed to compress to .001". I have seen some aviation equipment call for a MILSPEC sealer and size 00 silk thread between case halves. I've never tried either method.
09-29-2009, 12:07 PM
will the rear output shaft bearing for a NP242 (2003 JGC, 4.0) look the same as yours?
I picked on up today at the dealer...and it appears like this:
http://www.napaonline.com/MasterPage...+Shaft+Bearing
Which is right?!? (before I take it apart)
Any good online places recommended to buy parts?
06-21-2010, 01:49 PM
can some tell me if i have to tear the case done to replace the selector shaft seal on the nv 242 dealer says it all has to come apart to change it
10-24-2010, 11:49 PM
Can`t say for sure but the below posting says:
( RTV black which is for auto transmission use as others will dissolve over time )
http://go.jeep-xj.info/HowtoChainChange.htm
Thanks ZJ monster for all your time and effort guys like you MAKE these forums...
10-17-2011, 11:26 AM
I have a 242 just like pictured earlier in the how to.
I just changed all my seals for the TC and the output of the trans. Everything went well exept taking the TC out that top bolt is a real PIA I desided to go in from the top, taking out the center console and moving the shifter. I was happy to be done and over with it. I relised I had the linkage for the TC in the wrong possision so I adjusted. When I was under there I saw some fluid around the rear output. I drove it a few miles to see how bad and it was slinging fluid out of the seal radialy onto the tunnel and exhaust.
Now I have a problem with that seal and I'm not sure where to go with it. I put the seal in with some ATF to lube it, there was some grease on the shaft side when I bought it. I made sure all the mating sufaces were clean and then tapped that seal in and put that lock ring in place. The oil slinger I used was the old one and I'm think is part of the sealing facture here. If I replace with new might it solve this problem?
| « Previous Thread | Next Thread » |
| Thread Information |
Users Browsing this ThreadThere are currently 1 users browsing this thread. (0 members and 1 guests) |