|
|


 01-03-2011, 11:06 AM
I see you went with a modified ford radius arm but why are the arms triangulated so much?
You could run alot less lift if you cut the body some.. just sayin


 01-03-2011, 11:19 AM
There is an ongoing thread on Pirate comparing them to the Iroks:Originally Posted by OrangePower

http://www.pirate4x4.com/forum/showthread.php?t=940923
Looks like a lot of folks are happy with them on our side of the pond. I'm going to guess that the terrain on the "east coast" (actually this typically includes most states east of the Mississippi river when we say "east coast") as well as the north west (Washington, Oregon, etc.) are going to have similar terrain to what you are going to be wheeling on.
Last edited by SirFuego; 01-03-2011 at 11:23 AM.
01-03-2011, 03:59 PM
My neighbors pitbulls are wearing very quickly on the road, but the set of 37's he has on his trail only toyota are insane on every terrain. Go 37"s dude.
01-03-2011, 05:06 PM
They are triangulated that much because in this position they are working very good, I mean they are flexin under it`s own weight. If you make them not so much triangulated they are not working so well because of C bushings.
I can`t wait to see them working on trail.
Regarding lift, I bought 4,5 springs because I wanted to run only 33`s but then I get ford axles and cast wedges. There was no other option to mount spring and in this case I get stuck with aprox. 7 of lift.
I was thinking on selling 4,5 springs and get smaller one but now I see I will go to 35 tires
@it usually runs fine
37 cross my mind but in my country I will have a lot of problems to make ZJ on 35 street legal. 37 will be impossible.
01-03-2011, 05:48 PM
You could always cut a coil or two from the springs without really making them noticeably stiffer. It is common practice, but 2 coils is as far as I would go. If you do that, cut it off in 1/2 coil increments to make sure you don't take off too much. It would likely be cheaper and easier than selling and buying new springs to achieve the same thing.
01-04-2011, 07:33 AM
I will take this in to consideration, thank you for advice
Wright this moment I`m trying to find out how to get PBR radial 35x12,5x17 from USA to my country
01-04-2011, 10:19 AM
Ok so the triangulation of the arms is to get more leverage from the body or because they are normally angled that way so you dont want to bind the bushings? Sorry just trying to understand.
01-04-2011, 05:17 PM
In short: One link
It is hard to explain for me. You can read it in this article
http://www.rme4x4.com/showthread.php?t=47224&page=12
This was my inspiration...
01-04-2011, 05:41 PM
Thanks. I'll check it out.
01-04-2011, 05:59 PM
Another question
How to measure drive shaft length or how to measure to get correct length to make driveshaft.
In front I have old XJ driveshat and I can mount it, but in raid height he is totaly compressed. How much can I cut it off?
01-05-2011, 01:18 PM
Nobody knows anything about driveshaft?
Should I just compress axle and get reading and then drop axle till shocks max out and get another reading and then see how much play do I need on drive shaft.
Another question about drag link, tie-rod and track bar length.
Do they have to be in exactly specified percentage? I thing one of them must have 70% length of another or something like that?
I don`t know if I make sense...
01-05-2011, 01:41 PM
Ideally the track bar and drag link should be the same length and at the same angle, but that rarely happens in the real world. Get them as close as possible in length (the longer the better), but get the angles identical at ride height.
01-05-2011, 03:07 PM
do you plan on building your own driveshaft or having one made?
i could be wrong but i think you want to measure for the shaft at ride height
01-05-2011, 03:23 PM
Thank you Indy, I read about this stuff but I was not sure if this is all. I read somewhere about difference in length between tie rod and drag link. If one is 55 inch another must be 35 inch. I was not sure if this is important.
I plan on building my own driveshaft. I must cut off about an inch from front one and I must add aprox 3 inch on back one. I would like to know on what I must take care of when doing this.
If I`m not mistaken there must be about 2 inch of play left if you look at driveshaft under ride height. But again, this is what I read somewhere...
First hand advice is always better.
01-05-2011, 03:28 PM
What kind of steering are you going with?
01-05-2011, 03:59 PM
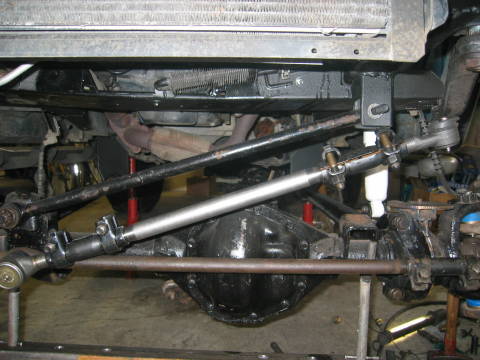
This is what it looks like now
On the end it will look something like this
For drag link I will use Joint`s similar to original but bigger, for track bar I will use 1,25inch tubing and RE heim joints with mis-alignment spacers on both sides.
http://www.rubiconexpress.com/jeeppa...part=QA1EXML12
P.S. Interestning...
http://www.quadratec.com/jeep_knowle...article-68.htm
I like Rockmonkey's build, He (Braden) is a friend of mine, and lives like 15 miles away.
Driveshaft length
For the driveshafts at ride height (static length) you should be able to get away with 2-3" of compression on the driveshaft before it bottoms out.
If you feel the need to test how much you need exactly, lift the front (or rear) end of the up in the air and let the axle droop all the way down.
Then measure center of yoke on the tcase to center of yoke on the axle.
Remove the springs and set it on the bumpstops and measure again.
Set your static length of your driveshaft in the middle of those two numbers.
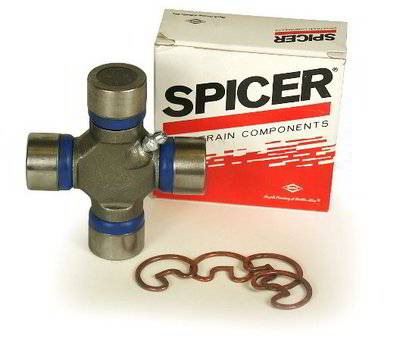
The U-joint yokes that the bronco axles call for is a Spicer 1330 joint. It has the same size (diameter) caps as the stock Jeep 1310 driveshaft ujoints but it has the trunion width (cross size) of a 1350 ujoint.
There are conversion joints available;
I would shy away from them because they are harder to get hold of than normal sizes and if you break one you could be stuck unless you have a spare.
The part # is Spicer part # 5-134x
or the Neapco. Part # is 1-0134
I'm sure you can find one locally or Bronco Graveyard can sell you one
Driveshaft options:
1.) I would use the double cardan joint off the ZJ front (1310) and mate it to the stock bronco front driveline (it will have a similar diameter).
Use it for the either axle, also the "slip and yoke" portion of the bronco driveline has larger (stronger) splines than a xj or zj slip.
2.) If that isn't an option: use a stock XJ or ZJ double cardan style front driveshaft and use a conversion joint (1310 to 1330) at the axle side.
DO NO use a conversion joint in the Double cardan (cv) part of the axle, it will bind and cause serious problems.
3.) You could also change the yokes on the axle to 1310 yokes and use lengthened or shortened off the shelf (or out of the junkyard) XJ or ZJ double cardan style front driveshafts.
Use your dial indicator and some dolly wheels or a piece of angle iron and turn your homemade driveshafts to check for runout before welding them. I've built a few this way to save money. Then I take them to a driveshaft shop to have them balanced for a small fee.
Concerning bumpsteer:
Ideally you want your draglink and trackbar to be as close to the same length and angle as possible to avoid bumpsteer.
This is easier to do if possible, by mounting your frameside trackbar mount at the same height (vertically as the draglink mounts to the pitman arm).
and your axle side trackbar mount at the same height (vertically as the draglink mounts to the tie rod).
Nice build, Good Luck! Keep at it!
Your welcome to look at my old old 44/9" build too
it has a bunch of driveshaft and steering tech
V (this link is in my signature) V
Last edited by Gravesdigger; 01-05-2011 at 06:41 PM.
01-23-2011, 01:00 PM
Little late answer, too little time
Gravesdigger thanks for great answer. I have your build under my favorites for a few months now
I had little time past weeks, so just a little update
I get some parts for building track bar and drag link, I also get u-joints for drive shaft.
At the moment, drive shafts are at my friend`s shop. We cut them and now we have to make them to correct lengths
Pics latter
One mayor thing I get wheels and tires Kumho KL71 35x12,5x15
Me with my 180cm...
My GF
Last edited by OrangePower; 01-23-2011 at 01:03 PM.
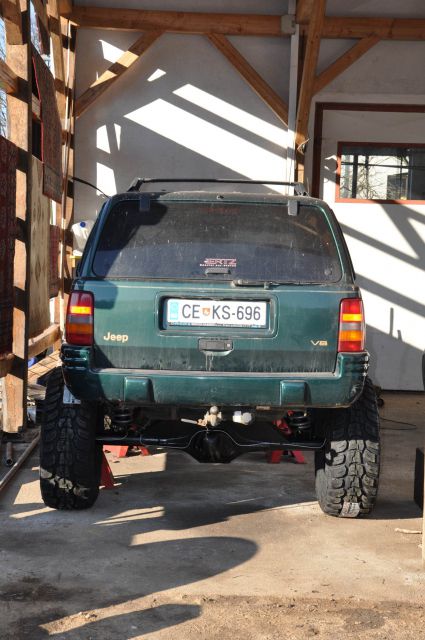
01-23-2011, 07:12 PM
looks like it still has a bit of forward rake. are you going to lower rear or lift front or leave it?
Also be careful of those brake lines on the rear axle, they look a little exposed.
lookin good though!
02-02-2011, 01:51 AM
I will lower rear.
This is what I was doing past few days
Steering:
For now track bar is mounted on original mount on axle side.
Hm...
I was trying to get flares. Bushwacker costs about 600$ in my country and I dont like them because of the look. Iceland flares I can only get from USA so this means that I must pay 450$ for flares and 300$ for shipping. To expensive So I called a friend who help me build front bumper and we get to work:
Cutting:
More cutting (2nd line)
Testing:
We came to this:
Back side:
To be continued...
02-02-2011, 05:36 AM
Nice work. You apparently are a patient person.

 02-02-2011, 07:22 AM
Those flares look very good but it will pay off in the end.
02-02-2011, 09:23 AM
We have very strict laws about this thing. If my tires stick out of the car or if modification is to complex, then Police can take my car and I can`t get it back.
So I must have flares, only option is which one.
I choose this
02-02-2011, 10:20 AM
Why not take some small tube and build a small flare with sheet metal .
 02-02-2011, 10:23 AM
I like this. Super unique way of going about it, and looks like you're pulling it off well!
| « Previous Thread | Next Thread » |
| Thread Information |
Users Browsing this ThreadThere are currently 1 users browsing this thread. (0 members and 1 guests) |