Warning: preg_replace(): The /e modifier is deprecated, use preg_replace_callback instead in ..../includes/class_bbcode.php on line 2958

Warning: preg_replace(): The /e modifier is deprecated, use preg_replace_callback instead in ..../includes/class_bbcode.php on line 2958

Warning: preg_replace(): The /e modifier is deprecated, use preg_replace_callback instead in ..../includes/class_bbcode.php on line 2958

Warning: preg_replace(): The /e modifier is deprecated, use preg_replace_callback instead in ..../includes/class_bbcode.php on line 2958

Warning: preg_replace(): The /e modifier is deprecated, use preg_replace_callback instead in ..../includes/class_bbcode.php on line 2958

Warning: preg_replace(): The /e modifier is deprecated, use preg_replace_callback instead in ..../includes/class_bbcode.php on line 2958
PSC Full Hydro Install For ZJ (PIC HEAVY)

Thread: PSC Full Hydro Install For ZJ (PIC HEAVY)

Page 1 of 3 123 LastLast
Results 1 to 25 of 63
  1. #1 PSC Full Hydro Install For ZJ (PIC HEAVY) 
    Senior Member
    Join Date
    Nov 2006
    Location
    Midlothian Virginia
    Posts
    2,710
    Rep Power
    124
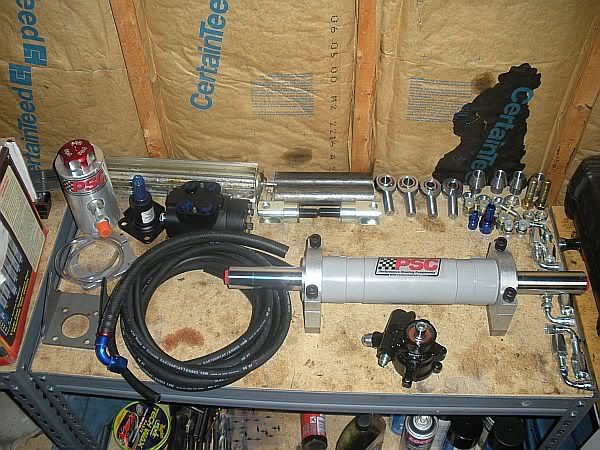
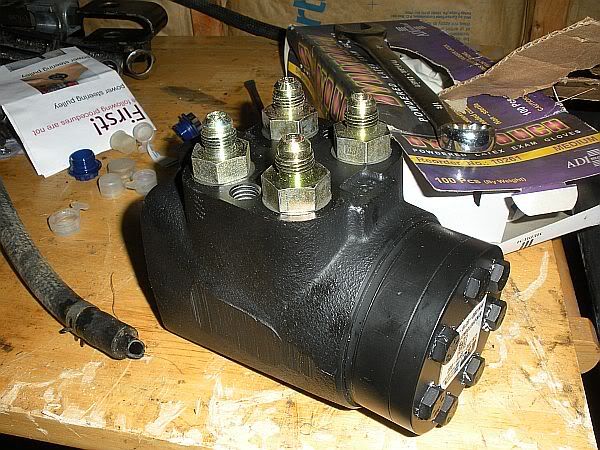
    I bought the PSC kit because it came with about 90% of everything you need to successfully install full hydro onto your rig.
    EVERYTHING you need to install is pictured here.


    The only things that do not come with this kit are a PS cooler and the 3/4" bolts/nuts/lockwashers that are installed into the steering arms. YOU NEED A COOLER.

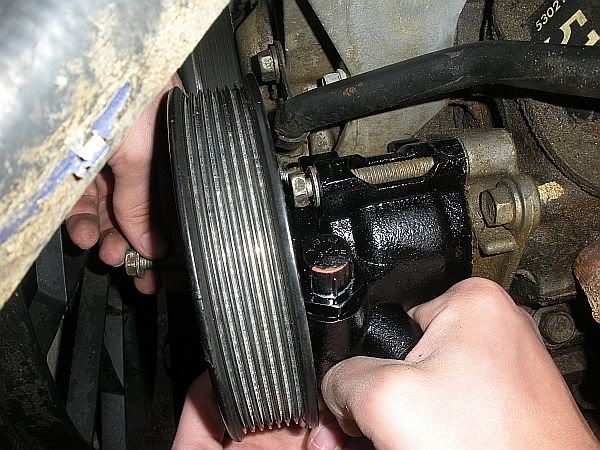
    The first thing you need to do is swap out your PS pump/res for the PSC pump.
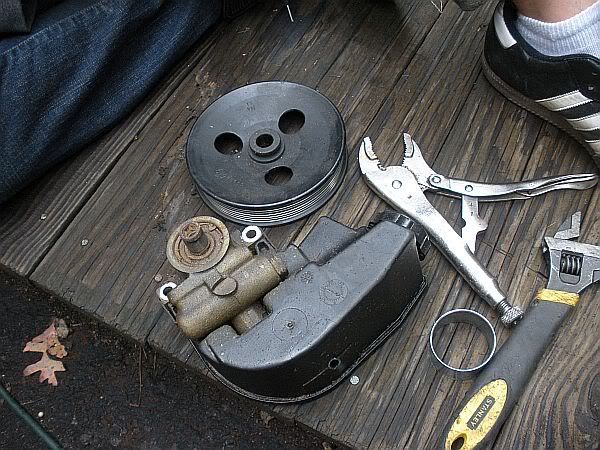
    Unbolt your PS pump by the 3 bolts that hold it on, you will need to take the belt off obviously, then rotate the pully to allow the holes to line up to get a socket onto the bolt heads. Once you remove it you need to remove the pully from the pump to put it onto the new pump.

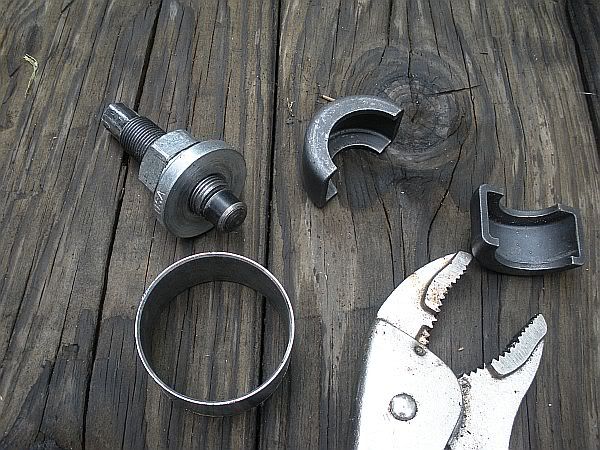
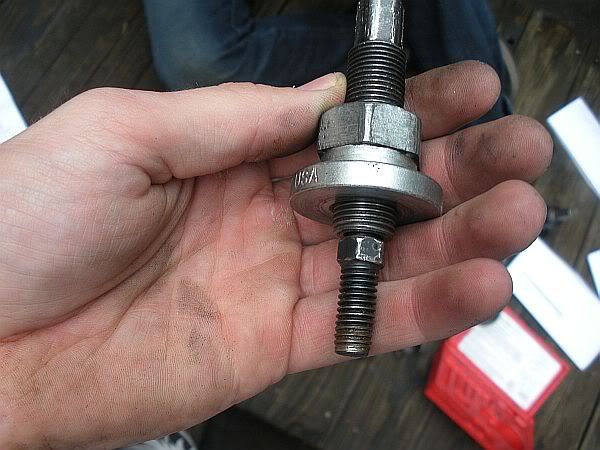
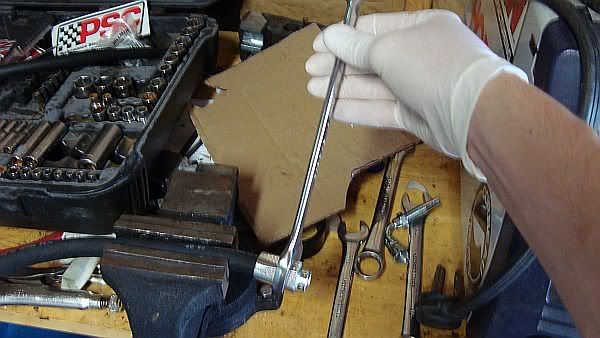
    I rented a puller tool from napa which I returned later for a full refund.
    The parts you need to remove it are so.


    Then apply them in this fashion around the pully.


    I did not have a impact at the time, so I had to do it with wrenches, just hold the giant nut, and screw down the threaded bolt until the pully pops off.


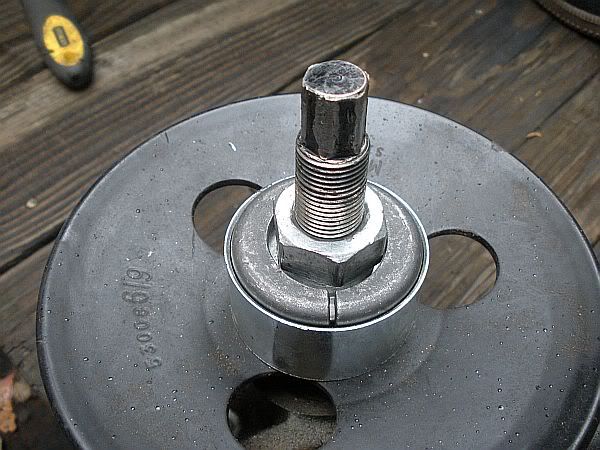
    To install the pully onto the new pump, apply the pieces like so.


    Keep tightening down until the pully is fully seated like so.


    Then install it back onto the jeep, routing the belt in the correct design.


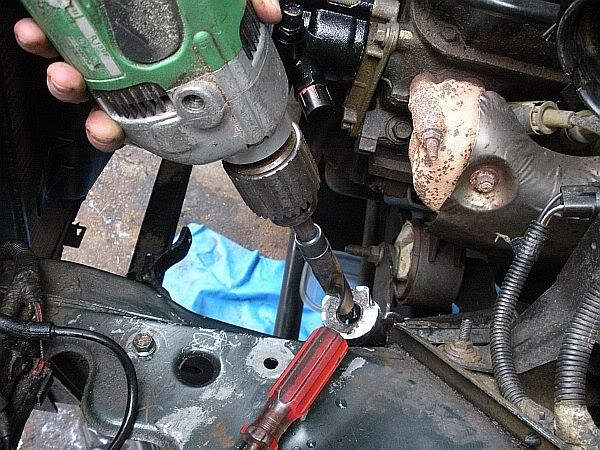
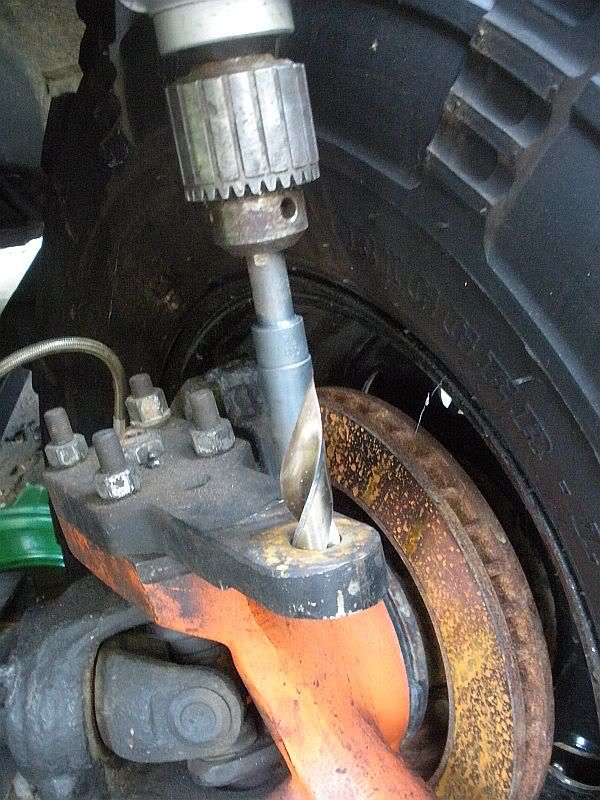
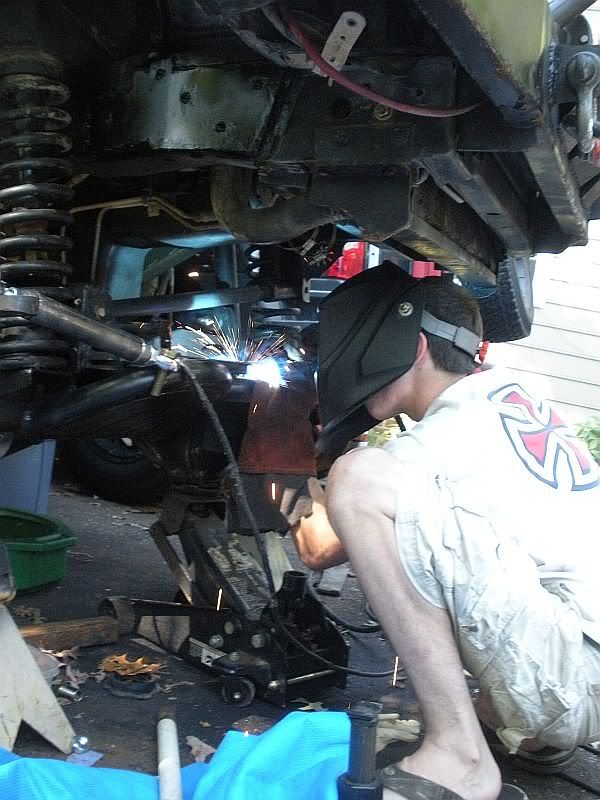
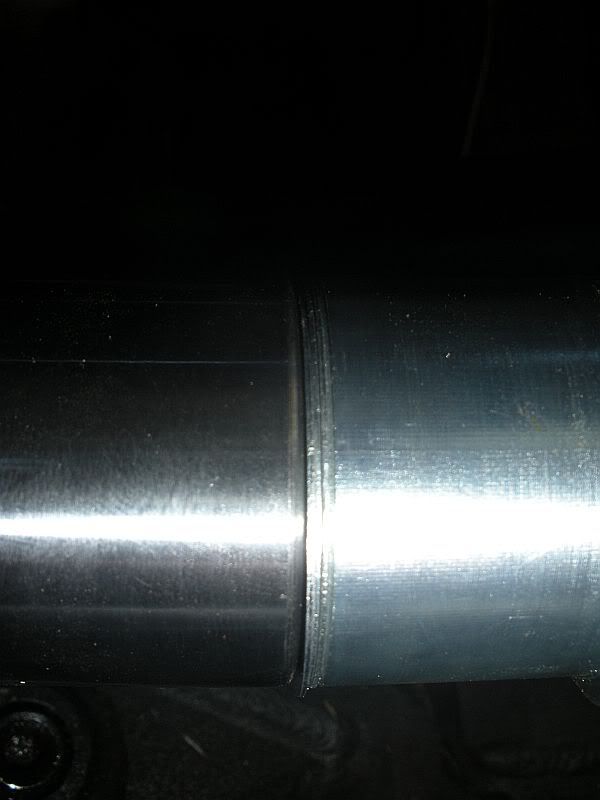
    Next I moved onto the steering shaft. For an extra 20 bucks you can get a steering column that will bolt right into the stock shaft, but at the time I did not know this and just got the basic 3/4" round one. To install this one you need to drill out the stock shaft using a 3/4" drill bit.


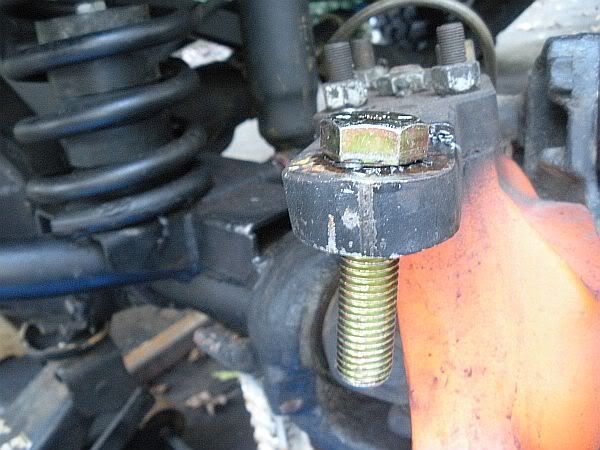
    then insert the steering column into the shaft, and weld it up, be sure to weld it in sections and cover everything to make sure slag doesn't get where you don't want it.


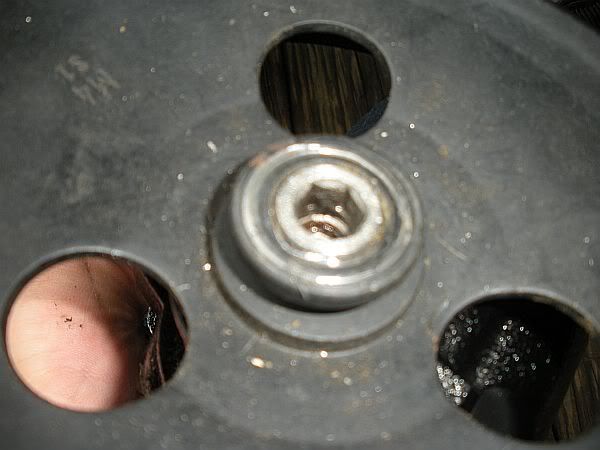
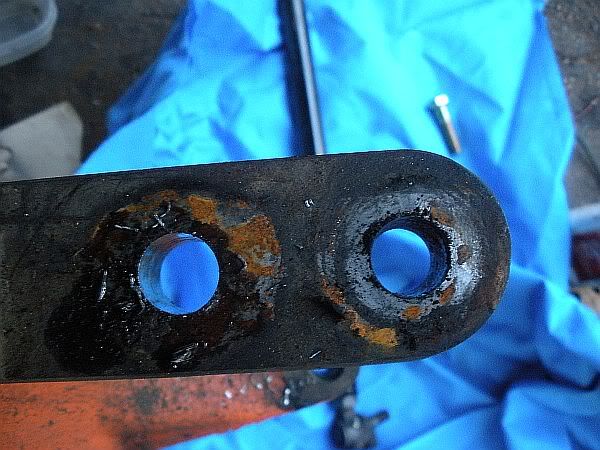
    While you have the drill bit out, go ahead and drill out the steering arms (which are currently drilled to fit a TRE) to 3/4" as well.


    Here is a picture of the 3/4" hole on left, TRE hole on right. It isn't a big difference, but you need to be able to fit the 3/4" bolt into the hole.


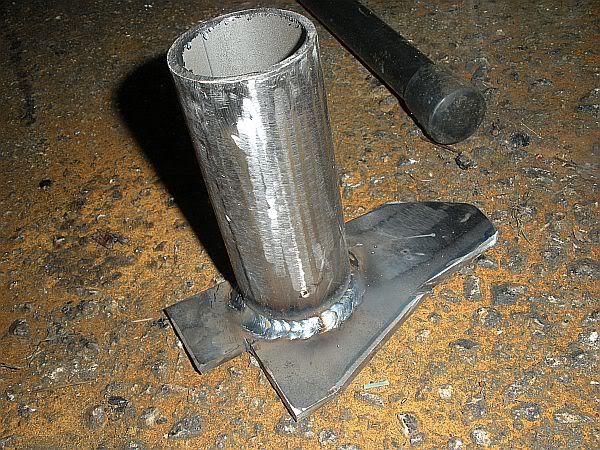
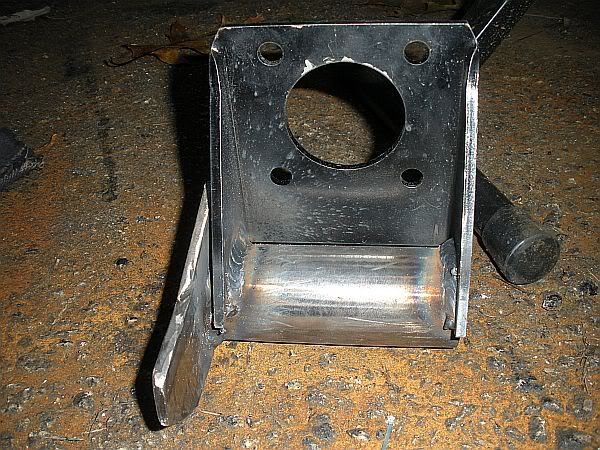
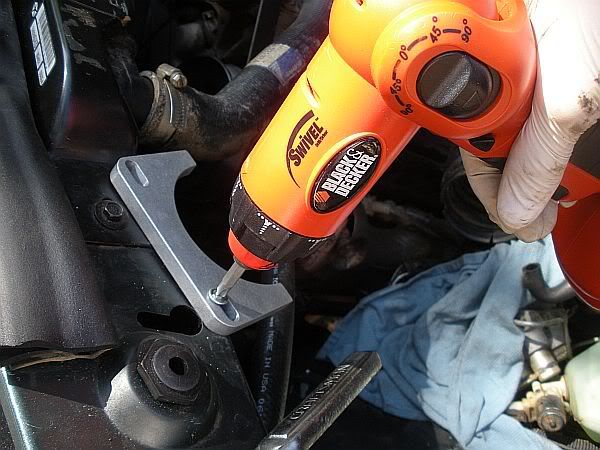
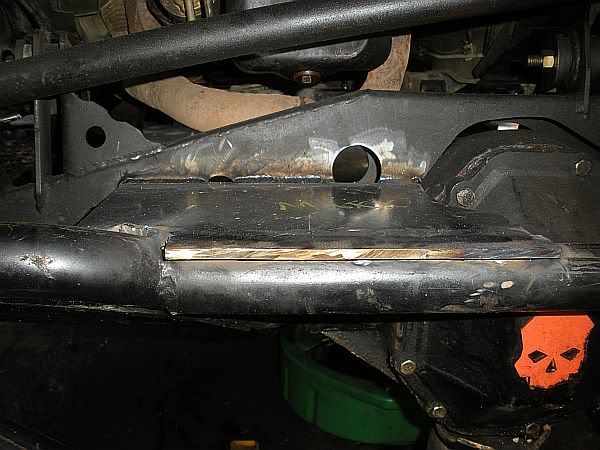
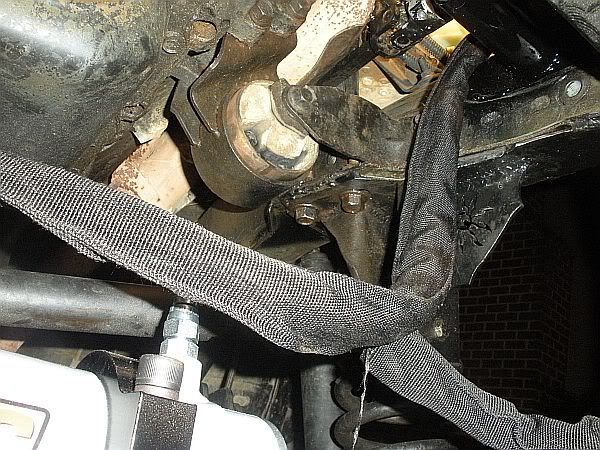
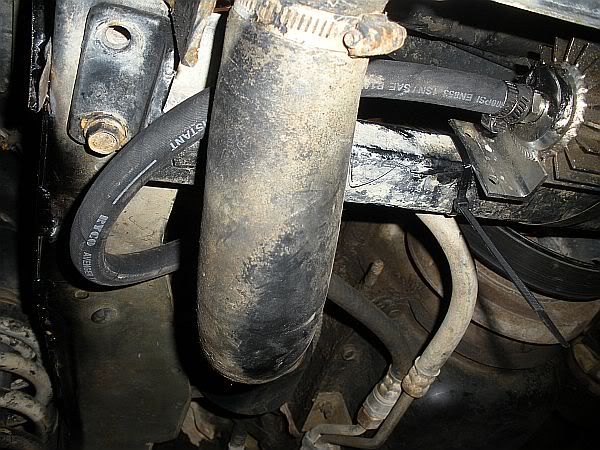
    Next we will move onto the orbital mount. I designed this little fancy bracket and then welded it on top and bottom to the frame rails. Make sure you weld it where you want the orbital, I made mine a hair further than I should, but it still works fine.


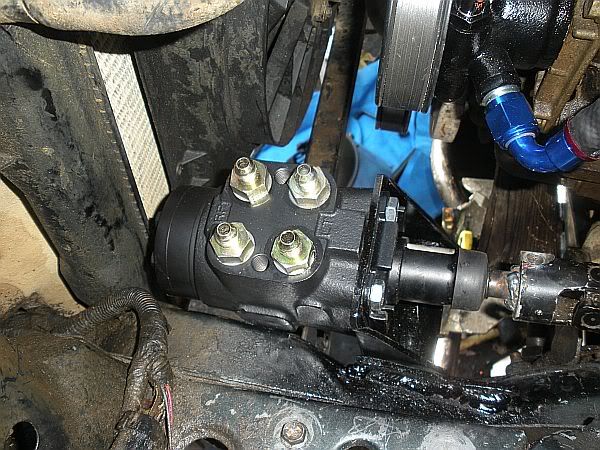
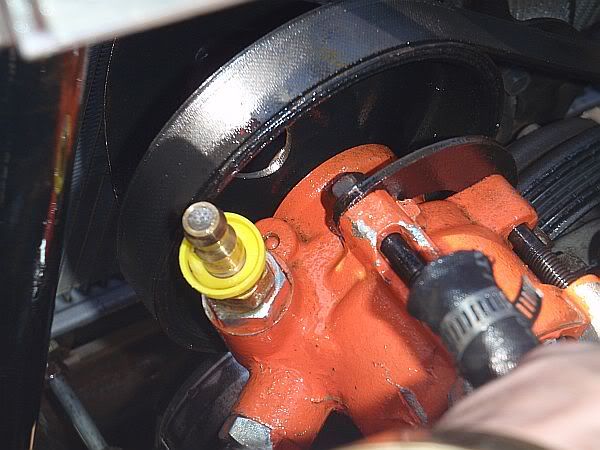
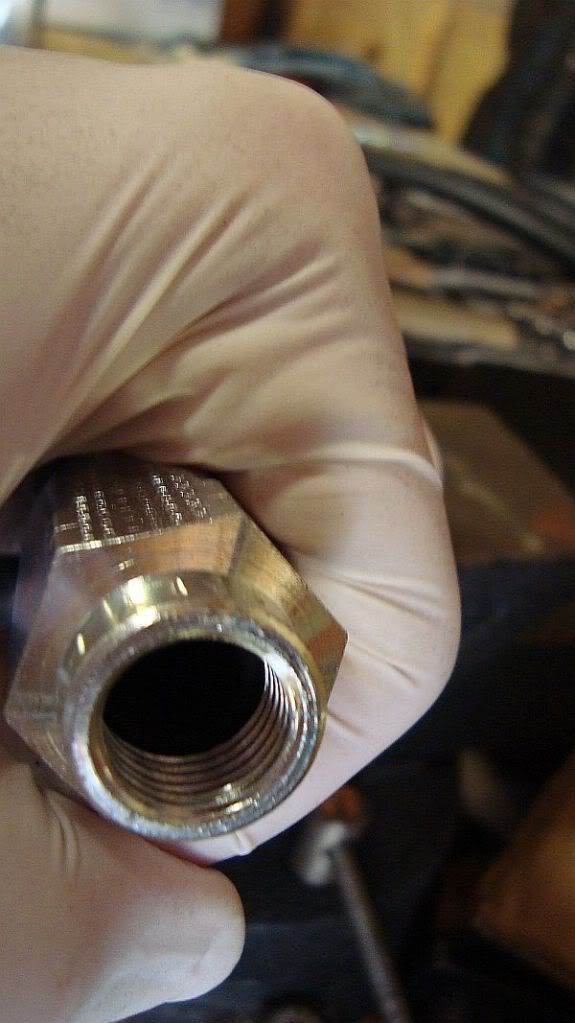
    Now you are ready to mount the orbital, but before you do, make sure to install all of the fittings that came supplied to the kit before you bolt it up, because it can be a pain to get a wrench into the engine bay. You will know when they are tight because the fittings bottom out onto the orbital.


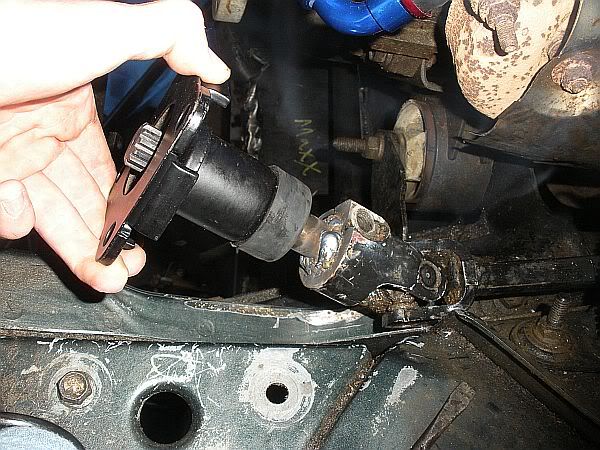
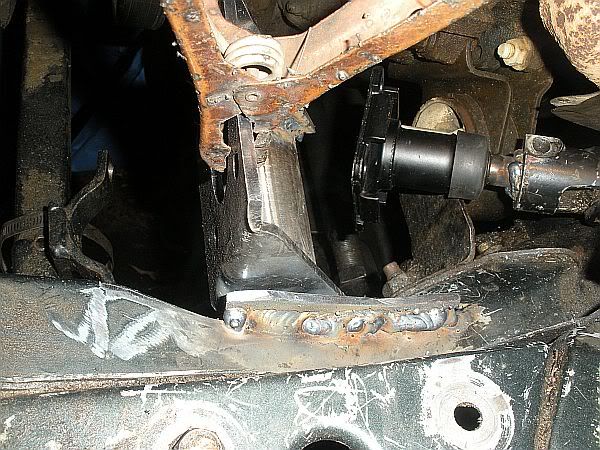
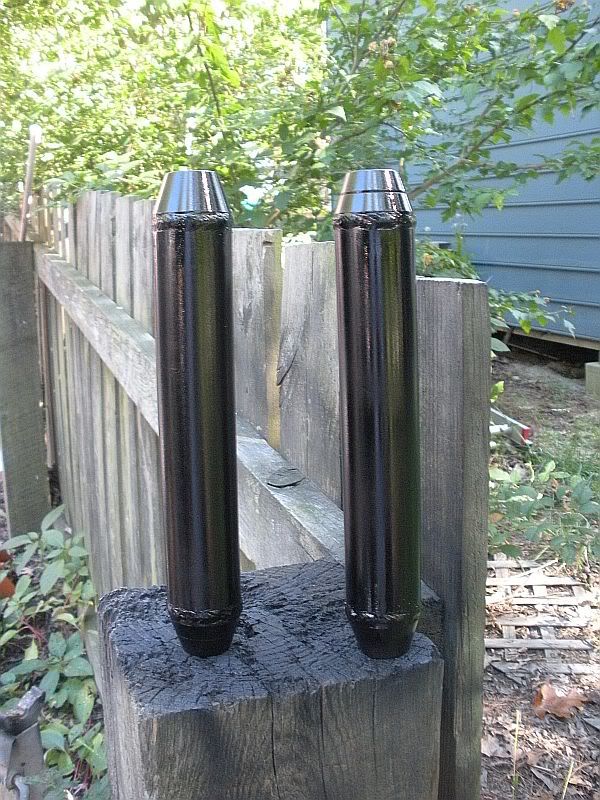
    Hold the orbital with one hand, and push the steering column onto the backside until it all lines up, then thread in the 17mm bolts to securely bolt the orbital to the column. Be careful, that bitch is heavy.


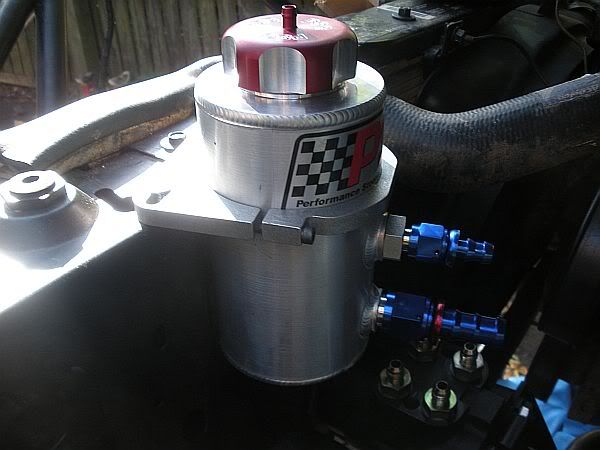
    Next I installed the reservoir. You want it to be the highest point in the steering setup and I opted to put it in front of the pump so that when on hill climbs and obstacles, the pump is not starving for fluid. I used some simple self tapping screws and went to town. keep in mind you want to mount it in a way that you can run lines correctly, and easily.


    Bolt up the reservoir, and install the two pushlock low pressure fittings onto it.


    I had to notch the hood a bit to make sure everything was fine when the hood was closed


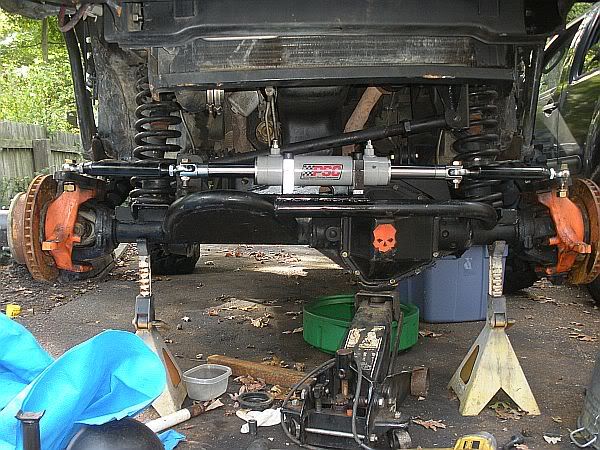
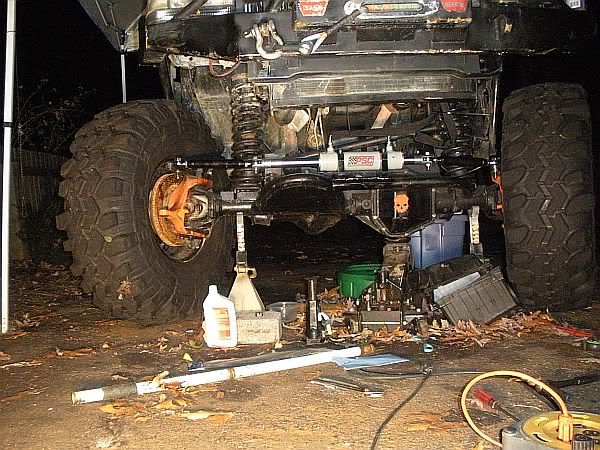
    Now we can start on the actual ram mounting. Ram placement is important because it needs to be setup correctly and in a quality location that will not interfere with anything.
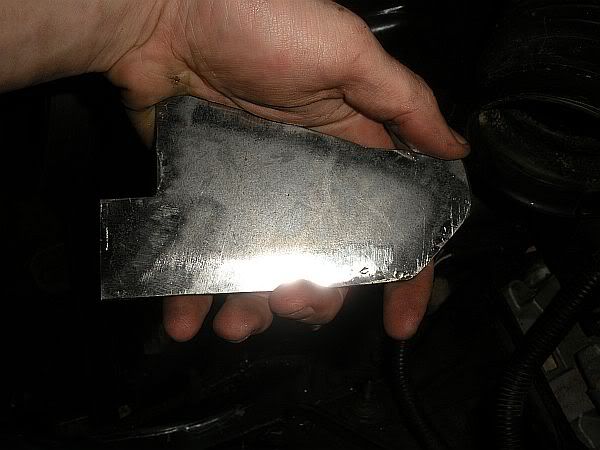
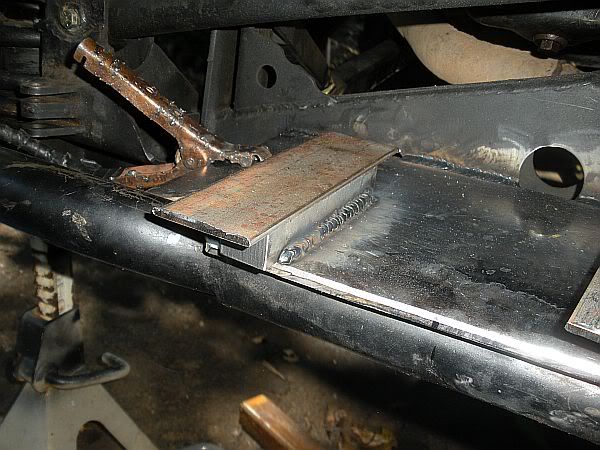
    There are many different ways you could design a mount. I just went off the tube that was protecting my hydro assist, and ran some 1/4" plate back to the TNT truss. I made sure this was 100% flat and about as centered as I could get.


    Ideally it is easier to weld the ram 100% centered but this is not always achievable. Set the ram to where you want it, and then tack on the threaded feet and then weld them up.


    you want to put something on top of them so the slag does not get into the threaded part of the bracket.


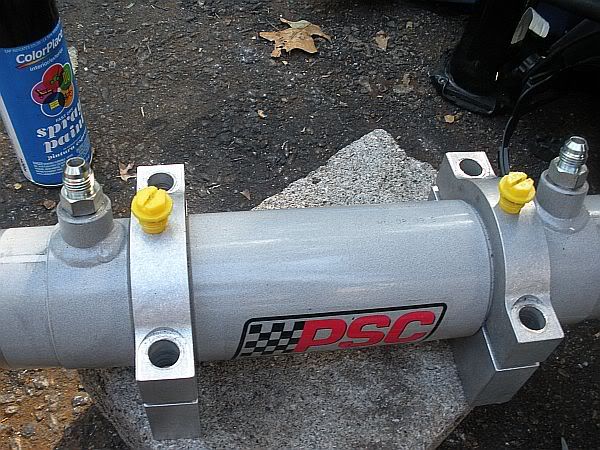
    Now you can bolt up the ram. Take out the yellow plugs and install the two -6 fittings until tight. Make sure you get the ram shaft equal on both sides. My 8" throw ram allowed me to put 4 3/4" shaft showing on either side of the ram. Use a rubber mallet to push the shaft to the right length.


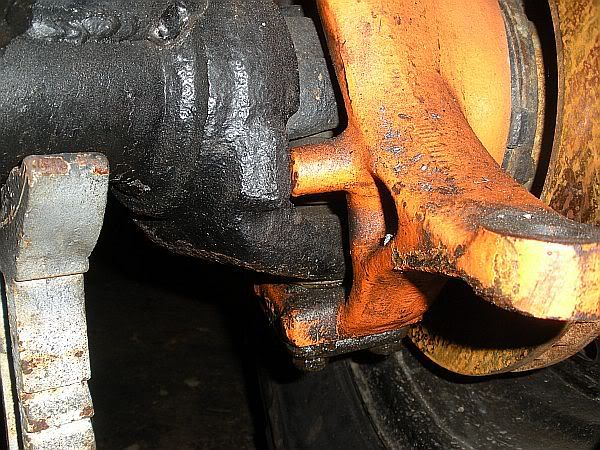
    Make sure your steering is aligned, then cut your tie rod ends to length and weld in the inserts. Mine used the entire length of the amount of tube that PSC gave with the kit. If the ram is not centered, then one tie rod will be shorter than the other.


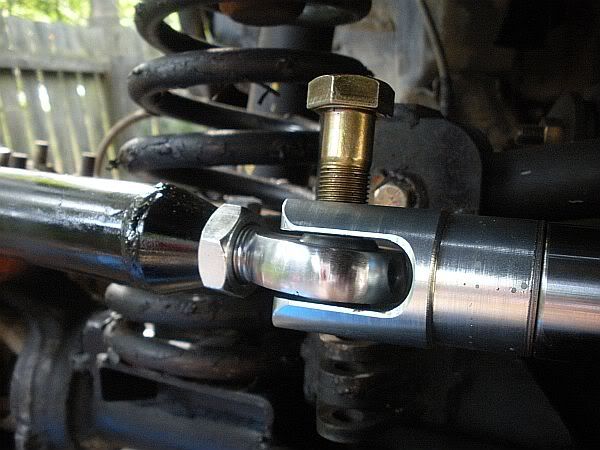
    Thread on the clevises onto the ends of the ram shaft, making sure that the clevises are in a horizontal plane so that you will both heims in the same direction. There are shims that are included with the kit that you might have to take out or add to get the clevises to get in the direction you want. I used all shims on one side, and one shim out on the other.


    Then thread the included heim joints into the tie rod ends, then bolt the links to the steering arms and the clevis. The clevis is threaded on one side, but I still added a nut to the bottom for added security.(and my kit came with the nuts) Whether or not your kit comes with the nuts is up to PSC I guess because Pat's did not come with them.


    After everything is bolted up, it should look something like this.


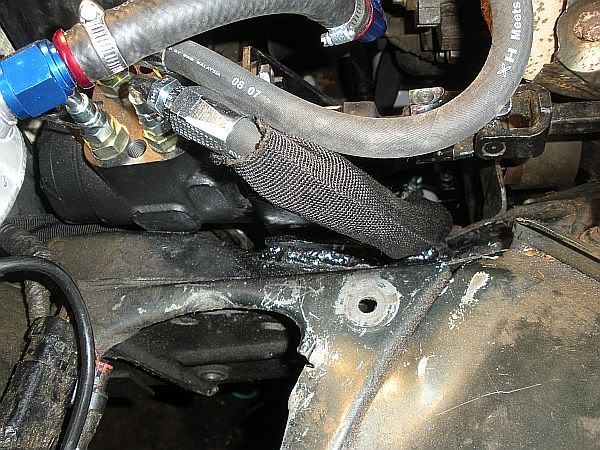
    Now onto the hose routing. PSC includes a diagram with the kit,and obviously, it needs to be followed correctly.

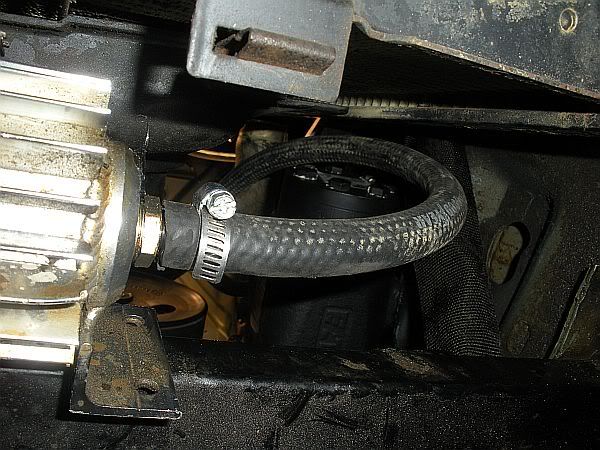
    First I will run the hose from the Main suction port on the res, to the low pressure port on the pump. This line needs to be as short as possible, and always at a downward angle to the pump.
    This is how mine is ran.


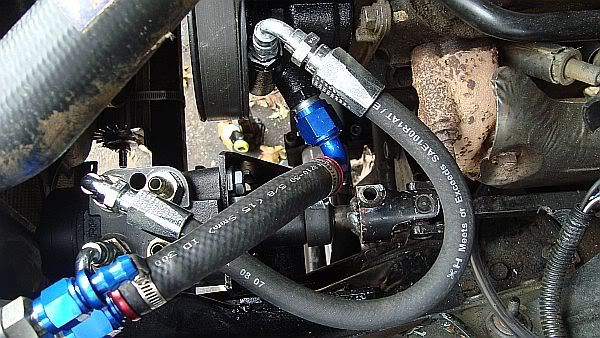
    At first I ran the High pressure hose from the pump to the orbital with the included line and fitting. But then after some friends knocking sense into me, I remembered that the puslock style fitting is NOT something you want with the high pressure side of the system.


    This is what happens if you use the pushlock fitting with the HP port.


    I later changed it with a High pressure line and a reusable fitting that will not blow off.
    95 Rubicon ZJ-60/14b-40" LTBs on 17" ORO beadlocks-full hydro
    Uber one Ton ZJ Tech
    PSC Full Hydro Tech for ZJ
    Crawler Ready Motor Mount Install
    Reply With Quote  
     

  2. #2 Re: PSC Full Hydro Install For ZJ (PIC HEAVY) 
    Senior Member
    Join Date
    Nov 2006
    Location
    Midlothian Virginia
    Posts
    2,710
    Rep Power
    124
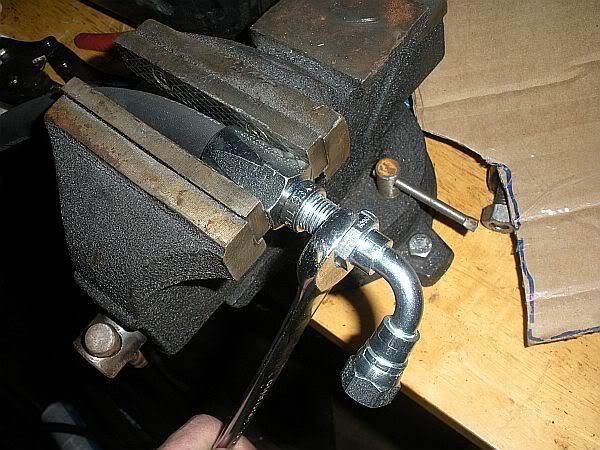
    To install these reusable fittings, do the following. Cut the hose to the length you want, then screw on the threaded portion onto the line. It is left handed thread.


    Screw it on until it bottoms out and meets the threaded part of the fitting.


    then screw on the 90* fitting until it bottoms out, or gets very close and then tweak it to get it at the right direction you want.


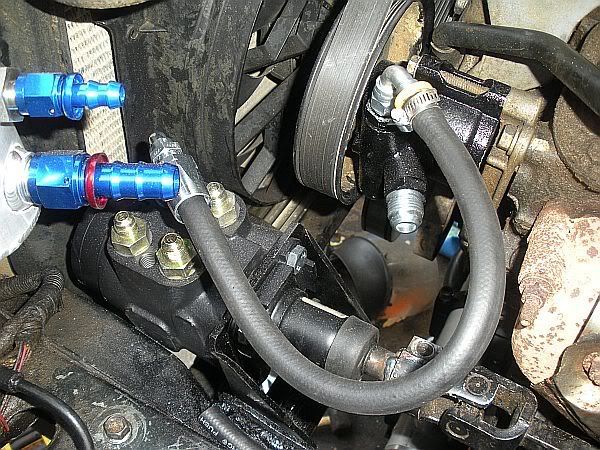
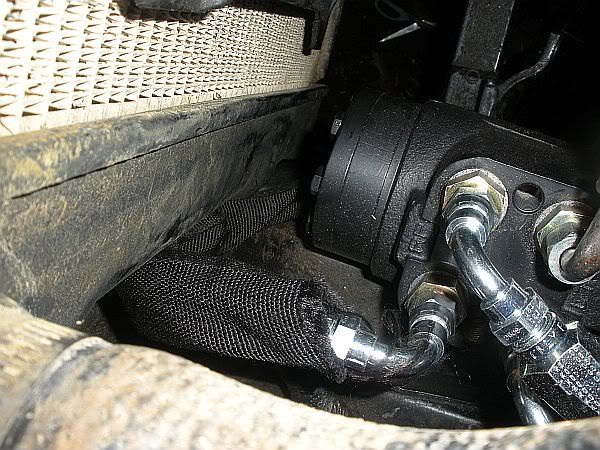
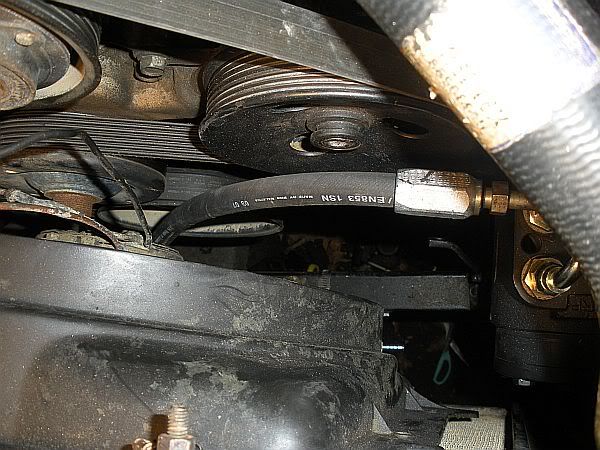
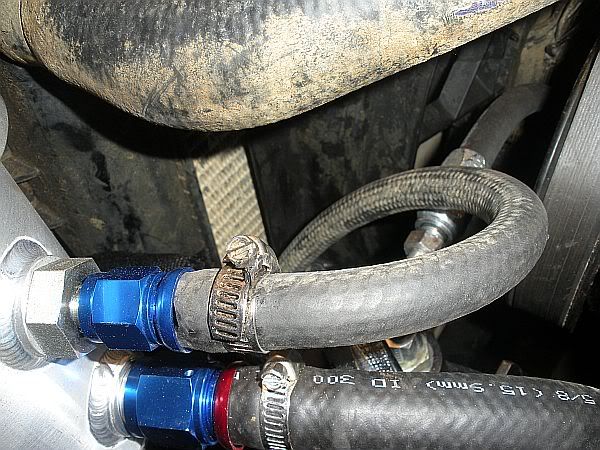
    After getting those two lines run, I went on to mount the main lines of the ram.
    The right port ram is routed like such.


    The left port is mounted like such.


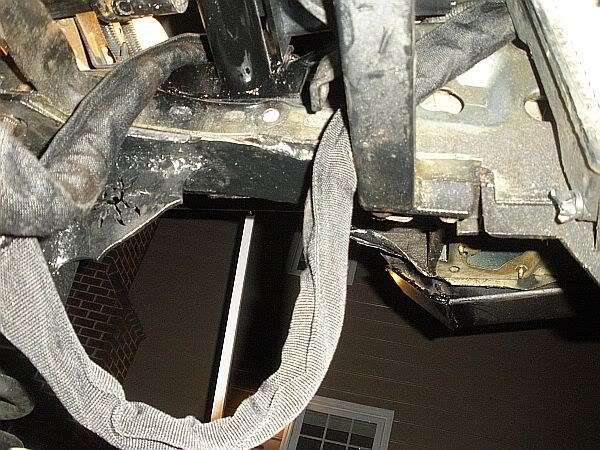
    You want to make sure these lines have slack in them for droop and flex. It was a pain in my ass to run these lines because of the lack of room. My lines also have a protective cover on them to further protect them from rocks or anything that would want to cut the lines.

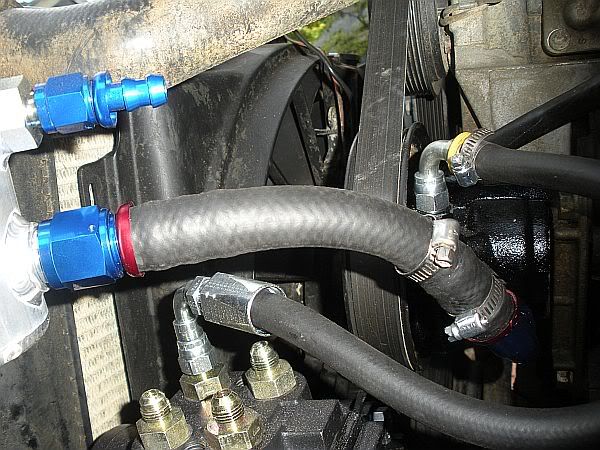
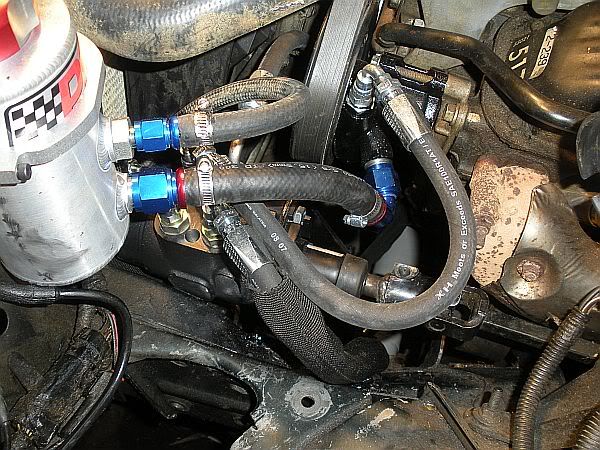
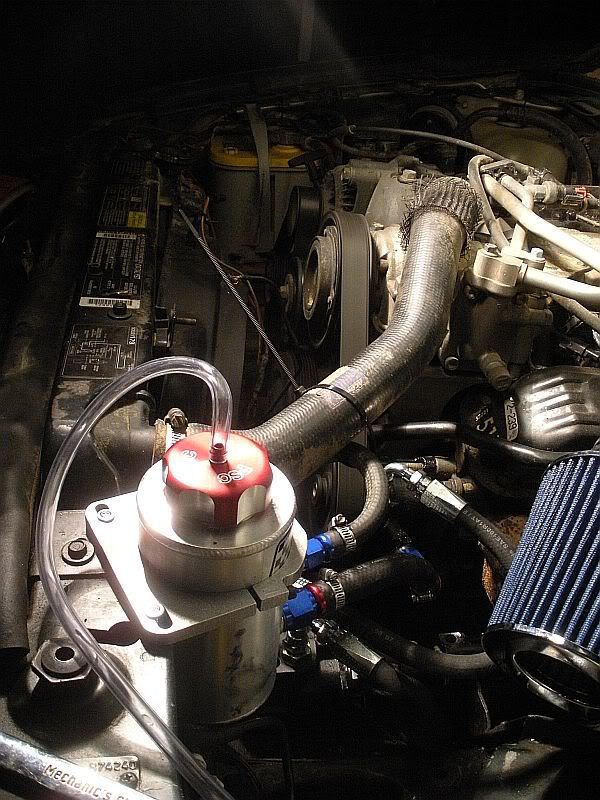
    The cooler needs to be mounted BELOW the reservoir. I opted to keep my steering box brace because it is a good mount for my cooler, and stiffens up the front end a tad.
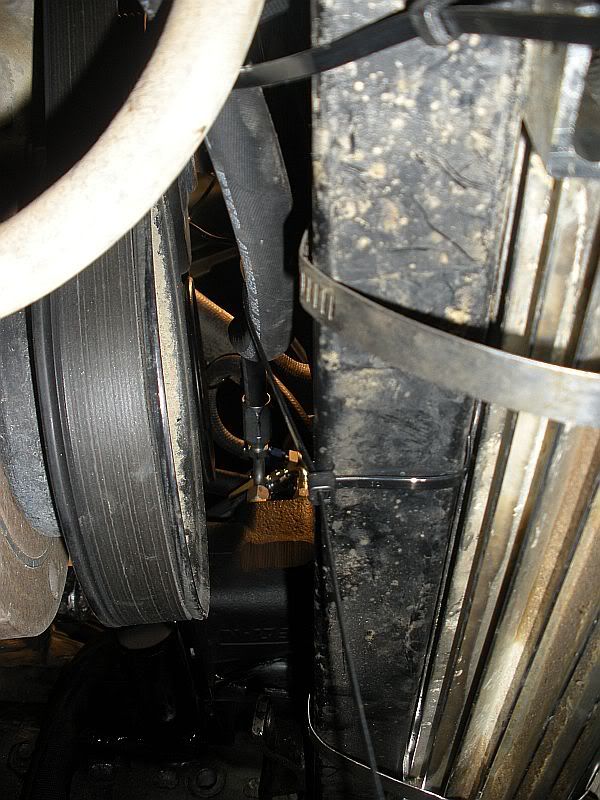
    The first line I ran was from the orbital on the low pressure port, to the far side of the cooler.
    Mine goes from here


    snakes between the engine and fan, I zip tied it later so it will not contact anything, and into the cooler.


    The other side of the cooler runs into the upper port on the reservoir.


    After everything is ran, it will look like so.


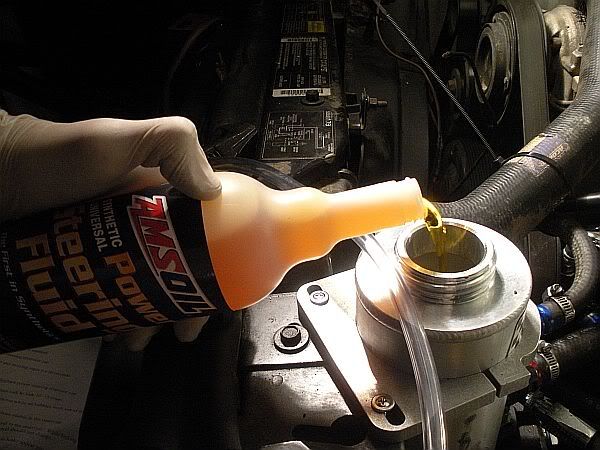
    Make sure everything is tight, and all the hoses are routed correctly and fill up the reservoir with your favorite brand of fluid.


    cycle the wheel a few times to push the fluid into some of the lines and to work air bubbles out like so.


    Then start it up and let it sit for 30 seconds.


    Then let it sit for 10 min with nothing on and let more bubbles work out. Then make sure fluid is at a good level, turn it on, and cycle the steering back and forth about 15 times (with tires off ground). Repeat this until the fluid is at a constant level and no air bubbles are in the system.


    Then you are done! Make sure nothing leaks and take her for a spin. You want the steering to stop itself, not the steering stops. Obviously i have some cutting of steering stops to do.


    I hope this article helped. I might have done things differently than others, but it works for me. I will post a pic and a review of how it drives once I have time to take it for a spin.
    95 Rubicon ZJ-60/14b-40" LTBs on 17" ORO beadlocks-full hydro
    Uber one Ton ZJ Tech
    PSC Full Hydro Tech for ZJ
    Crawler Ready Motor Mount Install
    Reply With Quote  
     

  3. #3 Re: PSC Full Hydro Install For ZJ (PIC HEAVY) 
    Senior Member grandmaster's Avatar
    Join Date
    Dec 2007
    Location
    Utah
    Posts
    496
    Rep Power
    74
    Nice writeup maxxX Good info, I might be using it in about 9 or 10 years
    Reply With Quote  
     

  4. #4 Re: PSC Full Hydro Install For ZJ (PIC HEAVY) 
    Senior Member GSSW Planner chadjans's Avatar
    Join Date
    Jun 2004
    Location
    Arizona
    Posts
    3,131
    Rep Power
    128
    Quote Originally Posted by zj95maxx View Post


    Where did you get this cable wrap?
    Reply With Quote  
     

  5. #5 Re: PSC Full Hydro Install For ZJ (PIC HEAVY) 
    Senior Member
    Join Date
    Jun 2004
    Location
    Atlanta, GA
    Posts
    1,153
    Rep Power
    114
    how did the bearing hold up in the orbital to column adapter through the welding to the u-joint?

    I welded on mine super carefully and in short durations and it still absolutely fubared my bearing. I should've disassembled it. oh well.
    Reply With Quote  
     

  6. #6 Re: PSC Full Hydro Install For ZJ (PIC HEAVY) 
    Senior Member ATL ZJ's Avatar
    Join Date
    Jun 2004
    Location
    Atlanta, GA
    Posts
    6,169
    Rep Power
    191
    Quote Originally Posted by paulkeith View Post
    how did the bearing hold up in the orbital to column adapter through the welding to the u-joint?

    I welded on mine super carefully and in short durations and it still absolutely fubared my bearing. I should've disassembled it. oh well.
    x2 I had that happen once.
    Reply With Quote  
     

  7. #7 Re: PSC Full Hydro Install For ZJ (PIC HEAVY) 
    Senior Member ATL ZJ's Avatar
    Join Date
    Jun 2004
    Location
    Atlanta, GA
    Posts
    6,169
    Rep Power
    191
    Quote Originally Posted by zj95maxx View Post
    Haha that's not the magical fluid for full hydro systems. You might as well have just bought regular autozone p/s fluid.

    THIS is the holy grail amsoil fluid.
    Last edited by ATL ZJ; 10-12-2009 at 03:31 PM.
    Reply With Quote  
     

  8. #8 Re: PSC Full Hydro Install For ZJ (PIC HEAVY) 
    The Oil Dude MallCrawlin Vendor
    Staff
    Cue-Ball's Avatar
    Join Date
    Sep 2004
    Location
    Napa, Ca.
    Posts
    4,809
    Rep Power
    131
    Quote Originally Posted by ATL ZJ View Post
    Haha that's not the magical fluid for full hydro systems. You might as well have just bought regular autozone p/s fluid.

    THIS is the holy grail amsoil fluid.
    You're right there the Tractor fluid is the bomb!!!!!!!!!!!!!!
    Your #1 Source for Amsoil Lubricants

    Lube it or Loose it!

    Reply With Quote  
     

  9. #9 Re: PSC Full Hydro Install For ZJ (PIC HEAVY) 
    Senior Member
    Join Date
    Nov 2006
    Location
    maryland
    Posts
    1,319
    Rep Power
    88
    very nice write up. Out of curiosity how is the speed of turning the wheels lock to lock compared to your old set up?
    93ish zj, d60s, 38.5 maxxis, and a bunch of other expensive parts to make them work.

    Truck stacks, for when your trucks nuts are just not gay enough anymore.
    Reply With Quote  
     

  10. #10 Re: PSC Full Hydro Install For ZJ (PIC HEAVY) 
    Senior Member
    Join Date
    Nov 2006
    Location
    Midlothian Virginia
    Posts
    2,710
    Rep Power
    124
    Quote Originally Posted by chadjans View Post
    Where did you get this cable wrap?
    http://www.discounthydraulichose.com...nps-parent.htm
    Nylon Protective Sleeve 1.05" ID (NGB-0121, by the foot) $1.25 a foot
    Quote Originally Posted by paulkeith View Post
    how did the bearing hold up in the orbital to column adapter through the welding to the u-joint?

    I welded on mine super carefully and in short durations and it still absolutely fubared my bearing. I should've disassembled it. oh well.
    I burned it on fast, then spun it after wards and it sounded fine.

    Quote Originally Posted by ATL ZJ View Post
    Haha that's not the magical fluid for full hydro systems. You might as well have just bought regular autozone p/s fluid.

    THIS is the holy grail amsoil fluid.
    well fuck, oh well.

    Quote Originally Posted by slim616 View Post
    very nice write up. Out of curiosity how is the speed of turning the wheels lock to lock compared to your old set up?
    It honestly turns about the same. I will let you know once I test drive it.
    95 Rubicon ZJ-60/14b-40" LTBs on 17" ORO beadlocks-full hydro
    Uber one Ton ZJ Tech
    PSC Full Hydro Tech for ZJ
    Crawler Ready Motor Mount Install
    Reply With Quote  
     

  11. #11 Re: PSC Full Hydro Install For ZJ (PIC HEAVY) 
    Senior Member canadian_driver's Avatar
    Join Date
    Apr 2006
    Location
    Canada, somewhere
    Posts
    1,731
    Rep Power
    107
    is the power of a hydro steering system really enough to damage your axle through the steering stops?
    This person should be taken as seriously as a heart attack while piloting a zeppelin over a bacon factory, which is the most serious of heart attacks, because if that zeppelin crashes into that bacon factory all of us will be without bacon and that simply will not do.
    Reply With Quote  
     

  12. #12 Re: PSC Full Hydro Install For ZJ (PIC HEAVY) 
    Senior Member AgitatedPancake's Avatar
    Join Date
    Feb 2006
    Location
    Sac, California
    Posts
    3,391
    Rep Power
    143
    I think you can blow/damage the seals in the ram if it hits the locks with too much pressure, but don't quote me on that.
    The Blue Submarine
    2001 Grand Cherokee (WJ) 4.7

    Life’s journey is not to arrive at the grave safely, in a
    Well preserved body, but rather to skid in sideways,
    Totally worn out, shouting “HOLY SHIT, WHAT A
    RIDE!”
    Reply With Quote  
     

  13. #13 Re: PSC Full Hydro Install For ZJ (PIC HEAVY) 
    Senior Member
    Join Date
    Dec 2007
    Location
    SL,UT
    Posts
    2,189
    Rep Power
    157
    Quote Originally Posted by AgitatedPancake View Post
    you can blow/damage the seals in the ram if it hits the locks with too much pressure
    Too late.
    Quote Originally Posted by IndyZJ View Post
    The password is newbgasm.
    www.crawlerready.com
    "For The Truly Addicted!"

    Reply With Quote  
     

  14. #14 Re: PSC Full Hydro Install For ZJ (PIC HEAVY) 
    Senior Member
    Join Date
    Nov 2006
    Location
    Midlothian Virginia
    Posts
    2,710
    Rep Power
    124
    Quote Originally Posted by CrawlerReady View Post
    Too late.
    what?

    I will be trimming down the stops.
    95 Rubicon ZJ-60/14b-40" LTBs on 17" ORO beadlocks-full hydro
    Uber one Ton ZJ Tech
    PSC Full Hydro Tech for ZJ
    Crawler Ready Motor Mount Install
    Reply With Quote  
     

  15. #15 Re: PSC Full Hydro Install For ZJ (PIC HEAVY) 
    Senior Member UTChavok's Avatar
    Join Date
    Jun 2008
    Location
    Clemson, SC
    Posts
    636
    Rep Power
    71
    Quote Originally Posted by zj95maxx View Post
    what?

    I will be trimming down the stops.
    Pretty sure he meant to late as in the dont quote me on that.

    Nice write up though.
    -Ronnie
    98 5.9 on 35s
    Subscribe to our Channel: http://www.youtube.com/user/ClemsonOffroadClub
    Reply With Quote  
     

  16. #16 Re: PSC Full Hydro Install For ZJ (PIC HEAVY) 
    Senior Member GSSW Planner chadjans's Avatar
    Join Date
    Jun 2004
    Location
    Arizona
    Posts
    3,131
    Rep Power
    128
    The ram should be hitting the max stroke AT THE SAME TIME the knuckles hit the stops.

    Otherwise kiss your knuckles goodbye.
    Reply With Quote  
     

  17. #17 Re: PSC Full Hydro Install For ZJ (PIC HEAVY) 
    Senior Member ATL ZJ's Avatar
    Join Date
    Jun 2004
    Location
    Atlanta, GA
    Posts
    6,169
    Rep Power
    191
    Quote Originally Posted by chadjans View Post
    The ram should be hitting the max stroke AT THE SAME TIME the knuckles hit the stops.

    Otherwise kiss your knuckles goodbye.
    Chad why do you need stops? Why not just let the cylinder limit steering travel?
    Reply With Quote  
     

  18. #18 Re: PSC Full Hydro Install For ZJ (PIC HEAVY) 
    Senior Member GSSW Planner chadjans's Avatar
    Join Date
    Jun 2004
    Location
    Arizona
    Posts
    3,131
    Rep Power
    128
    Quote Originally Posted by ATL ZJ View Post
    Chad why do you need stops? Why not just let the cylinder limit steering travel?
    This would be a valid alternative.

    Although we all know if his stops are hitting before the ram things must be changed.
    Reply With Quote  
     

  19. #19 Re: PSC Full Hydro Install For ZJ (PIC HEAVY) 
    Senior Member
    Join Date
    Nov 2006
    Location
    Midlothian Virginia
    Posts
    2,710
    Rep Power
    124
    Reid racing knuckles have longer than usual stops for the purpose of trimming to desired length. Mine will be trimmed down to attempt to get steering to stop itself.
    95 Rubicon ZJ-60/14b-40" LTBs on 17" ORO beadlocks-full hydro
    Uber one Ton ZJ Tech
    PSC Full Hydro Tech for ZJ
    Crawler Ready Motor Mount Install
    Reply With Quote  
     

  20. #20 Re: PSC Full Hydro Install For ZJ (PIC HEAVY) 
    ....... Lifetime Supporter rstrucks's Avatar
    Join Date
    Apr 2008
    Location
    Tn
    Posts
    1,511
    Rep Power
    106
    Also, wouldn't allowing the cylinder to be the travel limiter put the cylinder at risk of being damaged? Say you got the tire wedged in a rock and momentum/gravity/weight of the vehicle was twisting the tire and the knuckle trying to overextend the cylinder? I don't know the answer and have never witnessed this happening, anybody else?

    EDIT; after thinking for a second, I guess all hydraulic cylinders stop themselves when you reach the travel limit. Internal stops?

    Guess who didn't take the hydraulics class at tech school.
    Last edited by rstrucks; 10-14-2009 at 10:50 PM.
    Thank you to those that serve our country.
    Reply With Quote  
     

  21. #21 Re: PSC Full Hydro Install For ZJ (PIC HEAVY) 
    My avatar isn't animated Lifetime Supporter SirFuego's Avatar
    Join Date
    Nov 2006
    Location
    Elma, NY (near Buffalo)
    Posts
    2,765
    Rep Power
    144
    I have no experience with full hydro. I'm not a mechanical engineer, but I am a computer engineer and stayed in a number of Holiday Inn Expresses. Here is my line of thinking for setting steering stops.

    Setting the steering stops such that it limits the throw of the ram is setting yourself up for knuckle failure or possibly blowing a seal (get your mind out of the gutter, I would never do that to a seal).

    If you don't have any steering stops, the ram will stop itself. However, when your steering is maxed out by the ram, any additional force on the knuckle (i.e. wheels at full lock with the rig pointed downhill) will be transferred to the maxed out steering ram -- possibly damaging it. I believe this is the same line of thinking as Ryan.

    So you want your steering stops to be set to when your ram maxes out since there are bad situations that could occur if they aren't.

    Please feel free to point out any errors in my line of thought.

    Do the reid knuckles have steering stops on the front and back of the knuckle?
    Last edited by SirFuego; 10-14-2009 at 11:22 PM.
    Quote Originally Posted by SB406
    I think that's your signature move.
    "The Former"- Lay Jeep against obstacle in trail. Mat gas pedal. Form Jeep to the shape of obstacle.
    Robot
    Reply With Quote  
     

  22. #22 Re: PSC Full Hydro Install For ZJ (PIC HEAVY) 
    ....... Lifetime Supporter rstrucks's Avatar
    Join Date
    Apr 2008
    Location
    Tn
    Posts
    1,511
    Rep Power
    106
    Quote Originally Posted by SirFuego View Post
    I not a mechanical engineer
    You not an english major either!


    Thank you to those that serve our country.
    Reply With Quote  
     

  23. #23 Re: PSC Full Hydro Install For ZJ (PIC HEAVY) 
    ....... Lifetime Supporter rstrucks's Avatar
    Join Date
    Apr 2008
    Location
    Tn
    Posts
    1,511
    Rep Power
    106
    Quote Originally Posted by SirFuego View Post
    I'm not a mechanical engineer
    Damn, your quick, I'm a....
    Thank you to those that serve our country.
    Reply With Quote  
     

  24. #24 Re: PSC Full Hydro Install For ZJ (PIC HEAVY) 
    My avatar isn't animated Lifetime Supporter SirFuego's Avatar
    Join Date
    Nov 2006
    Location
    Elma, NY (near Buffalo)
    Posts
    2,765
    Rep Power
    144
    Dammit, you read that before my typical post-post grammatical corrections

    I'd say that about 90% of my multi-sentence posts are edited at least once to correct some error within about 5 minutes of posting... But we digress...
    Quote Originally Posted by SB406
    I think that's your signature move.
    "The Former"- Lay Jeep against obstacle in trail. Mat gas pedal. Form Jeep to the shape of obstacle.
    Robot
    Reply With Quote  
     

  25. #25 Re: PSC Full Hydro Install For ZJ (PIC HEAVY) 
    My avatar isn't animated Lifetime Supporter SirFuego's Avatar
    Join Date
    Nov 2006
    Location
    Elma, NY (near Buffalo)
    Posts
    2,765
    Rep Power
    144
    I figured I would add these from other threads since they should add good tech to the thread. Both of these were in response to "Why choose PSC instead of other options (Howe, POS, etc.)?". Click on that fancy little white arrow next to the username in the quote block to go to the appropriate thread those comments were originally posted in.

    Quote Originally Posted by ATL ZJ View Post
    Mostly cost. The POS kit is better than PSC's but it's more expensive, and Howe has some nice stuff too but I didn't look at them as much. Actually my system is really about 50% PSC, 25% POS, and 25% custom. I knew I wanted to have a balanced cylinder, especially for the little bit of go-fast that we do. I didn't want unequal numbers of turns right/left that you get with a "single ended" cylinder and the likelihood of overcorrection. Plus I also liked the idea of having a little return to center.

    I priced out the DE cylinder from surplus center that some of my friends run, that has the feet welded on, but I kept coming back to the PSC cylinder for its ease of mounting. And I've since come across cheaper sources for quality orbitals, but at the time, the PSC orbital was the most cost-effective, guaranteed quality valve I found. Then I was shopping field-servicable fittings and I couldn't find any for a better deal than PSC's kit. So I bought the kit.

    That said, PSC's kit lacks in a few areas. They really short you on the hose they provide, so I bought a ton extra from discount hydraulic hose to have as spare hose... because why have field-serviceable fittings if you don't have hose to make a trail repair with? And it's common knowledge that their pumps are horrible. So I passed on their pump and res and called POS for that. I run a POS TC pump that's been awesome. IMO it's the best balance of reliablity and performance you can get in a TC pump. I also run the appleton cooler/filter/reservoir, which I got from POS and is bling but worth it. It's unvented and doesn't puke like all the PSC reservoirs I see spewing their fluid all over the trail. The last area I wanted to improve over PSC's kit was the suction line from the res to the pump. The pump and res use -10an fittings but I upsized to massive suction hose that I sourced from discount hydraulic hose and found some oddball adapter fittings from a place called clearwater hydraulics in Idaho. I upsized that hose because I didn't want to have fluid cavitating if the pump was not able to get fluid fast enough. Lastly, I run a p/s cooler that was actually a transmission cooler out of the radiator of an FJ80 that seems to work great.

    My steering goals for this upcoming rebuild are to inboard my frame-side lower link mounts to let the tires clear the links and finally get my full range of steering, and to finally dial in the alignment. Right now it pulls to the right slightly and you have to keep turning the wheel to the left just barely, to go straight on the highway. I'm also going to try the stock LQ4 pump for ease of mounting on the new setup, so my tc pumps (POS pump and spare) are up for grabs if anyone's interested.
    Quote Originally Posted by zj95maxx View Post
    I chose the PSC kit because I do not really know much about the others.
    Pat has the PSC kit and it has worked well for him so far. Only problem I noticed on this past trip was that the ram seems to have moved in the mounts from side to side. That could be because the allen head bolts have loosened up a bit. Thankfully the new design of the ram I have, has recesses in the ram so it should elminate side to side movement if by chance my bolts arent as tight as they should be.

    PSC has a great kit at a great price. I priced out everything I needed by buying parts from different areas of the market, but it was pretty much the exact same cost at a much bigger hassle.

    Having ONE box show up to my door with EVERYTHING I need is much more appealing to me than having 5 boxes show up at different times with different companies parts.(not saying PSC makes all their parts..)

    I got this kit for the old September price of 1375 shipped instead of the current 1420 shipped because someone cancelled there order and I was able to snag it up at the old price.

    Only thing this kit does not come with is the 3/4" bolts, nuts, and lock washers for the steering arms. A cooler does not come with the kit as well. I have the Derale cooler though, and it works well.
    Quote Originally Posted by SB406
    I think that's your signature move.
    "The Former"- Lay Jeep against obstacle in trail. Mat gas pedal. Form Jeep to the shape of obstacle.
    Robot
    Reply With Quote  
     

Page 1 of 3 123 LastLast
Thread Information
Users Browsing this Thread

There are currently 1 users browsing this thread. (0 members and 1 guests)

Posting Permissions
  • You may not post new threads
  • You may not post replies
  • You may not post attachments
  • You may not edit your posts
  •