
|
|


 10-17-2012, 09:14 PM
I should add that I got these dies from billybob12 on Pirate. Great vendor there. Based on his posts there I did not go thicker than 11 gauge with his dies and used a lot of WD-40 for lube while pressing the dimples. I used the medium set he sells to do all my work. They still look to be in great shape. Some of the guys have what may be considered higher quality dies but for my needs I could not be more pleased.


 10-18-2012, 12:11 AM
whats the overall thickness of this? including the structural bracing and without?
 10-18-2012, 09:10 AM
1/2" UHMW + 1/4" laminated 11 gauge + 1/2" tall spines = 1 1/4"
*** I'm going to have to check but the spines might be 3/4". Crappy memory!
Last edited by Pearce; 10-18-2012 at 09:13 AM.
10-25-2012, 08:19 PM
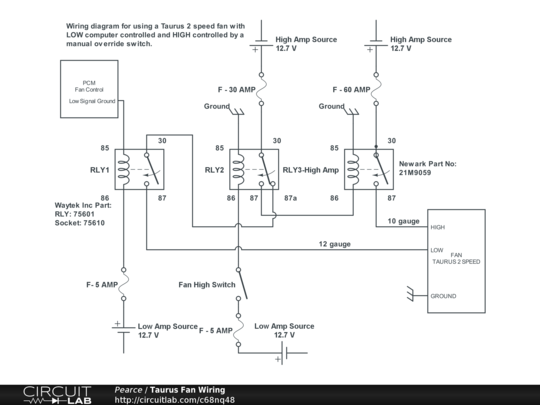
One of the guys wanted to see the wiring diagram for my Taurus fan so I thought I would try to make something cool out of it. I found a website that allows you to build electrical diagrams and came up with this. But, I have to give credit to Cam for the design. I just made it look cool. Cam if you see a mistake let me know.
This design is to have the PCM control the low speed automatically and then the user can manually override to high at any time. Relay 1 and 2 are typical automotive relays and 3 is a high amp relay.
10-25-2012, 08:55 PM
This might show up bigger.
Last edited by Pearce; 10-25-2012 at 09:02 PM.
10-26-2012, 10:47 AM
Here is some more Taurus fan tech for ya. I found a Taurus fan with one of these on it once and researched what it is. They are hard to find but really worth it if you run across one. Brazilian Nutwood boy could have used it to prevent his fan from burning up, cam.
Engine Cooling Fan Motor Wiring Harness Circuit Protection Modification
After the first post there, check out #8 for an explanation.
10-26-2012, 10:56 AM
Yep, got one of those on both my Taurus fans.

When you put a tree through your fan and crack the shroud I am pretty sure its toast no matter how clever the wiring
 10-26-2012, 12:08 PM
For my 5.3 YJ I'm going to run the Volvo relay setup seen here: http://www.nastyz28.com/forum/showth...ighlight=volvo
But controlled by the ECM. It significantly simplifies wiring, is completely sealed, and very compact. Plus it costs $5 at pic-a-part.
My Taurus fan motor was identical to the one in the Volvo I pulled the relay(s) from.
10-26-2012, 12:44 PM
That should work pretty easy for you. Cool.
Yes the Volvo and Taurus fans are the same motors. The only difference I've found so far is the Volvo is a slightly smaller diameter, and without the built-in shroud.
Side by side, Taurus on the left Volvo on the right.

Last edited by Pearce; 10-26-2012 at 01:00 PM.
12-02-2012, 09:25 PM
Golden Mountain Park in Sparta TN vs. Me = regular carnage every time! But damn that place is fun!!
Broke 14 bolt shaft and Detroit. Slid back off a steep slab rock onto the back left tire one to many times with to much wheel speed.

09-10-2013, 08:57 PM
With all the recent build thread activity it reminded me I wanted to update mine. After the above carnage I ended up making the decision to chop the back half. Was tired of not having enough up travel, tires scrubbing on fenders, and knew it could go on a diet. Soo out came the cutting tools! Cut everything away to the frame and used that as a guide to build around.
I cut the tub from the A pillar back with the idea of raising the rockers the full length but due to time constraints to make GSSE, I decided to wait till the next phase, front chop. Still in development. The frame was cut from the B pillar back. I shortened the back up a bit and tied into the C pillar. The cage was originally bolted in thinking I would take it off one more time to do this, but screw that.
For the rock rail I used 1.75" x 0.180 and tied it through the B into the back half.

09-10-2013, 09:05 PM
I ended up recycling the tub bed for the new floor. Took some time to get the hang of welding thin to thick. But pretty happy with how that turned out. So in the process of this I found out that my coilovers had lost their nitrogen charge, 3 of them. No idea why other than a very long slow leak. Or they were never set up right when I bought them. Either way, that was added to the list and they are now all holding great and feel great! Now that it's lighter in the back I need to swap out my top coil. It wasn't too long ago I swapped in a heavier coil due to the weight, now I need to go back but sold those old ones. Figures!
With this new design I didn't leave myself room to reuse my tool box. After a lot of debating I finally settled on 3 of the big plastic ammo cans. These things are tough! One is bolted in and the other two are in mounts tied down with a strap. I wanted the option of pulling the cans for use. This is less storage than I had but it also forced me to go through my tools and reduce what I carried. Another benefit of this build.

Last edited by Pearce; 09-10-2013 at 09:09 PM.
09-10-2013, 09:12 PM
Looking good! I'm going to have to go through my tools one day too...I carry way too much.
09-10-2013, 09:28 PM
Next on the list was repairing a crack in my aluminum fuel cell. I have the worst luck with any aluminum welded product I buy. I find out later that there was a pin hole leak in them somewhere and normally JB Weld fixes it. Well not on a fuel cell. Tired that on the last one. With this one I tried a product called Dura-Fix. It is similar to Alumiweld. It's basically a braising rod used to fill holes, cracks and join aluminum. When you buy it they give you a small stainless steel brush to clean the surface before starting. This is the most important part. You must have clean bare aluminum for the rods to do their thing. You next have to get the material you are working with hot enough to start melting the rods, and not melting the rods with the heat. I used a small propane torch. It takes some time but then once the material was hot enough the rod melted onto it, rub it around and patch as needed.
You may be asking, what, he put a flame to a used fuel cell? Yes I did. But first I washed it 2 times with dish soap and cold water, then 1 more with dish soap and boiling water, then let it dry in the sun for a week, then because I had an extra bottle of helium from my Craigs List purchase of nitrogen (2 for one deal) I used the helium as a shielding gas while braising.
So it turned out pretty good. It held gas for a month prior to GSSE then held on the trail. Last fill up, I over filled the tank pretty bad and couldn't tell if I may have a slight leak but after washing the rig it looks like maybe just some left over fuel near where the patch is. I'd try it one more time before paying to have it tig welded. I think I could do an even better job if needed.

09-10-2013, 09:42 PM
I just noticed that the pic of my flop is not here. So a little more story to go with the broken Detroit. After that, I borrowed a welded spider from Cam to go back out on the trails. This is my first time with a welded anything axle. Late that night I proceeded to do this crazy maneuver that I believe was in part due to a welded rear. Basically made the rear all squirrelly from what I am used too. Yup that's my story, sticking to it.
Got that welded thing out in short order and put a Grizzly in and WOW am I happy again! Thing works great with that and everything else I've done. Vid from this past GSSE:
09-11-2013, 12:26 AM
looks good, are you planning on skinning the back half of the tubing? give it a mini tub kinda look, or just take a less back half buggy look. it would give you a little bit more storage, things you can thrown in loose.
09-11-2013, 08:50 AM
Actually yes, I do plan to add skins. Ran out of time for that too. Will keep me a little cleaner inside the rig! Yeah since I cut the back part of the floor out I can't just throw stuff under me seats anymore, will fall out behind the seats. Details details.....
09-11-2013, 12:45 PM
ok, atleast you have more storage then my buddies yj. the only storage is a tool box and a tool bag in the middle of the seats.

03-15-2015, 03:29 PM
Had a little fun yesterday at an off road park here in FL called Hardrock. Not a bad little place considering it's FL. And you have just as much chance to do hard core damage as I found out!
It was a pretty wild ride! Have a few new cage dents but this is the exciting one!
Someone got a video of the roll that was standing at the top. If I can get hold of it, I'll post it here. So far appears the rest of the rig is fine.
Last edited by Pearce; 03-15-2015 at 03:33 PM.
03-16-2015, 11:28 AM
Looks like the cage did its job well. What size tubing is that? Any plans to go beefier?
03-16-2015, 11:43 AM
03-16-2015, 01:38 PM
Most of the cage is 1 3/4" .120 dom. Some of the internal is erw .095. I honestly cant remember what parts I did that for. I thought I did all of the X out of .120. That horizontal may not have been. It will just get plated all around for now and i will work on it next year. I am VERY happy with how the rig did on a roll like that. Thumbs up to all the guys I regularly wheel with and the wealth of knowledge we share.
04-27-2015, 08:41 PM
Additional damage report:
Not much straight left on it.
Sooo, I've looked it over pretty good and just on the easy to see stuff there's a lot of work ahead to patch it up right. The cage did it's job. Saved my ass. I'm not about to start taking it easier. It's not in me. But, I do want to be safe. I think the retirement of Frankenjeep is near and a chassis build is in my future. It's still a tough decision that I've had to make but the right one. Still blows me away what I've accomplished with it. At the very least it will make one more GSSE this year with some patching up. About time to order Bend-Tech and get started designing.
Last edited by Pearce; 04-27-2015 at 08:44 PM.
 04-28-2015, 08:01 AM
| « Previous Thread | Next Thread » |
| Thread Information |
Users Browsing this ThreadThere are currently 1 users browsing this thread. (0 members and 1 guests) |


