|
|


 02-15-2010, 02:14 AM
how did i miss this. that is an amazing build!


 02-15-2010, 02:43 AM
Thanks bud!Originally Posted by blackzj52

I'm trying to find a reasonably priced set of LS2 manifolds like these, hopefully they will work. Baring that there are a few sets of CARB certified shorty headers I have found that I can cut and modify if I need; like to change the angle of the outlet flange but I'm still hoping for a cheaper solution. Other than that I think I have solved all other major problems, now it's just all the little stuff like plumbing trans cooling lines, power steering lines, coolant, etc...

02-23-2010, 02:34 AM
Alright I'm continuing to plug along while I search for a reasonably priced set of LS2 manifolds. I got a ton of wiring done going to the interior for the remote start, gauge cluster lights (check engine & cruise control) and OBDII. I also mounted the drive by wire pedal and got the brake pedal back in.
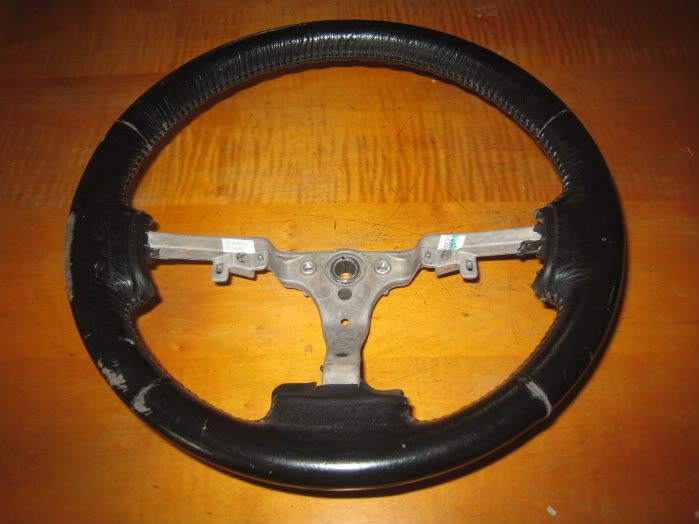
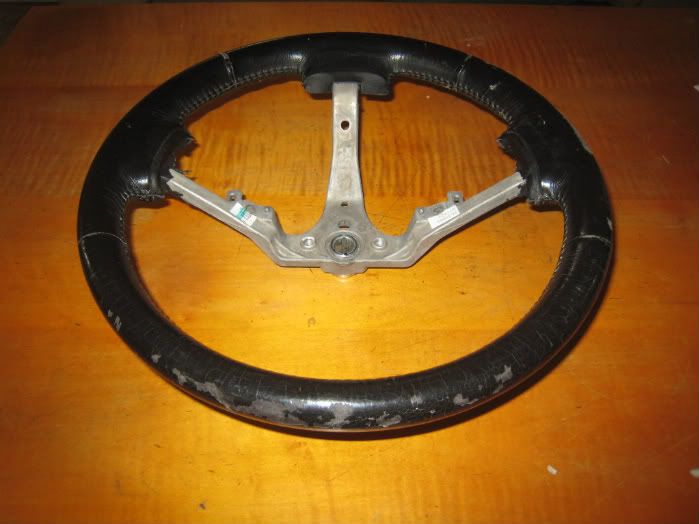
Now this next part is in no way hardcore but I figured I'd put it up here anyway. The leather on the steering wheel has been cracked and flaking shit since I bought the rig. I looked into having it rewrapped but long story short did it myself.
Before:
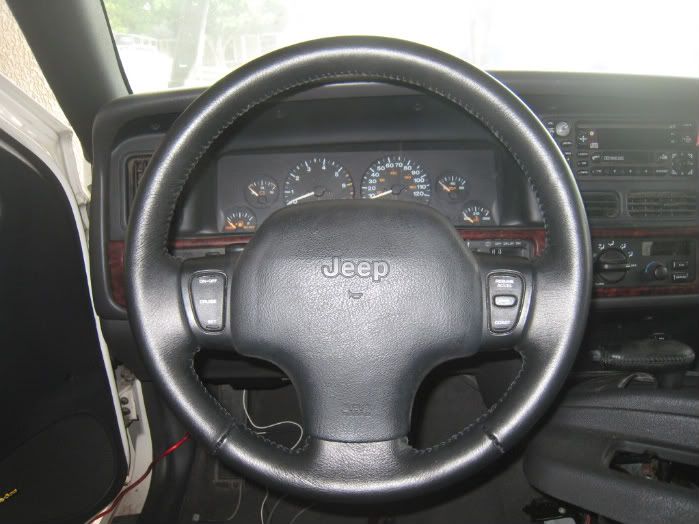
After:
For those interested in how I did it (I'm sure I'm not the only one with a shitty ZJ steering wheel) I did a write up here.
Alright flame on
02-23-2010, 03:34 AM
Great work! My wheel is starting to peel as well (not nearly as bad as yours was) and I've been wanting to do something about it. Now I know what to do. Thanks a ton for that writeup
02-23-2010, 10:22 AM
Man, I give you props for the dedication to stitch all that!
looks great
02-23-2010, 02:38 PM
Thanks a lot guys
 02-23-2010, 02:40 PM
ehhhh, it looks like shit
just kidding man, looks great!
 02-24-2010, 01:55 PM
Props to you for having that much patience. I just dont think I could do it.
 02-24-2010, 08:02 PM
I certainly wouldn't want to make a career out of it but it wasn't that bad. I spread it out over two nights while watching TV and having a few drinks. Actually I had enough leftover afterward that I redid the shift lever and parking brake levers too.
02-24-2010, 08:18 PM
dude, i'm blown away by how well that came out. I've hand-sewn two covers and neither looked that good. How'd you keep the stitching so tight? Did you buy a special kind of leather? UV treated or anything?
02-24-2010, 08:46 PM
To get the leather so tight I cut it a little smaller and just stretched it using the stitching. I'm not sure if the leather is UV treated. The guy I bought it from does it for a living, he has a motorcycle almost completely skinned in leather that looks bad ass. This is what he recommended. I do know it was on the thinner more flexible side as far as leather goes that helped a ton. Honestly I've never worked with leather before in my life.
 02-24-2010, 09:18 PM
Nice job on the wheel! I may have to use that as motivation to one day recover my Dodge steering wheel.
 02-24-2010, 11:28 PM
You made it look easy. How did you stitch the three pieces together? Sewing machine or by hand?
02-25-2010, 12:43 AM
Haha thanks. I just hand stitched it, I don't even know anyone with a sewing machine.
Last edited by downtowncb; 02-25-2010 at 02:03 PM.
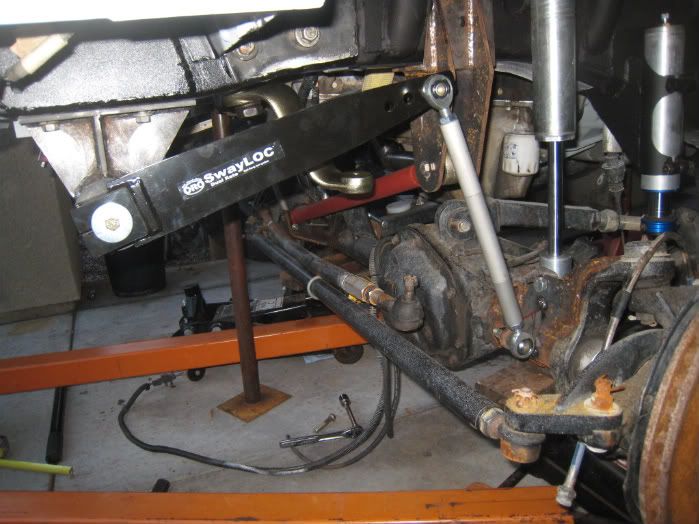
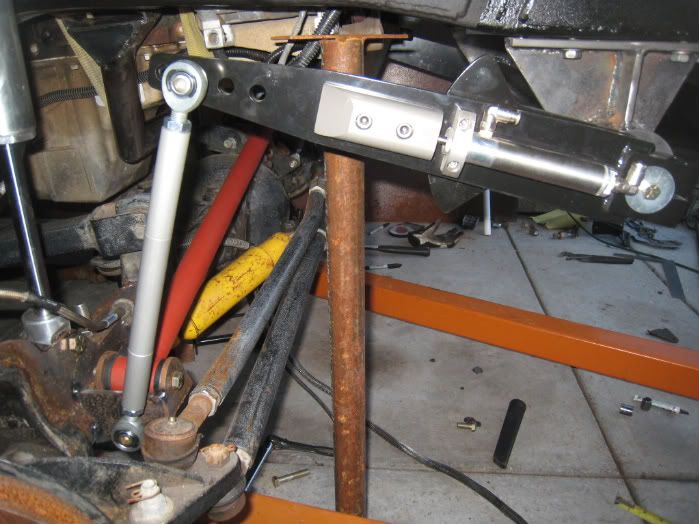
02-25-2010, 10:49 PM
Got the SwayLoc installed today, pretty happy with how it's turning out. I used a SwayLoc intended for a TJ because from my understanding they have the longest arms. I want long arms so that at full droop I don't accidentally invert the sway bar (I've done it before)
This part was very much inspired by GoldenSD's SwayLoc install, so credit where credit is due. Here is the combination sway bar bracket and radiator support. Amazingly this thing only weights 5 lbs more than the original radiator support and it is way beefier.
Here is the driver side at ride height, I love how the flash brings out every damn spot of rust, I can't wait to paint & powder coat this stuff.
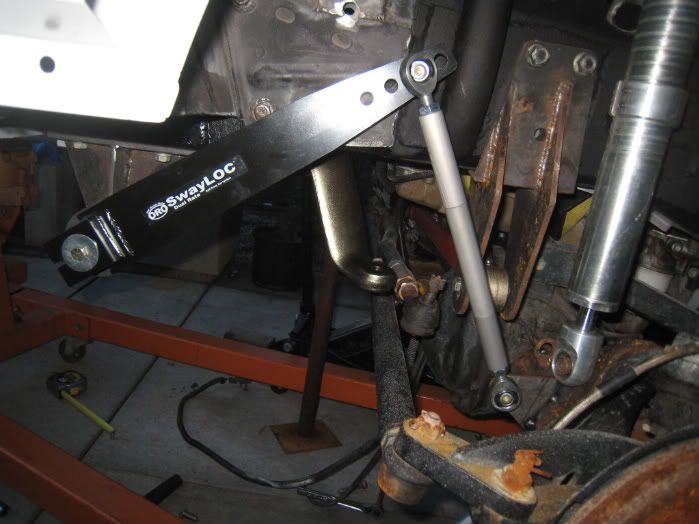
And the passenger side.
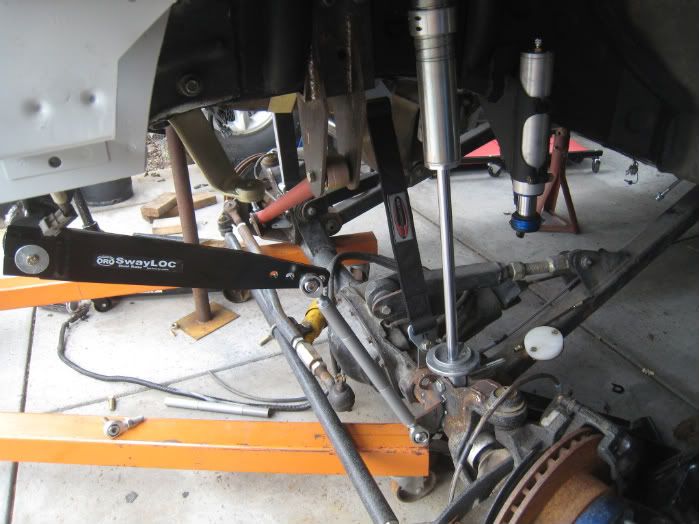
Here is full bump, it touches the coil over hoop barely, so I'll do a little clearancing tomorrow.
And here is full droop, you can see why I wanted the longer arms with these 14" coil overs. Even here I'm a little nervous about the angle between the arm and connecting rod, I might make my own custom length ones.

Last edited by downtowncb; 02-25-2010 at 10:52 PM.
02-26-2010, 12:17 AM
Do you think it would help any to throw a gusset between those two plates on the trackbar mount? I'm sure you worked calculations and stuff, but it just looks like it could be a little stronger to me. I may be wrong, but that's just my observation.
Love the build, can't wait to see it moving!
02-26-2010, 01:20 AM
I'm going to add a cross piece, just haven't got to it yet.
You and me both! Doubly so after seeing ATLZJ's buggy driving with his new chevy motor.
 02-26-2010, 01:29 AM
Haha, mallcrawlin GM Gen III club... now awaiting new members
03-03-2010, 04:52 AM
Found some Corvette headers finally, they are on the way!
Measured for the limit straps and picked some up. It is handy having Poly Performance two miles away.
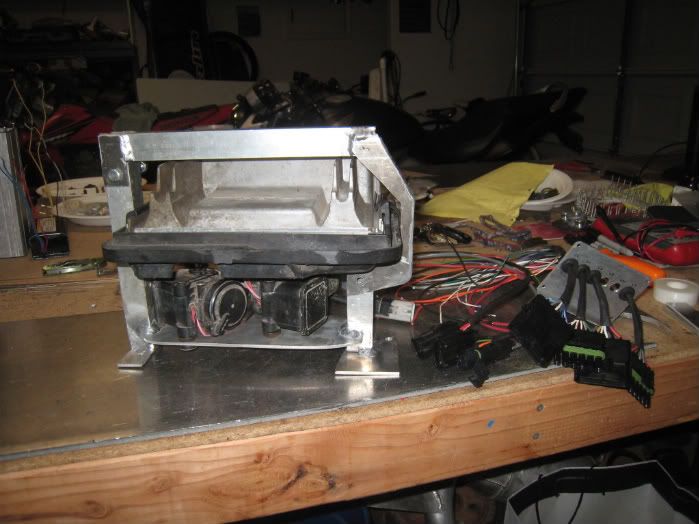
This contraption is going where I had intended to put the second battery, looks like it will be going in the back instead. This is a rack that holds the compressors for the lockers on the bottom, the Chevy ECU in the middle and will hold the fuse & relay panel & iPhone controller on top. That cluster of connectors on the right will all be coming out of the fuse box (totaling 56 wires), it's a lot to keep track of haha.
03-03-2010, 11:22 AM
Sweet build! I'll start a build thread when my 5.3l starts going into my WJ.
Last edited by DaveJeep; 03-09-2010 at 04:57 PM.
03-09-2010, 09:49 PM
I continue to make progress but most of it isnt photo worthy. Im still waiting for the headers to get here.
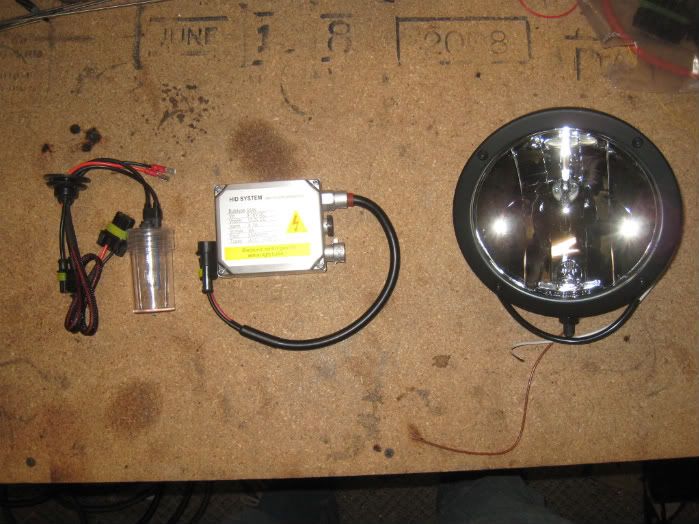
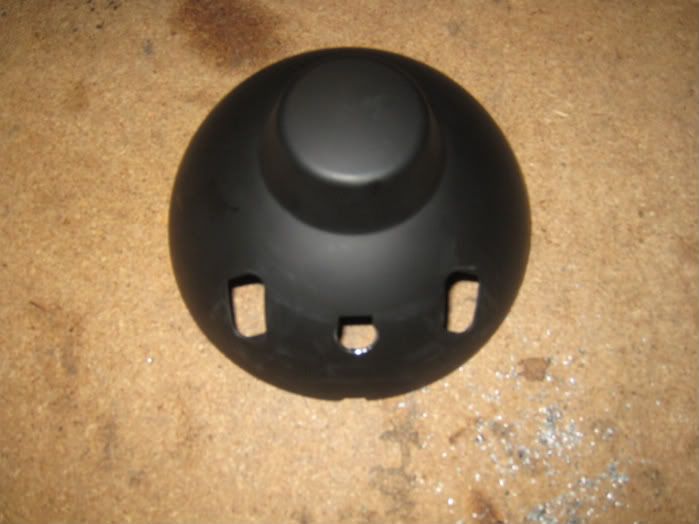
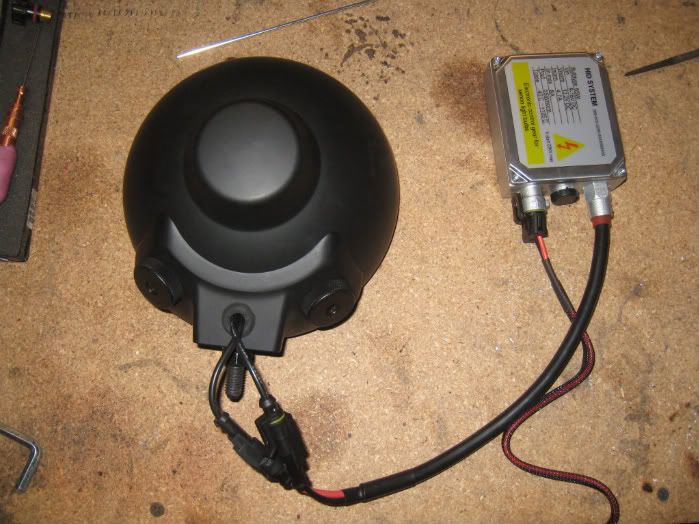
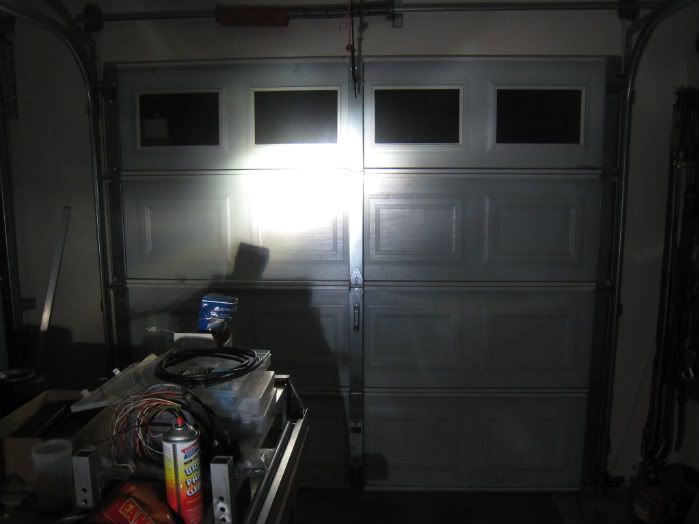
Ive wanted to have HID fog lights for a long time but they are EXPENSIVE, so I pieced my own together. I have about $125 into each, which is a lot cheaper than most setups.
I used 55W 5000K HID bulbs and Hella 4000 housings. The Hellas come with H1 bulbs so I just order the HID setup with the same.
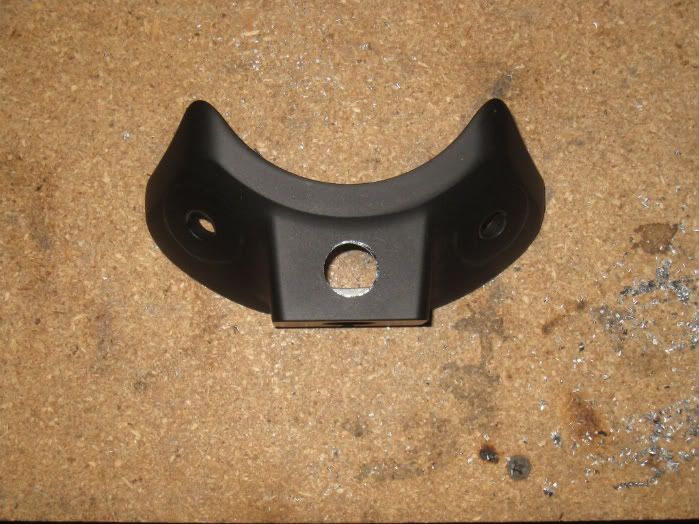
I had to do a little modification to get them in there but nothing major. I used a stepper bit to drill a hole in the back of the housing and the stand large enough to fit the bulb connectors through.
I used a grommet on the back to protect the wires and keep stuff out.
I dont have a real world shot yet because they arent on the Jeep but here is a garage door shot. I am VERY happy with how bright these puppies are and the quality of light.
03-09-2010, 10:35 PM
Dang man this stuff is way cool, Is your last name mcgiever?
03-10-2010, 12:26 AM
Haha I grew up watching MacGyver and last Christmas my parents gave me all the seasons on DVD, definitely one of my heroes
03-10-2010, 10:46 AM
Cool idea on the hid upgrade. Added to must do to Jeep list. Thanks alot...LOL
03-11-2010, 10:50 PM
Hey, I showed it can be done on a budget!
Got the HIDs from http://www.ddmtuning.com for ~40 shipped (I remember when these things cost like $400). Got the Hella 4000s from http://www.adv4x4.com/hera40coblla.html for ~210 shipped.
| « Previous Thread | Next Thread » |
| Thread Information |
Users Browsing this ThreadThere are currently 1 users browsing this thread. (0 members and 1 guests) |
| Tags for this Thread |