Warning: preg_replace(): The /e modifier is deprecated, use preg_replace_callback instead in ..../includes/class_bbcode.php on line 2958

Warning: preg_replace(): The /e modifier is deprecated, use preg_replace_callback instead in ..../includes/class_bbcode.php on line 2958
WK Build Begins - Page 5

Thread: WK Build Begins

Page 5 of 6 FirstFirst 123456 LastLast
Results 101 to 125 of 144
  1. #101 Re: WK Build Begins 
    Senior Member Grand Slam West Planner
    Join Date
    Dec 2006
    Location
    Denver, CO
    Posts
    2,519
    Rep Power
    109
    Very nice Tom! Looking forward to seeing it in person.
    Jim Karlin
    Project Big Red Jeep
    96 ZJ, 4" inch lift (Claytons, Teraflex coils), 33" Kumho MT KL71s, Aussie in the rear
    A bunch of KOR stuff
    Taurus e-fan swap (DC Controls box)

    GSW 2010 Pics
    Reply With Quote  
     

  2. #102 Re: WK Build Begins 
    Member KDUB's Avatar
    Join Date
    Nov 2006
    Location
    San Antonio TX
    Posts
    132
    Rep Power
    72
    Very well done. Looking forward to seeing it in it's complete form. X2 on the wire wheel clean up and some spray paint finish.
    96 ZJ, 5.2L, 231
    Reply With Quote  
     

  3. #103 Re: WK Build Begins 
    Senior Member Grand Slam West Planner
    Join Date
    Aug 2004
    Posts
    1,892
    Rep Power
    102
    I'm not sure the wire wheel will get into the pitted areas, but I'll try. Prior to spraying with primer I did strip everything with a flapper disc - maybe I got it all with that. I washed the WK last night - I suppose that if any rust still exists it'll eat through the primer rather quickly and I can use the wire wheel.

    Another question - to straighten up some lines I'd like to affix 12 gauge sheet to one plane of the end cap and then flapper-disc a smooth transition on 3 sides (I need to leave the 4 side straight). I can't weld it - would epoxy or JB weld be strong enough to attach 12 gauge to 3/16 plate and hold under the duress of the flapper wheel? (I'd fill any small gaps with body putty).
    Reply With Quote  
     

  4. #104 Re: WK Build Begins 
    Member D-FRESH WJ's Avatar
    Join Date
    Dec 2007
    Location
    charlotte, NC
    Posts
    59
    Rep Power
    0
    i personaly think that the flap disc would just rip it off or tear it off .. youd have to get the epoxy spread pritty good . at the body shop we put door skins on with a heavy duty light wate epoxy.
    99 4.7 AWD grand cherokee WJ
    rustys 2.5 lift


    http://www.myspace.com/stcoffroad
    Reply With Quote  
     

  5. #105 Re: WK Build Begins 
    Junior Member
    Join Date
    Mar 2008
    Location
    Denver, CO.
    Posts
    13
    Rep Power
    0
    Any more progress on this bumper Z?
    Reply With Quote  
     

  6. #106 Re: WK Build Begins 
    Senior Member Grand Slam West Planner
    Join Date
    Aug 2004
    Posts
    1,892
    Rep Power
    102
    Quote Originally Posted by ZigsRig View Post
    Any more progress on this bumper Z?
    Sheet metal guy is fabbing the center section - on Saturday I saw what he had done so far and it is an absolute thing of beauty. It's amazing what you can do with 30 years of experience and the right tools.

    While at his shop he showed me one of his "real" projects - it was a safety gantry - roughly the size and configuration of a street lamp with extra reinforcement. This project cost $100K and it's sole purpose was to prevent a workman from falling (unrestrained) 6 feet. $100K to prevent someone from falling half a story. Seems to me like a hard hat with a chin strap would be a little cheaper.

    I also figured out how to re-line my fender well - vinyl lawn edging.
    Reply With Quote  
     

  7. #107 Re: WK Build Begins 
    Previously "Maatt" Matt's Avatar
    Join Date
    Mar 2006
    Location
    Kiowa, CO
    Posts
    861
    Rep Power
    84
    Quote Originally Posted by Z View Post
    While at his shop he showed me one of his "real" projects - it was a safety gantry - roughly the size and configuration of a street lamp with extra reinforcement. This project cost $100K and it's sole purpose was to prevent a workman from falling (unrestrained) 6 feet.
    It must be a government project.

    Sounds like the bumper is coming along great, can't wait to see it.
    Project Never-ending
    1997 ZJ - sold
    www.tntcustoms.com
    Reply With Quote  
     

  8. #108 Re: WK Build Begins 
    Senior Member Grand Slam West Planner PassRunnerZJ's Avatar
    Join Date
    Aug 2004
    Location
    Grand Junction, Colorado, United States
    Posts
    1,469
    Rep Power
    96
    Would cutting the lining and re-attaching it be out of the question? That is what I ended up doing with my front inner-liners. If you knew someone that worked in a frizbee factory you could probably get some scrap sheets.

    Look and see if there is a plastics mfg somewhere close that could supply sheeting or (just came to me) pick 'n pull and look at some front truck inner-linners.
    '98 ZJ, 33s and an XJ drivetrain, Iron Rock Offroad 4.5" Critical Path suspension lift, D44i, custom rear bumper w/tire carrier, KOR ZJ Radiator Support
    '95 ZJ - after 208k and the fun gear swapped to the '98, now it gets setup to sell
    '01 WJ, T/C skid, K&N replacement - wife's DD
    '04 Honda Civic - my DD

    Reply With Quote  
     

  9. #109 Re: WK Build Begins 
    Senior Member Grand Slam West Planner
    Join Date
    Aug 2004
    Posts
    1,892
    Rep Power
    102
    Quote Originally Posted by PassRunnerZJ View Post
    Would cutting the lining and re-attaching it be out of the question? That is what I ended up doing with my front inner-liners. If you knew someone that worked in a frizbee factory you could probably get some scrap sheets.
    Todd -

    I don't have any friends in China (Frisbee manufacturer).

    I actually like the idea of the vinyl lawn edging - 5-6" strips of pliable, durable vinyl that I can plastic rivet into place. When I'm done it'll kinda look like an armadillo under there.
    Reply With Quote  
     

  10. #110 Re: WK Build Begins 
    Junior Member
    Join Date
    Mar 2008
    Location
    Denver, CO.
    Posts
    13
    Rep Power
    0
    cant wait to see it....

    I'm still exploring my own winch route...

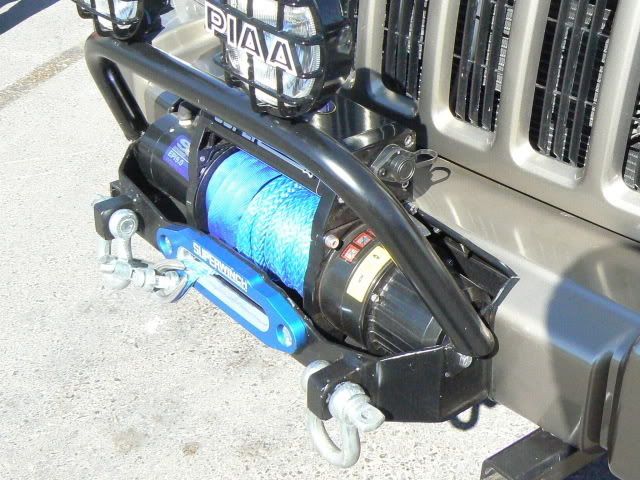
    im trying to figure out who made this...

    Reply With Quote  
     

  11. #111 Re: WK Build Begins 
    Senior Member Grand Slam West Planner
    Join Date
    Aug 2004
    Posts
    1,892
    Rep Power
    102
    Yeah, I was looking for something a little more elegant than that. It's not too bad a solution, though.
    Reply With Quote  
     

  12. #112 Re: WK Build Begins 
    Senior Member Lifetime Supporter
    Grand Slam West Planner
    jsteves's Avatar
    Join Date
    Jul 2004
    Location
    Fort Fun
    Posts
    2,388
    Rep Power
    111
    That would block a lot of air flow!
    04 Dub -- Longarms, JK44, 9" ARB's etc.
    68 Super Wagoneer - Resto Project
    93 ZJ: longarms, 231D, 35's, 44/Hi 9", ARB's, etc. -- Sold
    Reply With Quote  
     

  13. #113 Re: WK Build Begins 
    Senior Member Grand Slam West Planner
    Join Date
    Aug 2004
    Posts
    1,892
    Rep Power
    102
    Quote Originally Posted by jsteves View Post
    That would block a lot of air flow!
    Actually not that much. The winch is taking place of the bumper, which would be blocked anyway. There's a big void underneath that mount that would let in a bunch of air. The obstruction in front of the grill doesn't seem to be too bad.
    Reply With Quote  
     

  14. #114 Re: WK Build Begins 
    Senior Member Lifetime Supporter
    Grand Slam West Planner
    jsteves's Avatar
    Join Date
    Jul 2004
    Location
    Fort Fun
    Posts
    2,388
    Rep Power
    111
    Quote Originally Posted by Z View Post
    Actually not that much. The winch is taking place of the bumper, which would be blocked anyway. There's a big void underneath that mount that would let in a bunch of air. The obstruction in front of the grill doesn't seem to be too bad.
    Not your design...the pic posted above.
    04 Dub -- Longarms, JK44, 9" ARB's etc.
    68 Super Wagoneer - Resto Project
    93 ZJ: longarms, 231D, 35's, 44/Hi 9", ARB's, etc. -- Sold
    Reply With Quote  
     

  15. #115 Re: WK Build Begins 
    Senior Member Grand Slam West Planner
    Join Date
    Aug 2004
    Posts
    1,892
    Rep Power
    102
    Quote Originally Posted by jsteves View Post
    Not your design...the pic posted above.
    I know - but it's roughly the same design. The only difference from an airflow perspective is the bits that stick out up top.
    Reply With Quote  
     

  16. #116 Re: WK Build Begins 
    Senior Member Lifetime Supporter
    Grand Slam West Planner
    jsteves's Avatar
    Join Date
    Jul 2004
    Location
    Fort Fun
    Posts
    2,388
    Rep Power
    111
    The angle is awkward but it looks like the solenoid, light bar, and lights block quite a bit of air flow. I would get one with the seperate solenoid, mount it under the hood or behind the bumper and NOT put on the lights, bar, etc.
    04 Dub -- Longarms, JK44, 9" ARB's etc.
    68 Super Wagoneer - Resto Project
    93 ZJ: longarms, 231D, 35's, 44/Hi 9", ARB's, etc. -- Sold
    Reply With Quote  
     

  17. #117 Re: WK Build Begins 
    Junior Member
    Join Date
    Mar 2008
    Location
    Denver, CO.
    Posts
    13
    Rep Power
    0
    Though I do not have a winch on there yet... I haven’t had any issues with overheating at all, at any speed. I’m just wondering how this would affect my jeeps cooling (especially at low speeds) compared to stock. Even towing my ATV trailer, in the 90's down to the sand dunes I never got the temp gage out of its normal operating zone. I wouldn't think the winch being in the way would cause that much "blockage" to increase the heat in my engine to a critical level...

    Oh, and i wouldnt have lights on there... not my thing. I have another solution coming for that

    thoughts?
    Reply With Quote  
     

  18. #118 Re: WK Build Begins 
    Junior Member
    Join Date
    Mar 2009
    Location
    Long Island, NY
    Posts
    2
    Rep Power
    0
    hey man - nice build. Id like to do the same thing to the rear w/ the 33" spare. I can;t stand mine on the roof but right now its my only choice.

    Your front bumper is a little too much for my purpose right now but i wanted to ask you about the stock bumper on the 08.

    From the 1 front shot in this thread it looks like you removed the lower air dam. How do the fog lights mount to the front fascia? the approach angle is terrible and i'm trying to find the best way to improve it as much as i can but still keep the unique 08 front grill.

    http://www.cardomain.com/ride/3071817

    let me know if yo have any insight - many thanks
    Reply With Quote  
     

  19. #119 Re: WK Build Begins 
    Senior Member Grand Slam West Planner
    Join Date
    Aug 2004
    Posts
    1,892
    Rep Power
    102
    Center cover is almost done. Went for a test fit today - the cover needs a few tweaks to get the fit just right (close the gaps), but here's the current status (I love it):


    Reply With Quote  
     

  20. #120 Re: WK Build Begins 
    Senior Member Grand Slam West Planner
    Join Date
    Aug 2004
    Posts
    1,892
    Rep Power
    102
    Quote Originally Posted by mikskillz View Post
    hey man - nice build. Id like to do the same thing to the rear w/ the 33" spare. I can;t stand mine on the roof but right now its my only choice.

    Your front bumper is a little too much for my purpose right now but i wanted to ask you about the stock bumper on the 08.

    From the 1 front shot in this thread it looks like you removed the lower air dam. How do the fog lights mount to the front fascia? the approach angle is terrible and i'm trying to find the best way to improve it as much as i can but still keep the unique 08 front grill.

    http://www.cardomain.com/ride/3071817

    let me know if yo have any insight - many thanks
    If you look at the AEV WK at that site the lower valence is all black. That entire (black) piece comes off, but there's still fascia material around the center section (where the removable black valence angles upward). The fog lamps are attached to the fascia that's hidden behind the attached valence.

    The approach angle with the valence removed (and 4" of lift and 33" tires) is actually very good, though I do have a few scrapes on my fog lamp lenses and outer edges of the fascia.
    Reply With Quote  
     

  21. #121 Re: WK Build Begins 
    Senor Member Lifetime Supporter ArloGuthroJeep's Avatar
    Join Date
    Mar 2006
    Location
    Boulder, CO
    Posts
    1,482
    Rep Power
    95
    I may have missed it Tom, but any plans for protection of the lower radiator?

    Bumper looks great
    -Ryan
    '04 WJ w/6" on Clayton LA's, 242 SYE, 4.56 (locked 44a), 35" BFG MT KM2's
    Reply With Quote  
     

  22. #122 Re: WK Build Begins 
    Senior Member Grand Slam West Planner
    Join Date
    Aug 2004
    Posts
    1,892
    Rep Power
    102
    Quote Originally Posted by ArloGuthroJeep View Post
    I may have missed it Tom, but any plans for protection of the lower radiator?

    Bumper looks great
    4xGuard skid plate (currently remove) protects that.
    Reply With Quote  
     

  23. #123 Re: WK Build Begins 
    Senior Member Grand Slam West Planner
    Join Date
    Dec 2006
    Location
    Denver, CO
    Posts
    2,519
    Rep Power
    109
    Almost factory Tom, looks great.
    Jim Karlin
    Project Big Red Jeep
    96 ZJ, 4" inch lift (Claytons, Teraflex coils), 33" Kumho MT KL71s, Aussie in the rear
    A bunch of KOR stuff
    Taurus e-fan swap (DC Controls box)

    GSW 2010 Pics
    Reply With Quote  
     

  24. #124 Re: WK Build Begins 
    Junior Member
    Join Date
    Mar 2008
    Location
    Denver, CO.
    Posts
    13
    Rep Power
    0
    Looks great Z...

    Cant wait to see the finished project!
    Reply With Quote  
     

  25. #125 Re: WK Build Begins 
    Junior Member
    Join Date
    Mar 2009
    Location
    Long Island, NY
    Posts
    2
    Rep Power
    0
    Quote Originally Posted by Z View Post
    If you look at the AEV WK at that site the lower valence is all black. That entire (black) piece comes off, but there's still fascia material around the center section (where the removable black valence angles upward). The fog lamps are attached to the fascia that's hidden behind the attached valence.

    The approach angle with the valence removed (and 4" of lift and 33" tires) is actually very good, though I do have a few scrapes on my fog lamp lenses and outer edges of the fascia.

    yea - Russ over at 4XGuard showed me a shot w/ the valence off. I like the look of the black on mine so i want to try and keep it around the lights and just below the tow hooks. I might try and just trim that lower lip off that hangs down below where the front fender ends. hopefully that will give me increased approach angle and still keep a finished look.

    I'm worried about my fog lamps too but those are replaceable, i guess so is the valence too for that matter but why beat it up if you can avoid it.

    anyway that bumper you have going looks real nice.

    ganna keep watching this post - good luck and thanks for the insight
    Reply With Quote  
     

Page 5 of 6 FirstFirst 123456 LastLast
Thread Information
Users Browsing this Thread

There are currently 1 users browsing this thread. (0 members and 1 guests)

Posting Permissions
  • You may not post new threads
  • You may not post replies
  • You may not post attachments
  • You may not edit your posts
  •